Microsoft is removing NodeServices and SpaServices in ASP.NET Core 3.1 and has provided no documentation for the replacement: SpaServices.Extensions. If you’re using webpack without the use of react-scripts or create-react-app, this will break your upgrade from ASP.NET Core 2.1. It’s also hard to find information for how to get this to work from other avenues such as Github tickets or Stackoverflow. Below, I’ll explain how to use webpack, ASP.NET Core 3.1, and React while keeping technology to what will continue to work into .NET 5.
This approach assumes that you’re using a custom webpack configuration right now. If you’re starting a new project with React, then I suggest following the Microsoft guidelines on how to create a new project with create-react-app, which are found here. We’ll use webpack-dev-server only to serve built and static files, not the entire application. This will ensure there are no conflicts with custom middleware, authentication, redirects, etc.
Configuring webpack-dev-server
webpack-dev-server is used because it only has to build the bundle once and will watch for file changes to serve them up directly, which is quicker than the previous NodeServices package which would watch for file changes then fire up a new full rebuild with the webpack console.
First, install webpack-dev-server and fs (for SSL Certificate) using either npm or yarn.
yarn add webpack-dev-server fs
OR
npm install webpack-dev-server fs
To use the service, I suggest you add two separate commands to npm commands. One will act as the standard webpack-dev-server execution and the other will be for extended debugging information to help find out why something isn’t working. The debugging version also uses the npm package “cross-env,” which, if you do not have, should be installed similar to the above. You can optionally ignore it for now.
Then, add these two npm commands in packages.json:
"scripts": {
    ...
    "devserver": "webpack-dev-server --config ./webpack.config.js",
    "devserver:debug": "cross-env DEBUG='express:*' webpack-dev-server --config ./webpack.config.js --progress --clientLogLevel debug",
    ...
},
Next, configure webpack-dev-server. Some detail is provided as comments preceding the properties. For more detail on configuration usage, the documentation is available here. This configuration enables hot module replacement which can be seen in more detail here.
// If you are using https then at the start include ‘fs’
const fs = require('fs');


const config = {
    mode: 'development',
    devServer: {
    // these three properties are for using https during local development; if you do not use this then you can skip these
    pfx: fs.readFileSync(path.resolve(__dirname, 'localhost.pfx')),
    pfxPassphrase: 'abc123', // this password is also hard coded in the build script which makes the certificates
    https: true,

    // this is where the webpack-dev-server starts serving files from, so if the web client requests https://localhost:8400/vendor.js this will serve the built file vendor.js
    publicPath: '/',

    // this is where static files are stored; in this example the physical path ./wwwroot/dist/some/image.jpg will be attainable via https://localhost:8400/dist/some/image.jpg
    contentBase: path.resolve(__dirname, './wwwroot/dist'), // you will need to change this to your own dist path

    // this enabled hot module replacement of modules so when you make a change in a javascript or css file the change will reflect on the browser
    hot: true,
    // port that the webpack-dev-server runs on; must match the later configuration where ASP.NET Core knows where to execute
    port: 8400,

    // this uses websockets for communication for hot module reload, and websockets are planned to be the default for the 5.x release
    transportMode: 'ws',
    },

    // the rest of your existing configuration
    ...,
});
Generating an SSL certificate
This part is only useful if you DO use https locally for development and DON’T have a pfx file already. If you don’t use https locally, or if you already have a pfx file, then ignore this step. It is a powershell script which will generate an ssl cert in pfx format for you.
The first property, $webDir, must be set by you in order to be useful.
$webDir = "-- enter the directory with your webpack.config.js file here";

Write-Host "Creating cert directly into CurrentUser\My store (due to limitation that certs cannot be created directly in root store)"
$cert = New-SelfSignedCertificate -CertStoreLocation Cert:\CurrentUser\My -DnsName localhost -NotAfter ([DateTime]::Now.AddYears(10))

$certFile = Join-Path $webdir "localhost.pfx"
Write-Host "Exporting certificate to $certFile -- this is used by the webpack-dev-server directly with a hardcoded password"
$password = ConvertTo-SecureString -String "abc123" -Force -AsPlainText
Export-PfxCertificate -Cert $cert -FilePath $certFile -Password $password

Write-Host "Importing $certFile to CurrentUser\Root store for immediate system wide trust"
Write-Host "---------- THERE MAY BE A WINDOWS PROMPT WHICH MUST BE ACCEPTED FOR THIS NOW ------------" -ForegroundColor Yellow
Import-PfxCertificate -FilePath $certFile -CertStoreLocation Cert:\LocalMachine\Root -Password $password
Running webpack-dev-server
Now that webpack-dev-server is configured, it must be running anytime you are running your application. I suggest a Visual Studio extension to have the work automatically, which I describe in the following section.
If you are unable to use the Visual Studio extension for some reason, then you will have to start it manually. When developing your application have another shell window open and execute:
npm run devserver
-- or to debug --
npm run devserver:debug
To ensure webpack-dev-server is executed upon project load, install NPM Task Runner for Visual Studio. This extension is recommended by Microsoft. It will automatically use yarn, or npm if it does not exist. Doing this will mean you never have to remember to execute webpack-dev-server manually while allowing you to see the full output of the server as needed.
NPM Task Runner adds features to the built-in Visual Studio Task Runner, and can be viewed by going to View -> Other Windows -> Task Runner Explorer.
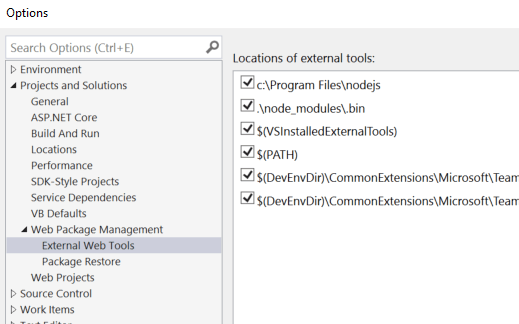
Visual Studio has a version of nodejs built in, but the one you use for your project may be a different version. You can tell Visual Studio to use yours by going to Tools -> Options then selecting Projects and Solutions -> Web Package Management -> External Web Tools and adding the path as shown below.
Click the "+" to add your path, most likely c:\Program Files\nodejs, then use the up arrow to move it to the top of the list.
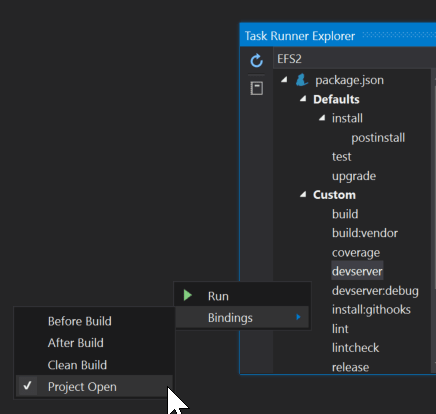
Add devserver to the NPM Task Runner bindings so that it automatically starts. This gets saved in package.json file and will be shared with other developers with the extension. In the Task Runner Explorer window right-click devserver -> Bindings -> checkbox Project Open as shown below.
Setting up ASP.NET Core
Now you have to tell ASP.NET Core how to access your bundles. From your web application’s project in Visual Studio, install SpaServices.Extensions nuget package. It’s a confusing name, but this is not the same as the NodeServices or SpaServices packages which are obsolete. The SpaServices.Extensions package is recommended by Microsoft for ASP.NET Core 3.1 and .NET 5 will continue to be used and supported: https://github.com/aspnet/Announcements/issues/379
Now to utilize SpaServices.Extensions and configure your application to use webpack-dev-server. The existing documentation from Microsoft assumes you use create-react-app, and is not updated for 3.1, leading you to use obsolete methods.
In your Startup class ConfigureServices method, add a call to the spa extensions which will inform it where your static files are kept, which is used during deployment. The following is an example assuming static files are in "ClientApp/dist".
services.AddSpaStaticFiles(configuration => {
    configuration.RootPath = "ClientApp/dist";
});
This part is where I found the most trouble getting things hooked up with little to no documentation. To do this, we can make use of the Map method which will configure all requests to a specific url into the webpack-dev-server. For example, let’s assume that you use /dist path for your bundle, and optionally all static files. Using this method, the webpack output is served from ASP.NET Core, while ASP.NET Core calls into webpack-dev-server to download it first. To accomplish this ,we will assume that only during development all webpack bundled and static files are served by webpack-dev-server.
if (_env.IsDevelopment())
{
    app.Map(
        "/dist",
        ctx => ctx.UseSpa(
            spa =>
            {
                spa.Options.SourcePath = "ClientApp";
                spa.UseProxyToSpaDevelopmentServer("https://localhost:8400/");
            }));
}
Then, immediately following, assume fall back to ignore webpack-dev-server and use the standard ASP.NET Core options. This section should be what you’re already doing to serve the build bundles when deployed.
else
{
    app.UseStaticFiles();
    app.UseSpaStaticFiles();
}
This is an example and you might have custom options for static files such as caching.
Verifying
Now to verify everything is connected. In Visual Studio, open the Task Runner Explorer window (View -> Other Windows -> Task Runner Explorer) and look for the running command— you should see devserver (running). If you don’t, then try executing the devserver:debug custom command to see the full debug output. Then execute the web application. You should see in your web browser’s javascript console log messages showing the connection to your webpack-dev-server and enabling Hot Module Reload.
Utilizing these steps, you can continue using your custom webpack configuration with ASP.NET Core 3.1 with a method that will work continuing into .NET 5.


Top comments (1)
repeated, change data in index file, hot doesn't work