In my quest to remove Google from all facets of my life, there are two products that remain near-essential. Google Photos and Google Maps. Google Photos will be hard to replace, it's very polished, handles large amounts of photos with ease, and has great sharing features. Google Maps will also be hard to stop using due to its accuracy and data set, but I am currently using Google Maps to share my location with a few friends and family members which I could definitely replace.
There is an open source product called OwnTracks that has been around for many years and is somewhat easy to setup. But to make a single server work for multiple friend groups and my family, some modifications need to be made. My mom doesn't need to know where my friends are, and separate friend groups don't need to see each other's locations. OwnTracks defaults let everyone on the server see everyone else's location, though. Luckily, I have come up with a fairly simple workaround.
Docker Config
To start, I'm hosting the Mosquitto MQTT broker and Node-Red on a free Oracle Cloud instance using Docker and Caddy as a reverse proxy. My docker-compose.yml file looks like this:
version: "3.8"

services:
  caddy:
    container_name: caddy
    image: lucaslorentz/caddy-docker-proxy:2.3
    restart: always
    ports:
      - 80:80
      - 443:443
    networks:
      - caddy
    volumes:
      - /var/run/docker.sock:/var/run/docker.sock
      - caddy_data:/data
    depends_on:
      - ddns-updater
    deploy:
      placement:
        constraints:
          - node.role == manager
      replicas: 1
    labels:
      caddy.email: ${CERTIFICATE_EMAIL_ADDRESS}

  mosquitto:
    image: eclipse-mosquitto:2
    networks:
      - caddy
      - internal
    ports:
      - 1883:1883
      - 9001:9001
    volumes:
      - mosquitto_data:/mosquitto/data
      - mosquitto_logs:/mosquitto/logs
      - ./apps/mosquitto:/mosquitto/config
    restart: unless-stopped
    labels:
      caddy: mqtt.${DOMAIN_NAME}
      caddy.reverse_proxy: "{{upstreams 9001}}"

  nodered:
    image: nodered/node-red:latest-12
    restart: always
    environment:
      - TZ=${TZ}
    ports:
      - "1880:1880"
    networks:
      - caddy
      - internal
    depends_on:
      - mosquitto
    volumes:
      - nodered_data:/data
    labels:
      caddy: nodered.${DOMAIN_NAME}
      caddy.reverse_proxy: "{{upstreams 1880}}"
      caddy.basicauth: "*"
      caddy.basicauth.admin: "${NODERED_ADMIN_PASS}"
      caddy.log.output: "stdout"

networks:
  # caddy network allows the caddy to see any containers you want to
  # expose to the internet
  caddy:
    driver: bridge
    ipam:
      config:
        - subnet: 172.18.1.0/24
          gateway: 172.18.1.1
      driver: default
  # internal network for any future non-public servers
  internal:
    driver: bridge
    ipam:
      config:
        - subnet: 172.18.2.0/24
          gateway: 172.18.2.1
      driver: default

# list data volumes here
volumes:
  caddy_data: {}
  mosquitto_data: {}
  mosquitto_logs: {}
  nodered_data: {}
So I am exposing Mosquitto via websockets with Caddy handling SSL and I'm exposing Node-Red with basic auth and SSL handled by Caddy. This simplifies the configuration of each service greatly.
Mosquitto Config
Here is my mosquitto.conf configuration file with mosquitto running standard mqtt protocol on port 1883 (we'll use this for Node-Red), websockets on 9001 (for external connections), with user authentication and access control.
listener 1883
protocol mqtt

listener 9001
protocol websockets

persistence true
persistence_location /mosquitto/data
log_dest file /mosquitto/logs/mosquitto.log

allow_anonymous false
password_file /mosquitto/config/passwd
acl_file /mosquitto/config/acl
To control user access to only stuff we want them to see, you can use a simple ACL file like following. It allows users to read anything on their username topic and any subtopics, and they can write to owntracks/username. There's also an owntracks user that can read and write to any topic.
pattern read %u/#
pattern write owntracks/%u/#

user owntracks
topic readwrite #
Now that we have configuration out of the way, you'll want to create users using the mosquitto-passwd utility. This can be run inside the mosquitto docker container by doing docker-compose exec mosquitto mosquitto_passwd .... First create the owntracks user by running mosquitto_passwd -c /mosquitto/config/passwd owntracks which will prompt you for a password. All subsequent users can be added by running mosquitto_passwd -b /mosquitto/config/passwd usernamehere passwordhere. Note: mosquitto will need to be restarted for new users to be picked up.
OwnTracks User Config
To make it much easier on your users, there is a way to share OwnTracks configuration via a link. Unfortunately, the link starts with owntracks:// which will be stripped by all messaging platforms that I've tried, but you can use Branch.io to help with this. First create a .otrc file for each user that looks like this:
{
  "_type" : "configuration",
  "autostartOnBoot" : true,
  "cleanSession" : false,
  "clientId" : "{{username}}-phone",
  "cmd" : true,
  "debugLog" : false,
  "deviceId" : "{{username}}phone",
  "fusedRegionDetection" : true,
  "host" : "mqtt.{{mydomain}}.com",
  "ignoreInaccurateLocations" : 0,
  "ignoreStaleLocations" : 0.0,
  "info" : true,
  "keepalive" : 3600,
  "locatorDisplacement" : 500,
  "locatorInterval" : 300,
  "locatorPriority" : 2,
  "mode" : 0,
  "monitoring" : 1,
  "moveModeLocatorInterval" : 10,
  "mqttProtocolLevel" : 4,
  "notificationEvents" : true,
  "notificationGeocoderErrors" : true,
  "notificationHigherPriority" : false,
  "notificationLocation" : true,
  "opencageApiKey" : "",
  "password" : "{{password}}",
  "ping" : 30,
  "port" : 443,
  "pubExtendedData" : true,
  "pubQos" : 1,
  "pubRetain" : true,
  "pubTopicBase" : "owntracks/%u/%d",
  "reverseGeocodeProvider" : "None",
  "sub" : true,
  "subQos" : 2,
  "subTopic" : "{{username}}/+/+",
  "theme" : 0,
  "tid" : "{{initials}}",
  "tls" : true,
  "tlsCaCrt" : "",
  "tlsClientCrt" : "",
  "tlsClientCrtPassword" : "",
  "username" : "{{username}}",
  "ws" : true
}
Make sure to replace the {{variables}} with the appropriate values. Then you can turn this configuration into an owntracks link by running echo "owntracks:///config?inline=$(openssl enc -a -A -in configname.otrc)". This will print the link to the console and you can copy it when configuring Branch.io links.
Once you've created your Branch.io account, you can configure your application like this:
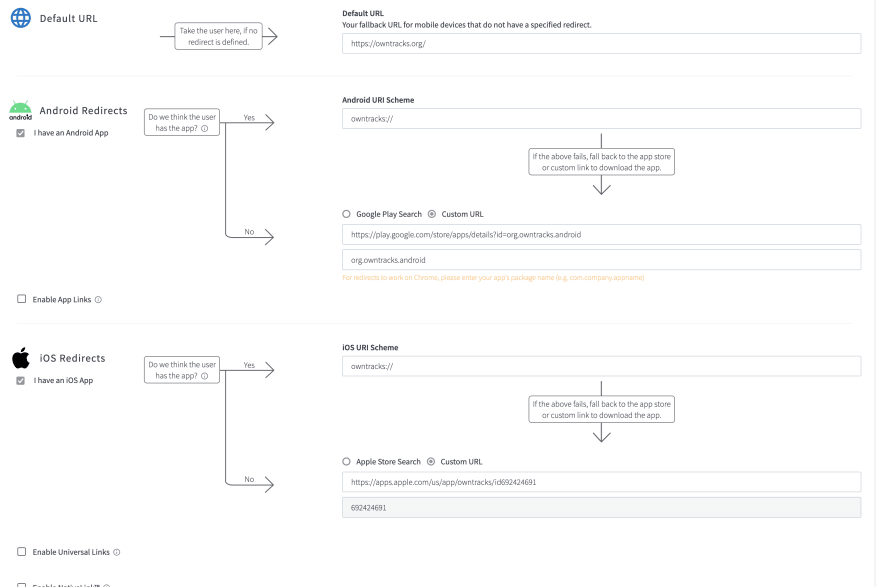
Branch.io will send a user the Play Store or App Store if they don't have OwnTracks installed, otherwise it will open the app link you send. It's really cool. Now, for each user we'll need to create a "Quick Link" with their specific application config. So in Branch select Quick Links from the sidebar, create a new Quick Link and give it a title (I just use the person's username), and then select Link Data. For the key, select $deeplink_path and then paste the link you generated in the terminal into the Value field. You can then save and share that link, and when a user clicks it, OwnTracks will be opened and they can import the configuration and are good to go.
Node-Red Config
The final piece of this puzzle is a layer to re-broadcast messages from owntracks/someuser/somedevice to all the users who they want to share their location with i.e. mom/someuser/somedevice. I decided to use Node-Red for this because it made prototyping easy and allows room for easy future features.

First, drag in a mqtt in node, configure it to point to the local mqtt server (mosquitto:1883) using the owntracks user, and subscribe to owntracks/+/+. Next, connect a function node and put in the following code:
// Customize this
const groups = [
    {
        name: "Group One",
        members: ["user1", "user2", "etc"]
    },
    {
        name: "Group Two",
        members: ["user1", "user3", "user4", "etc"]
    }
];
const users = [
    {
        name: "user1",
        groups: ["Group One", "Group Two"],
        friends: ["user5", "user6"]
    },
    {
        name: "user2",
        groups: ["Group One"],
        friends: []
    }
];

// Don't change this
const originalTopic = msg.topic;
let recipients = [];
const messageUser = msg.topic.match(/owntracks\/(\w+)\//)[1];
const messageUserSettings = users.find(u => u.name === messageUser);
if (messageUserSettings) {
    messageUserSettings.groups.forEach(g => {
        const groupSettings = groups.find(group => group.name === g);
        if (groupSettings) {
            recipients = [...recipients, ...groupSettings.members];
        }
    });
    if (messageUserSettings.friends.length > 0) recipients = [...recipients, ...messageUserSettings.friends];
}
recipients = recipients.filter(r => r !== messageUser);
recipients = recipients.filter((item, pos) => recipients.indexOf(item) === pos);
const messages = recipients.forEach(recipient => {
    node.send({ topic:originalTopic.replace(/^owntracks/, recipient), payload: msg.payload });
});
Let's say user1 posts their location to owntracks/user1/user1phone. This code runs and sees that the messageUser is user1 and then get's all the people in the groups that user1 belongs to (in this case Group One and Group Two) as well as any other friends they want to share with. It then re-broadcasts their original location data message to user2/user1/user1phone, user3/user1/user1phone, etc. Any users not in Group One, Group Two and not user5 or user6 will not see user1 on their map.
Lastly, connect a mqtt out node and select your local MQTT server. Leave the topic blank as it and the message are set by the function node. I also connect a debug node just to make sure all the messages are going out as they should.
I just prototyped this all out so it's a little rough around the edges and a lot of work if you have a bunch of users, but there's lots of room for automation which I will hopefully tackle soon. Let me know if you see any room for improvement!

Top comments (0)