As I was working on my project this week, I got authentication with Google to work, but I ran across a problem when I tried refreshing my page. I had the code set up so that when my application initializes, the google callback function returns user information which is then passed to my redux store. I previously thought that the redux store would continue to persist the store information as an entity separate from the redux application, but I noticed that all of my user information disappeared on refresh.
After a bit of research, I found that everytime your application renders for the first time, Redux uses the initial state that you set on your reducer function. This includes when your application is refreshed. In order to help witt this issue, I also found there is actually a library to help with this problem called Redux Persist.
The way Redux Persist works is it uses the local storage in your browser to 'persist' your redux state. First let's take a look at how your reducers need to be configured with redux-persist.
Persist Reducer
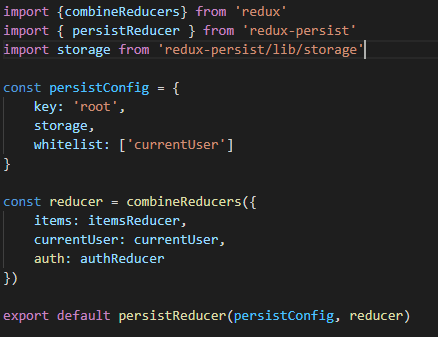
After importing the usual combineReducers function from Redux to aggregate the reducers, you'll need to take the result and pass it into persistReducer with a persistConfig. In this JSON object, there 2 initial configurations which you need to set. The first is key, which essentially means at what level of your reducer you'll want to start persisting data. For persiting the whole reducer, you'll want to use 'root'. The second is the storage variable which is imported from redux-persist/lib/storage, and is a variable which points to your browser's local storage.
After setting those up, there are a number of different options to customize the persisted state. Two notable ones are stateReconciler and blacklist/whitelist.
stateReconciler has 2 main options, which is hardSet, autoMergeLevel1, and autoMergeLevel2. These options are basically variations of how you want to deal with conflicts in initial state and the incoming state. The first option is going to hardset your incoming state. The second option is the default, and it will return a state with the keys in your initial state, considering any overwrites from your incoming state. Any keys not in the initial state are omitted. The third option is going to do the same and but keys not in inital state are kept.
The other blacklist/whitelist option is used to determine what keys in your reducer you want to blacklist(remove) or whitelist(keep). Using whitelist will make it so that only those keys you included will be persisted.
After configuring your desired options, put the combined reducers and configuration object into the imported persistReducers function and export the result.
Persist Store
With the reducers ready for use, you can now send your modified reducers into the createStore function from Redux to create your store variable. Along with this, you will pass the store variable into a persistStore function which saves your Redux state onto the localStorage everytime your store changes. We will need to export both of these to the index.js file.
Putting it all together
At the root level of your folder, you'll need to wrap your App component with the usual Provider component which will be given the store variable. With Redux persist, you'll also need the PersistGate component which is exported from Redux-Persist and wrap it around the app component one level beneath Provider. This will allow your app to check whether the app has the persisted state saved to the Redux before your app component renders.
With this I was able to get my Redux state persisted, and my user information displayed even after the refresh. You could save information to local storage yourself, but Redux-Persist has so many built in options for persisting Redux state.


Top comments (0)