In the past, building a regular bot would require large blocks of code and careful structuring of the logic that would drive the entire process. Today, developing simple and fairly complex bots can be achieved pretty easily, even without writing a single line of code; thanks to the technology that is available to us.
By the end of this article, we would have built a smart Facebook Messanger bot that is able to process messages sent to a Facebook page and respond appropriately in real time. We will not write a single line of code ( though we should if we intend to build a more complex bot ) for this implementation.

While this article promises that zero code is required to follow along, the article also assumes very basic knowledge working with the Facebook developer platform and DialogFlow ( formerly Api.ai ).
Let's create our own Facebook bot in just four steps:
- Create An Agent
- Integrating Facebook Messenger
- Configuring Facebook Messenger
- Testing the Facebook Messenger Bot
Create An Agent:
First, let's visit DialogFlow ( formerly Api.ai ) and sign in with a Google account. Immediately after that, we will be redirected to the 'Get Started' Page with an option to create a new agent. Click on the 'Create Agent' option to the left of the screen.

Next, let's fill out the form that is presented to us. For the sake of this article, we will call the agent smallTalkBot ( Well, why not? ). After the necessary fields are filled, click on the 'Save' button.
There really is no need to specify the
ADD SAMPLE DATAfield as we intend to create an empty agent.

On the new page, there will be a scrollable section to the left, we'll scroll down a bit so we can find the option that says 'Small Talk', click on it.

Great, now we are on the Small Talk dashboard and this is where most of the logic will be done so let's begin by enabling the Small Talk feature.

On the Small Talk dashboard, we can train our agent on how to engage in small conversations and respond adequately depending on the messages it receives. Let's begin by teaching the agent how to respond to questions under the About Agent category.
Protip: A great way to make the agent ( bot ) seem smarter is by entering several answer variants, it will help the agent respond differently to similar questions.

Though you don't have to fill in everything, for the sake of this article we will provide answers to all the suggested questions in the small talk dashboard. Click on the Save option when you are done.

Awesome stuff! We have completed the first step.
Integrating Facebook Messenger
On the left section of the agent's dashboard, there is an option that says Integrations, click on it. Great, now we have a page body that says One-click integrations.The page also has lots of integration options, let's modify the settings for the 'Facebook Messenger' integration by clicking on the 'SETTINGS' just below the icon.

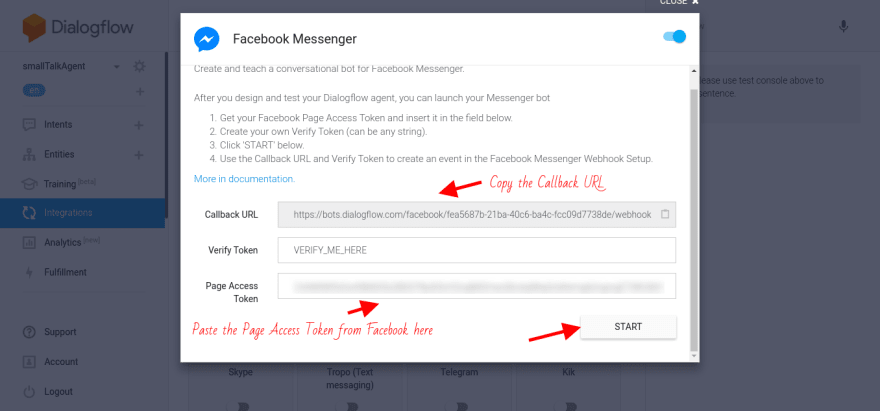
We get a pop up with three fields, we need to enable the Facebook Messenger integration before we can start filling in the fields, so let's do that.

The three fields are:
Callback URL- This is the URL facebook will be sending data to whenever our page gets a message.
Verify Token- We need to specify a custom token here ( we'll specify the same token on Facebook when we create our app, so write a token you can remember ).
Page Access Token- This token will be given to us by Facebook after we create an app.

At this point, we cannot continue setting up the integration until we create the Facebook app that will be linked to the smallTalkBot. The reason is that we need the Page Access Token to proceed. Let's head over to the Facebook for developers platform ( in a new tab ) and create an app.

Now that we are here, let's fill in the details for a new Facebook app. Immediately that is done, we'll automatically be redirected to the app's dashboard. The screen also says Select A Product so let's select the messenger option and click on Set up.

Now, we scroll down a bit till we get to the Token Generation section. We need to select a page for our app and generate a token.

The generated token is the reason we came here, let's briefly go back to DialogFlow (in the other tab) and do three simple things:
- Paste the token from Facebook in the
Page Access Tokenfield.- Copy the Callback URL ( Facebook needs this URL so it knows where to send data to )
- Click on the
StartOption to run our bot!
Hooray! Our bot is running now but let's not rejoice just yet, we need to do a bit more before we can start exchanging crazy texts with our creation over Facebook.
Configuring Facebook Messenger
Now, back on the Facebook Messenger Platform, just below where we generated the token for DialogFlow, there is a section that says Webhooks. Click on the Setup Webhooks Option.

Great work! Now there is a pop up with two fields and several checkboxes in our face, let's fill in the fields with the right data:
Callback URL- This is quite obvious, remember the Callback URL we copied from DialogFlow? Paste it in here.Verify Token- Here, let's enter the same customVerify Tokenwe entered for DialogFlow. In my case, it'sVERIFY_ME_HERE.- The checkboxes - We can ignore most of the checkboxes, we only need to subscribe to two events so let's check
messages&messaging_postbacks.
Great! Now click on Verify and Save and we are good to go!

Congratulations, we have set the bot up successfully.
Testing the Facebook Messenger Bot
To test the bot, simply message the linked Facebook page and wait for the lightning response.

Conclusion
As promised in the beginning of this article, we have successfully built a ( seemingly smart and sarcastic ) bot that is able to respond to messages sent to a Facebook page based on the intent ( This is mostly NLP technology ) of the text it receives. As you test your bot out, you will realise that it isn't as smart as it appears and the reason is; it only responds to messages using the predefined texts we supplied when we created smallTalkBot.
Working with the Small Talk feature DialogFlow provides is just an atom of the awesome things that can be done with DialogFlow, for instance, you can train your bot to respond more accurately to the messages it receives!
While we haven't fully explored the complexity of DialogFlow, you can read the docs here if you wish to build an awesome bot that doesn't give the same responses all the time.

Latest comments (0)