Planning and executing a career pivot and consequential job search that follows is no small task. There are endless tools at our disposal designed to aid us in organization, production, value creation, communication and much more. As a software engineer, I'm always looking for the best tools to use, so I thought to myself - why not just build my own?
So, that's what I am doing. This blog will cover my process in initial app creation and design plan for my personal app called Associate.
Application Design and Architecture
Associate is built with a Ruby on Rails backend. Using Active Record ORM framework and Postgres database. Before actually going to our command line with rails new associate, it's important to create an ERM and user stories that guide development. ERM (Entity Relation Map) shows objects and their relationships, and are subject to change as development progresses.
Creating an ERM
For my purposes we will have a few objects, or entities, to map out. I always find it best to draw it out with pen and paper to get started, there are however multiple tools that you can use to help illustrate these relationships.
Here is the original ERM that I created for Associate.

USERS have a one to one relationship with PLANS. This means that a User object has 1 and only 1 Plan. In this case, the foreign key goes lives with the Plan model and points to the User ID that it belongs to.
PLANS also have many ASSESSMENTS and REFLECTIONS. They have a one to many relationship. This represents in real life the many reflections and assessments that a Plan would have.
Creating Database and Active Record Objects
Now, creating the Rails application and database together should be relatively simple now that our ERM is setup.
Using the Ruby Guides to get started, there are a number of steps to get everything setup.
- After checking that Ruby and Rails versions are installed on your local machine, you can generate the initial app with the following command:
rails new associate. Where associate is the name of your application.
I prefer to use postgres database so there is a little more to the rails new command that we need to include. Additionally, since I am using Ruby on Rails as an API we can include that in our command as well.
rails new associate --api --database=postgresql
- After running this command, your rails app will be generated with the file structure necessary for use as an API. Checking the config/database.yml file, make sure the database adapter is set to postgres.

- You'll also want to make sure your Rack CORS setup is taken care of. In the Gem file, you'll need to install the
cors gemwhich can be found here. After adding to your Gem file, make sure to run bundle install from your command line again.
Finally within config/initializers/cors.rb file you'll want the following code.

Now that the environment and setup is complete, from our command line we can create the models and associations that we need before finally creating our database.
You will need to run the following commands:
rails g resource users name email password_digest linkedin website github
rails g resource <model name> <attribute>
the attributes will default to string. If you for instance wanted an attribute to have a data type of integer, the syntax would look like this:rails g resource users age:integer
rails g resource plans app_target:integer net_target:integer current_app:integer current_net:integer belongs_to:user
the
belongs_to:userpiece creates a foreign key within the plans model. This is where the association between these models are made. Plan would then have a attribute name called user_id which would have the value of the id of the user that the plan belongs to.
After creating the final too models for assessments and reflections, making sure to add foreign keys to each of them for plan, within each model.rb file you can complete the associations with the following:
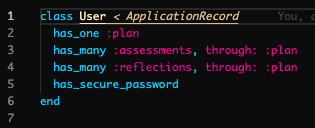
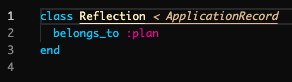
User should have one Plan. Plan should belong to a User. Plans should have many assessments and reflections, and assessments and reflections should belong to a Plan. The screenshots below show how you can do this.
User Model
Plan Model

Assessment Model

Reflection Model
Now that all the Models and there associations are created you can run the final few commands to get the database setup.
-
rails db:migratewill run all migration files and create the schema for the database -
rails db:setupwill create the database and load the schema created from the previous migrate command.
Once these commands are done, the database and correlating tables and columns for each model are created and you can begin next steps of building routes and action methods within the model controllers.

Top comments (0)