
AsyncStorage is a simple, asynchronous, unencrypted by default module that allows you to persist data offline in React Native apps. The persistence of data is done in a key-value storage system.
There are numerous scenarios where this module can be beneficial. Persisting data in a mobile app has benefits such as when the user restarts the app, the data or the setting variables being available to the user in the state they left before closing the app. This scenario is going to be covered in this tutorial.
You can find the complete code for this tutorial at this GitHub repo.
Installing the community module
React Native version 60+ has lots of its API modules available as separate packages that you can easily install with a package manager such as npm. These packages are managed by community members as well as open-source developers.
To begin, let us create a new React Native project and install the module: @react-native-community/async-storage. From a terminal window, execute the following commands in the order they are specified.
# create a new react-native app
npx react-native init rnAsyncStorageExample

# navigate inside the project directory
cd rnAsyncStorageExample

# install the async-storage module
npm install -S @react-native-community/async-storage
If you are using the latest React Native version (0.60.x or above) you do not have to link the native binaries for iOS and Android platforms manually. This linking of the module is handled automatically by the CLI. Though, for iOS, you have to install cocoapods. Go back to the terminal window:
cd ios/ && pod install

# after pods install, navigate back to the root directory
cd ..
That's it in terms of configuring the AsyncStorage module to work in the React Native app.
Changing the default storage limitation on Android
On iOS devices, the AsyncStorage is not limited programmatically.
On Android devices, the current AsyncStorage size is set to 6MB by default. Reaching this limit is going to result in errors like database or disk is full. There are valid reasons why this limit exists but if there is a need to increase the size, you can do that. Open the android/gradle.properties file and add the following:
android.useAndroidX=true
android.enableJetifier=true
// add the below line
AsyncStorage_db_size_in_MB=10
This file represents any project-wise settings that you can use to override the default values or settings.
Now, to make sure everything is working correctly, build the Android app (and make sure an Android device or emulator is running before you execute the command below).
npx react-native run-android
You are going to get the default screen that confirms that the app is configured.

Similarly, to build the app for iOS, execute the command below:
npx react-native run-ios
Using the AsyncStorage API
Let us start creating the demo application which is going to save a value from the user's input in the storage and fetch the value from the storage. This reading and writing of data are going to be done with the help of AsyncStorage API functions. Open the App.js file and start by importing the following components.
import React, { useState, useEffect } from 'react'
import {
  StyleSheet,
  View,
  Text,
  TextInput,
  TouchableOpacity
} from 'react-native'
import AsyncStorage from '@react-native-community/async-storage'
Next, define a variable name STORAGE_KEY that is going to read and save the data using the API functions. You can think of this key as the identifier to the value that is being stored, hence the key-value storage system. As you are going to store only one value at the moment, there is only the requirement for one key.
const STORAGE_KEY = '@save_age'
Inside the functional component App, define a state variable age whose default value is empty strings.
const App = () => {
  const [age, setAge] = useState('')
  // ...
}

export default App
Saving the data
To save the data for the app to read, let us define an asynchronous helper method called saveData. This method is going to be promise-based, thus, you can use the async-await syntax with try-catch block.
Passing the identifier STORAGE_KEY as well as the age state variable, the API method AsyncStorage.setItem() is going to store the value in storage. Let us update the state as well as display an alert box when the data is successfully stored.
const saveData = async () => {
  try {
    await AsyncStorage.setItem(STORAGE_KEY, age)
    alert('Data successfully saved')
  } catch (e) {
    alert('Failed to save the data to the storage')
  }
}

Reading the data
When the app restarts, it should be able to read the data persisted in the previous section. For this, create another helper function called readData that is going to be asynchronous. This function is going to read the value from the storage using the API method AsyncStorage.getItem and will only save the value of the state variable age when its value is not null.
const readData = async () => {
  try {
    const userAge = await AsyncStorage.getItem(STORAGE_KEY)

    if (userAge !== null) {
      setAge(userAge)
    }
  } catch (e) {
    alert('Failed to fetch the data from storage')
  }
}
To retrieve the data whenever the app starts, invoke this method inside the useEffect hook.
useEffect(() => {
  readData()
}, [])
Clearing all storage
The last API method that the current demo app is going to utilize from the AsyncStorage API is called clear(). This method deletes everything that was previously saved.
If you want to delete only a specific item from the storage, there are other methods available such as removeItem or multiRemove by the AsyncStorage API. Add the following snippet.
const clearStorage = async () => {
  try {
    await AsyncStorage.clear()
    alert('Storage successfully cleared!')
  } catch (e) {
    alert('Failed to clear the async storage.')
  }
}
Controlling the input
The last two helper functions this demo app requires are onChangeText and onSubmitEditing. These methods are going to be responsible for reading the user input and updating the state variable as well as storing the user's input.
const onChangeText = userAge => setAge(userAge)

const onSubmitEditing = () => {
  if (!age) return

  saveData(age)
  setAge('')
}
Completing the app
We have defined all the helper functions that are required by the app. Let us complete the return statement by defining the JSX as below:
const App = () => {
  // ... rest of the code remains the same

  return (
    <View style={styles.container}>
      <View style={styles.header}>
        <Text style={styles.title}>Android App</Text>
      </View>
      <View style={styles.panel}>
        <Text>Enter your age here:</Text>
        <TextInput
          style={styles.input}
          value={age}
          placeholder="Age is just a number"
          onChangeText={onChangeText}
          onSubmitEditing={onSubmitEditing}
        />
        <Text style={styles.text}>Your age is {age}</Text>
        <TouchableOpacity onPress={clearStorage} style={styles.button}>
          <Text style={styles.buttonText}>Clear Storage</Text>
        </TouchableOpacity>
      </View>
    </View>
  )
}
Here are the corresponding styles to the above code snippet:
const styles = StyleSheet.create({
  container: {
    flex: 1
  },
  header: {
    width: '100%',
    backgroundColor: '#dcdcdc',
    padding: 20,
    borderBottomWidth: StyleSheet.hairlineWidth,
    alignItems: 'center'
  },
  title: {
    fontSize: 22,
    color: '#333',
    fontWeight: 'bold'
  },
  panel: {
    paddingTop: 40,
    alignItems: 'center'
  },
  text: {
    fontSize: 24,
    padding: 10,
    backgroundColor: '#dcdcdc'
  },
  input: {
    padding: 15,
    height: 50,
    borderBottomWidth: 1,
    borderBottomColor: '#333',
    margin: 10
  },
  button: {
    margin: 10,
    padding: 10,
    backgroundColor: 'yellow'
  },
  buttonText: {
    fontSize: 18,
    color: '#444'
  }
})
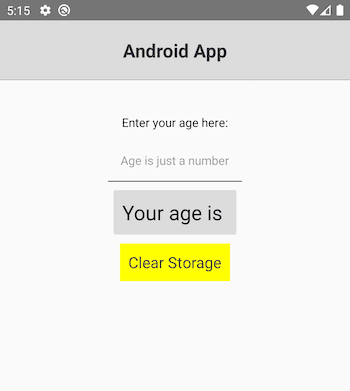
Now, go back to the Android emulator and you are going to be welcomed by the following screen:
Next, enter a value, close the app, and then open the app to see if the value was stored or not.

Lastly, see what happens when you click on the “Clear Storage” button.

Conclusion
Congratulations! I hope that, in this tutorial, you learned the basic API methods of using AsyncStorage API in your React Native app. Even though the demo app was minimal, it allowed us to understand the concepts.
Here is the link to the complete API for the AsyncStorage module that you can refer to for further reading.
And speaking of further reading, don't miss this guide on React Native Security and this tutorial on protecting the source code of React Native apps against code tampering and reverse-engineering.

Top comments (1)
Recommend react-native-easy-app open source library, it can make us more convenient to use AsyncStorage.
github: github.com/chende008/react-native-...