
You can find a collection of k6 scripts and Google Cloud Build workflows referenced in this tutorial here.
📖 What you will learn
- How to integrate load testing with k6 into Google Cloud Build CI/CD Platform.
- Different implementation paths, and when to use each.
Introduction
In this tutorial, we will look into how to integrate performance testing in your development process with Google Cloud Build and k6.
k6 is an open-source load testing tool for testing the performance of APIs, microservices, and websites. Developers use k6 to test a system's performance under a particular load to catch performance regressions or errors.
Google Cloud Build is a serverless CI/CD platform that allows developers to create custom workflows for their software development lifecycle within the Google Cloud Platform(GCP) ecosystem. It uses a pay-as-you-go pricing model with 120 free minutes given everyday.
If you've not used Google Cloud Build before, we recommend looking at the following links to get a hold of how it works:
- Building container images
- Build Configuration file syntax
- Creating and managing build Triggers
- Creating scheduled Triggers
Writing your performance test
We'll start small by writing a simple test that measure the performance of a single endpoint. As with most, if not all, development efforts, performance testing yields the best results if we work in small increments, iterating and expanding as our knowledge increases.
Our test will consist of three parts:
- An HTTP request against our system under test.
- A load configuration controlling the test duration and amount of virtual users.
- A performance goal, or service level objective, expressed as a threshold.
Creating the test script
When we execute our test script, each virtual user will execute the default function as many times as possible until the duration is up. To make sure we don't flood our system under test, we'll make the virtual user sleep for a second before it continues.
// ./test.js
import http from 'k6/http';
import { sleep } from 'k6';

export default function () {
    const res = http.get('https://test.k6.io');
    sleep(1);
}
Configuring the load
We'll configure our test to run 50 virtual users continuously for one minute. Because of the sleep we added earlier, this will result in just below 50 iterations per second, giving us a total of about 2900 iterations.
// ./test.js
import http from 'k6/http';
import { sleep } from 'k6';

export const options = {
    duration: '1m',
    vus: 50,
};

export default function () {
    const res = http.get('https://test.k6.io');
    sleep(1);
}
If you have installed k6 in your local machine, you can run your test locally in your terminal using the command: k6 run test.js.
Configuring our thresholds
The next step is to define your service level objectives, or SLOs around your application performance. SLOs are a vital aspect of ensuring the reliability of your systems and applications. If you do not currently have any defined SLAs or SLOs, now is an excellent time to consider your requirements.
You can define SLOs as Pass/Fail criteria with Thresholds in your k6 script. k6 evaluates them during the test execution and informs about the Threshold results. If any of the thresholds in our test fails, k6 will return with a non-zero exit code, communicating to the CI tool that the step has failed.
Now, we will add one Threshold to our previous script to validate than the 95th percentile response time must be below 500ms.
// ./test.js
import http from 'k6/http';
import { sleep } from 'k6';

export const options = {
    duration: '1m',
    vus: 50,
    thresholds: {
        http_req_duration: ['p(95)<500'],
    },
};

export default function () {
    const res = http.get('https://test.k6.io');
    sleep(1);
}
Thresholds are a powerful feature providing a flexible API to define various types of Pass/Fail criteria in the same test run. For example:
- The 99th percentile response time must be below 700 ms.
- The 95th percentile response time must be below 400 ms.
- No more than 1% failed requests.
- The content of a response must be correct more than 95% of the time.
Check out the Thresholds documentation for additional details on the API and its usage.
Setting up the Cloud Build workflow
Ideally, the easiest way to setup load testing in a CI/CD environment is to use docker:
docker run -i loadimpact/k6 run - <scripts/test.js
Unfortunately, the above command fails to run within the Cloud Build environment. The solution is to mount the source code files and execute them within a docker container environment. To ensure a smooth CI/CD workflow in Google Build's environment, we'll run our load performance test using docker-compose. First, we need to define our docker-compose.yml file:
version: '3.4'
services:
  k6:
    image: loadimpact/k6:latest
    command: run /scripts/test.js
    volumes:
      - ./scripts:/scripts
Basically, we have defined a single service called k6 that performs the following:
- Pulls the k6 docker image from Docker Hub registry
- Executes a command that runs the local k6 test
- Mounts the scripts folder in the /script path
Next we need to define the CI/CD steps that will be executed on the Cloud Build platform. We'll do this using cloudbuild.yaml file:
steps:
# Load Test
- name: 'gcr.io/cloud-builders/docker'
  args: ['run', '-i', 'loadimpact/k6', 'run', '-', '<scripts/test.js']
Normally, we would have to define steps for install, test, build and deploy. Since we are testing with an app that has already been deployed, test.k6.io, we'll only define a single step, Load Test.
At the time of writing, only GitHub, BitBucket and Google Cloud Source repositories are supported by Google Cloud Platform. For reference, we'll use GitHub for this tutorial. Once you've prepared a project containing the above files, you'll need to commit and push the changes to your remote repository.
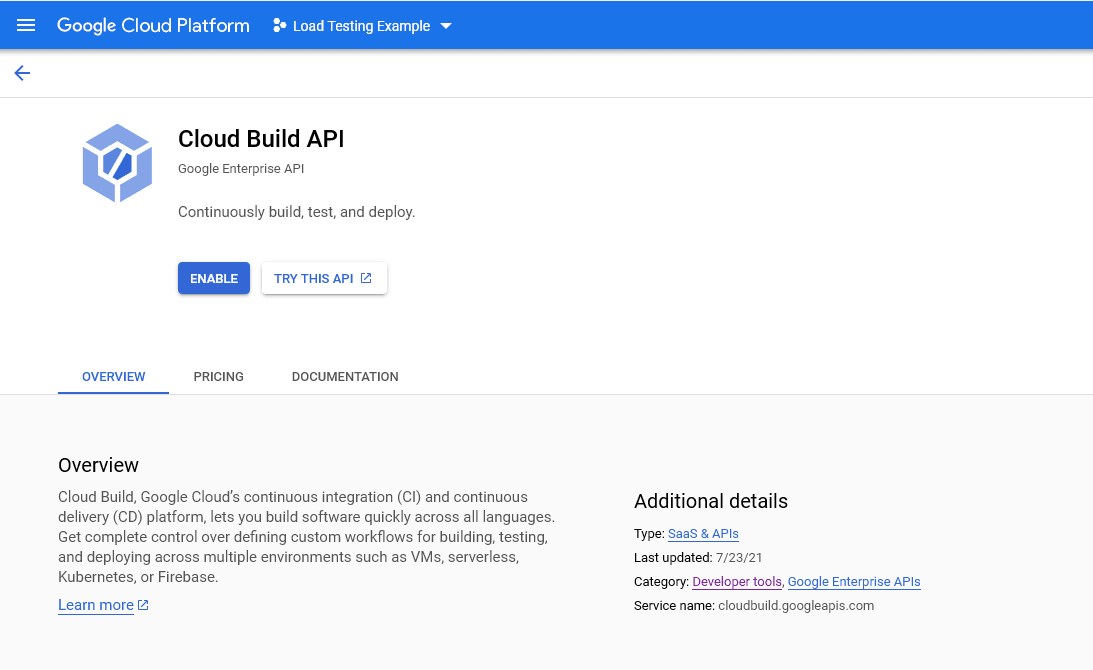
Once your remote repository is ready, you can start working on your Google Cloud Console. If you have never used Cloud Build before, you'll need to enable the API first. The setting below is located under API & Services > Library > Developer tools:
By enabling the API, the appropriate IAM service account will be created automatically that will allow you to run the build steps successfully. With Cloud Build, Google provides us with a selection of cloud builders a.k.a execution environments for running our CI/CD steps. These builders include yarn, npm, docker, mvn, go and a few more. Unfortunately, majority of the building tools we need for our projects are not available out of the box.
To add the tools we need, we have to visit the community contributed builders repository where all the tools needed in a software development lifecycle can be found. In our case, we simply need the docker-compose builder. The steps to install this builder in our own Google Cloud account is as follows:
Install and configure gcloud CLI tool to connect with your GCP account from your machine
Run the update command: gcloud components update
Install docker-compose builder on your GCP account using the following commands:
   # Clone the entire cloud builders community repo onto your hard drive
   git clone https://github.com/GoogleCloudPlatform/cloud-builders-community

   # Navigate into the docker-compose folder
   cd cloud-builders-community/docker-compose/

   # Install docker-compose builder into your account
   gcloud builds submit --config=cloudbuild.yaml .
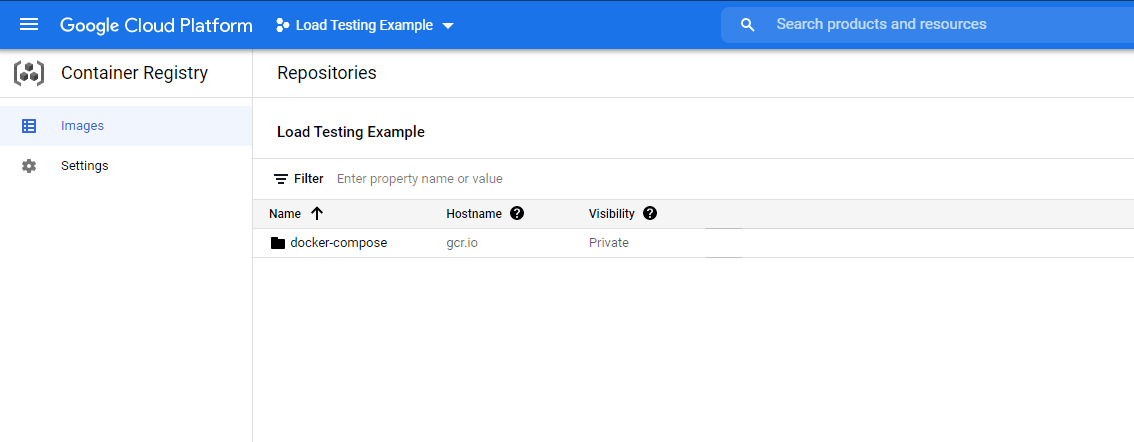
- Confirm the docker-compose builder has been installed. See Cloud Build > Container Registry > Images
Once you have completed this step, you can now proceed with creating a Trigger which is the basis of building a CI/CD pipeline in Google Cloud Build.
Head over to Cloud Build > Triggers page and click the Create Trigger button. Populate the form as follows:
- Name - Run-Performance-Test
- Description - Run k6 load test
- Event - Push to a branch
- Source - link to your GitHub repository
- Branch - main
- Configuration - Cloud Build configuration file (yaml or json)
- Location - Repository
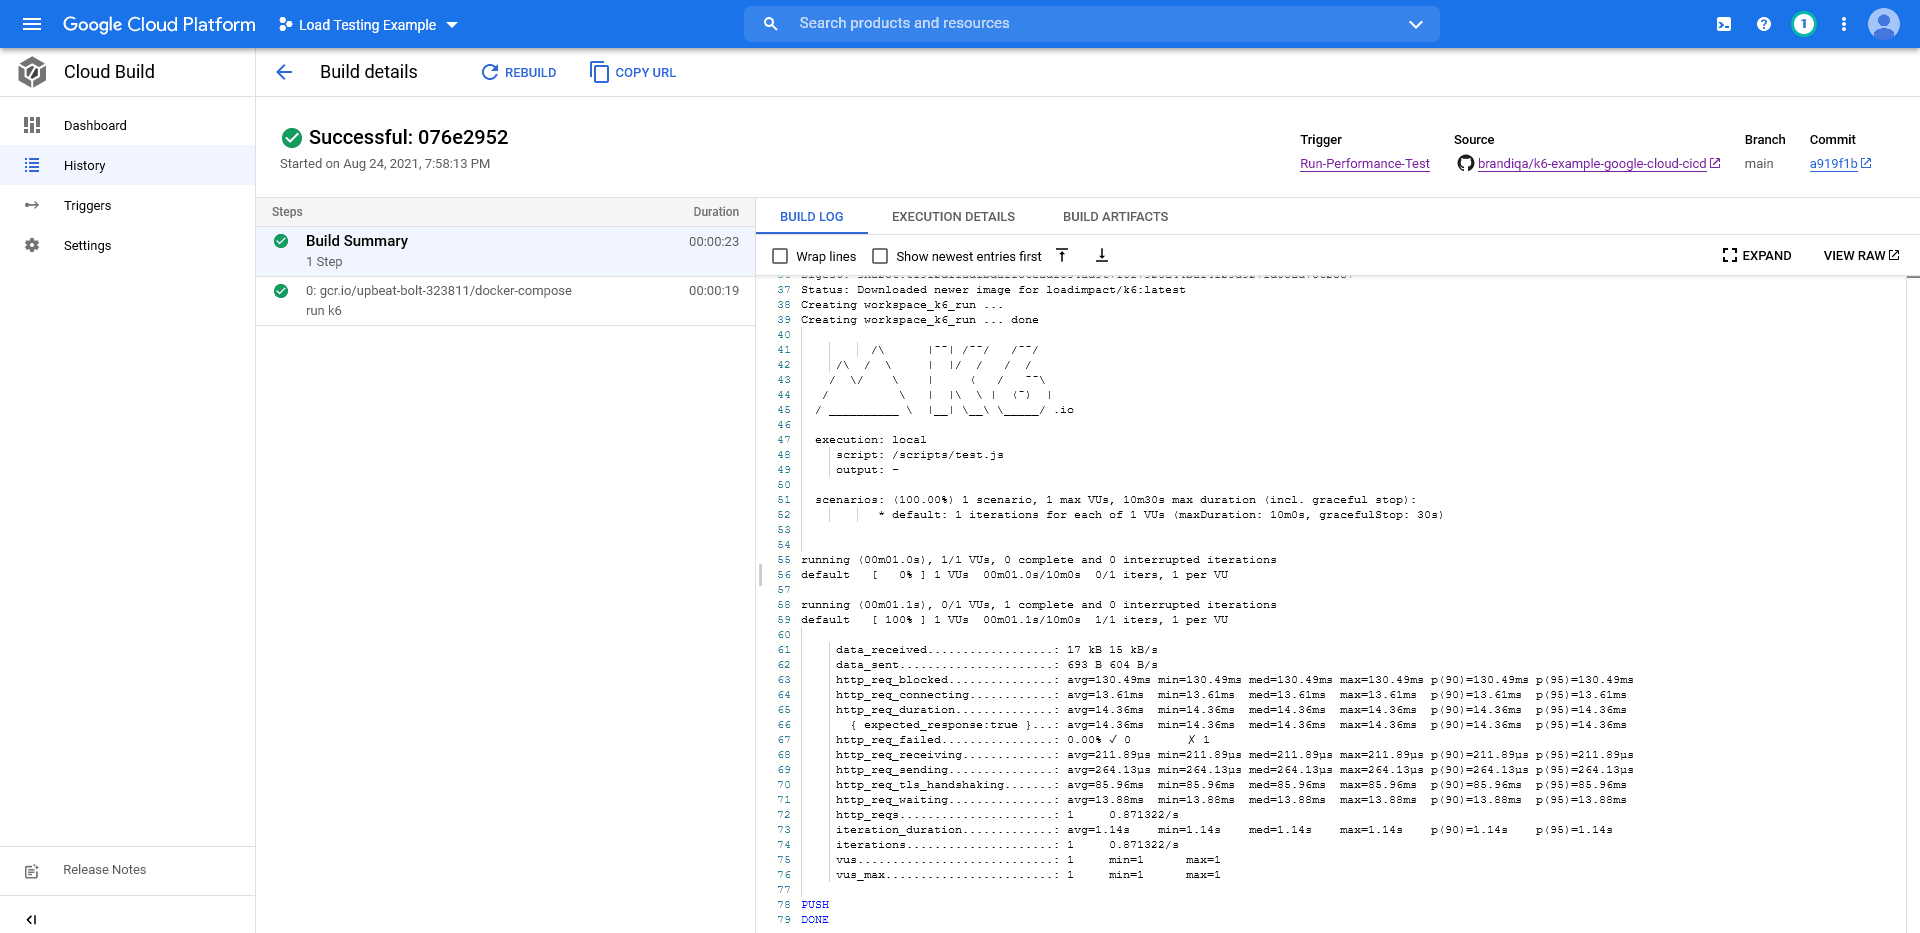
After hitting save, click the Run button. You should expect the following results:
Running k6 Cloud tests
There are two common execution modes to run k6 tests as part of the CI process.
- Locally on the CI server.
- In k6 Cloud, from one or multiple geographic locations.
You might want to use cloud tests in these common cases:
- If you're going to run a test from multiple geographic locations (load zones).
- If you're going to run a high-load test, that will need more compute resources than available in the runner.
If any of those reasons fit your needs, then running k6 Cloud tests is the way to go for you.
⚠️ Try it locally first
Before we start with the configuration, it is good to familiarize ourselves with how cloud execution works, and we recommend you to test how to trigger a cloud test from your machine.
Check out the cloud execution guide to learn how to distribute the test load across multiple geographic locations and more information about the cloud execution.
Now, we will show how to run cloud tests on the Google Cloud Build platform. If you do not have an account with k6 Cloud already, you should go here and start your free trial. After that, get your account token from the cloud app and save it somewhere temporarily.
Next, we need to update our docker-compose.yml file as follows:
version: '3.4'
services:
  k6:
    image: loadimpact/k6:latest
    command: cloud /scripts/test.js
    volumes:
      - ./scripts:/scripts
    environment:
      - K6_CLOUD_TOKEN=${K6_CLOUD_TOKEN}
There are only 2 changes we have made here:
- In the command section, we've changed from run to cloud
- We've added an environment section. The ${K6_CLOUD_TOKEN} environment variable value needs to be defined outside the docker container, in this case, we'll do it in the cloudbuild.yaml config file where execution call is made.
With most platforms, there is a system for securely storing environment variables. Unfortunately for Google Cloud Build, there isn't. Instead, what we'll paste the token value in plain format within the Trigger configuration. We'll use the inline YAML editor. Simply edit the current Trigger and update the following settings:
Configuration Location: Inline
Click Open Editor button and copy the following:
  steps:
    - name: gcr.io/$PROJECT_ID/docker-compose
      env:
        - 'K6_CLOUD_TOKEN=<paste your token here>'
      args:
        - run
        - k6
Paste in your token key as indicated. Click Done and then Save.
Once we commit and push the changes we made earlier, k6 will run our test using the k6 Cloud, and output the URL to our test results as part of the workflow logs:
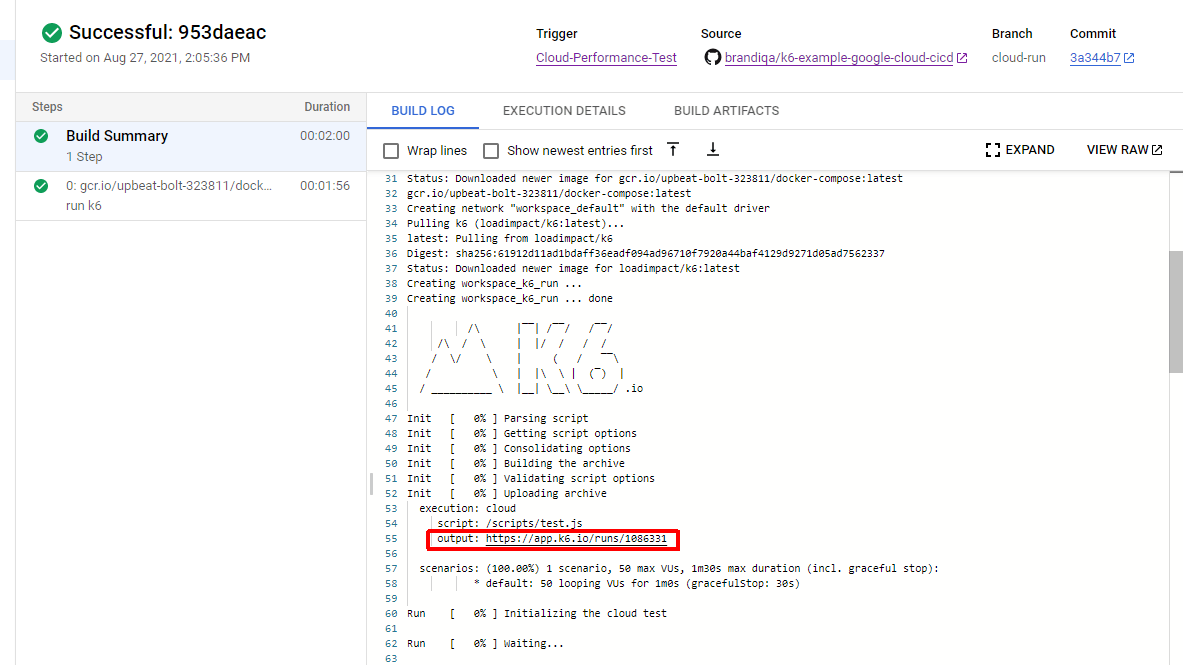
And if we copy the highlighted URL and navigate to it in a new tab

Nightly Builds
Triggering a subset of performance tests at a specific time is a best-practice for automating your performance testing.
It's common to run some performance tests during the night when users do not access the system under test. For example, to isolate more extensive tests from other types of testing or to generate a performance report periodically.
To configure scheduled nightly build that runs at a given time of a given day or night, head over to your Trigger configuration and edit as follows:
- Event: Manual invocation
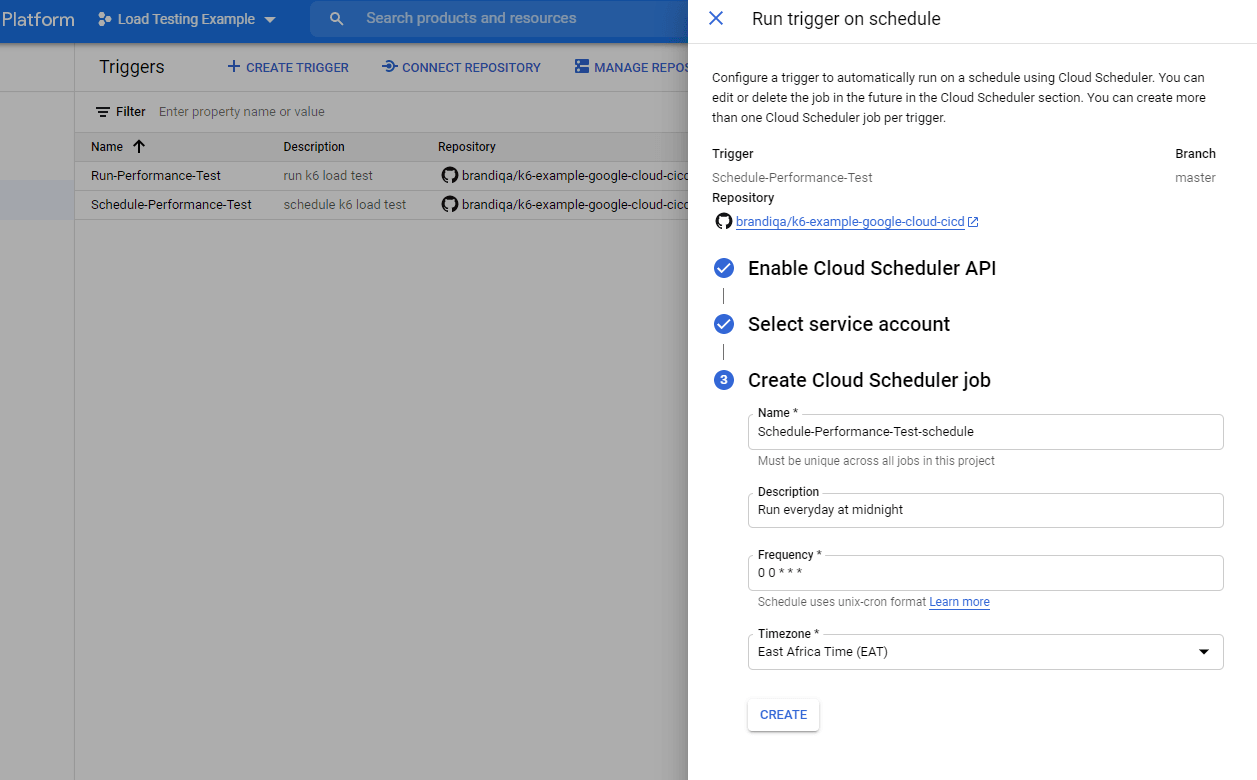
Go back to the main Triggers page and click on the menu (vertical ellipses) located at the right end of the row containing your trigger. You should see a new option called Run on schedule. Click on it to start setting up the schedule. You'll need to:
- Enable the Schedule API
- Select a service account (accept the default which should start with cloud-build-trigger-scheduler@..)
- Provide name, description and frequency of the schedule in POSIX cron syntax. Here is an interactive tool for creating crontab scheduling expressions. You can also select your desired time zone.
You can use the following values for reference:
Once you save your schedule settings, Google Cloud Build will take care of running the workflow at the time intervals you specified.
You can also visit the Cloud Scheduler page and trigger the scheduled job manually. In case this fails, edit the Job Schedule and check the Configure the job's target > Body field. By default the branch name is set to master. If you are using a different branch such as main, you need to update as follows:
{"branchName":"main"}
After saving, you should be able to successfully run the job manually.
Summary
While there is a learning curve with setting up a full CI/CD pipeline for your project with Google Cloud, integrating k6 performance tests into a new or existing Google Cloud Build pipeline is quick and easy as only a couple of configuration files are involved.
The configurations mentioned throughout the article, provide the same flexibility and capabilities as you're used to from running k6 locally. By integrating performance tests into your CI/CD pipelines, you'll be able to identify and correct performance regressions as they occur.

Top comments (1)
[[Pingback]]
This article was curated as a part of the 23rd issue of the Software Testing Notes.