Application programming interface (API) gateways have become an integral part of building serverless applications in the cloud. These tiny pieces of software sit in front of an API or a set of microservices and help to process network traffic to-and-fro. They basically act as a single point of entry for all API calls made to your application and can configured to apply policies which determine behaviour of services attached to it.
I have written extensively about API gateways and you can read it up here.
Authentication is a crucial aspect of API Gatways. You would want your API gateway to act as an extra layer of security, ensuring that your application is protected against hacks and data breeches by validating requests to the API Gateway. Implementing aythentication for your API gateway can extend the functionality of your gateway to include user validation and authorization, creating a paywall for services designed to be accessible only to paying users., etc.
There are broadly two methods of securing your API gateway - using a Cognito authorizer and using a Lambda authorizer.
Here is an in-depth article on how to use Cognito Authorizers.
In this article, we will be looking at practical ways to secure our API gateways using a lambda authorizer.
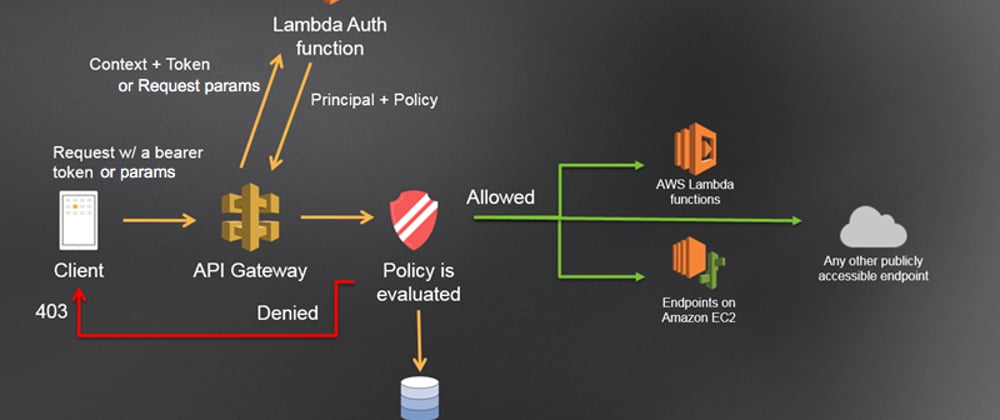
Lambda Authorizer
AWS lambda authorizer is an API Gateway feature that uses lambda functions to control access to your API. These lambda functions are invoked before your main functions are called and can be used to authenticate and/or authorize the caller.
Lambda authorizers can either be token-based - using tokens to receive the caller's identity information. They can also be parameter-based - using headers and query string parameters to receive the caller's identity. When working with WebSocket APIs, only parameter-based authorizers can be used.
Our Case Study

Here we have a Dynamodb table (resource 2) and a Lambda function (resource 1). The user is performing a getitem request via the API Gateway. In order to view the contents of this table, our lambda function must be invoked by the API Gateway. What if we want to make sure that only authorized users can access the contents of our database? To implement this, we have to secure the API Gateway. Our preferred method in this scenario is a Lambda Authorizer.
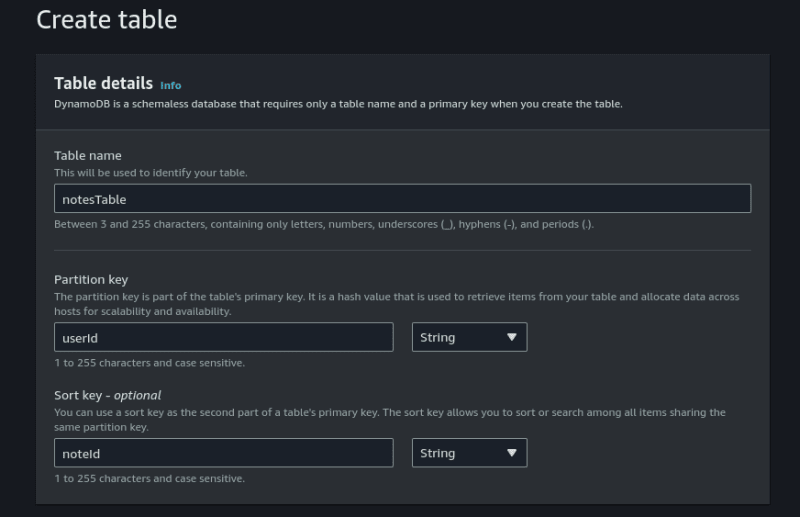
Step 1: Create A Dynamodb Table
First, let's create the database and populate it with contents. Our dynamodb table will be a simple database made up of primary keys (partition and sort keys) and one extra attribute. As you already know, the partition key is used to identify a partition of sorted data while sort key is used to sort data within the partition.
Our database should look like this:

PK stands for partition key while SK stands for sort key.
In the Dynamodb console, I am creating a table with the name notesTable. The primary key set to userId while the sort key is set to noteId. Every other setting is set as default. I then clcik on Create table.
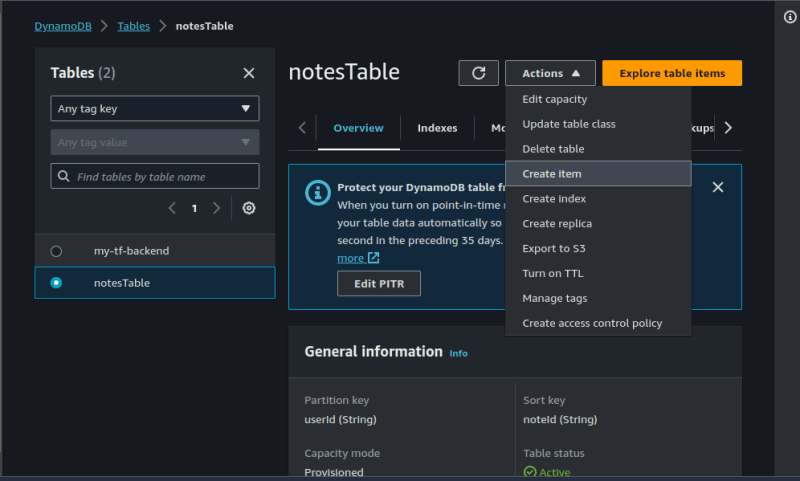
On your newly created table, click on Actions, Create item.
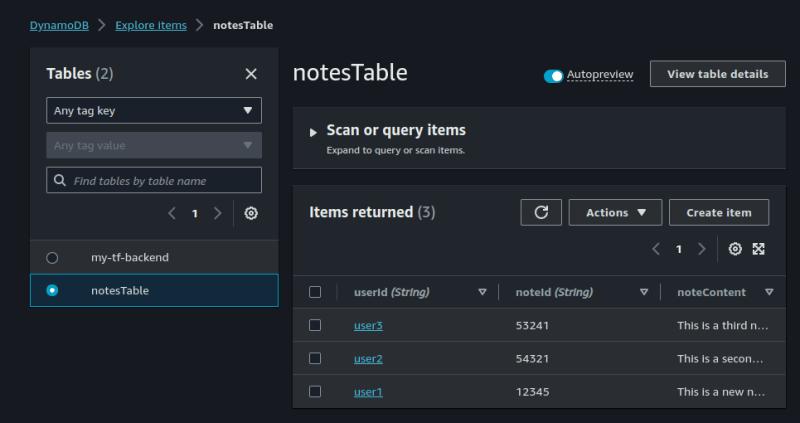
Click on Add new attribute, create a noteContent attribute. Polulate the table as shown below. click on Create item.

Repeat the process for at least three times using different values. Here's how mine looks:
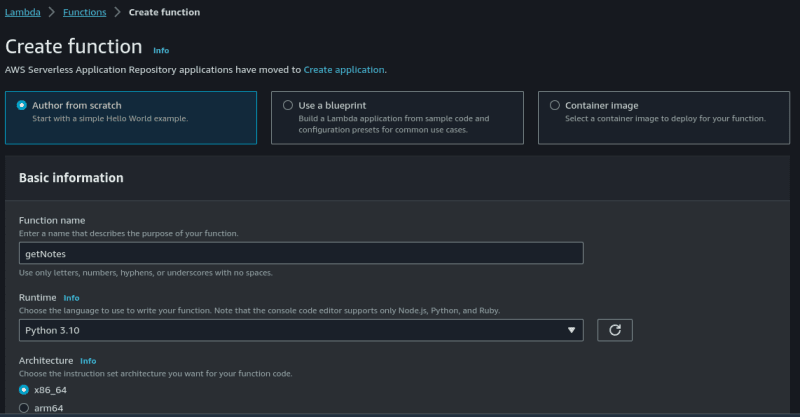
Step2: Create A Lambda Function
Now, we need to create a lambda function which will perform a getitem request for the items in our database table.
On the AWS lambda console, select Create function, give your function a name and select python 3.10 as the runtime. Leave every other thing as default and click on Create function.
Now click on Code and insert the following python code:
import boto3
import json

def lambda_handler(event, context):
    # Define variables
    UserID = event['queryStringParameters']['userId']
    NoteID = event['queryStringParameters']['noteId']

    # Print variables into Cloudwatch logstream
    print('userId=' + UserID)
    print('noteId=' + NoteID)

    # Connect to Dynamodb
    dynamodb = boto3.resource('dynamodb')
    table = dynamodb.Table('notesTable')

    content = table.get_item(
    Key={
        'userId': UserID,
        'noteId': NoteID
    }
    )

    # Construct Dynamodb response
    try:
        dynamodbResponse = {}
        dynamodbResponse['userId'] = UserID
        dynamodbResponse['noteId'] = NoteID
        dynamodbResponse['message'] = 'Successfully retrieved database content'
        dynamodbResponse['note'] = content['Item']['noteContent']
    except KeyError:
        dynamodbResponse = {}
        dynamodbResponse['userId'] = UserID
        dynamodbResponse['noteId'] = NoteID
        dynamodbResponse['message'] = 'Unable to retrieve database content. Partition or sort key not valid.'
        dynamodbResponse['note'] = 'NULL'

    # Construct Response Object
    responseObject = {}
    responseObject['statusCode'] = 200
    responseObject['headers'] = {}
    responseObject['headers']['Content-Type'] = 'application/json'
    responseObject['body'] = json.dumps(dynamodbResponse)

    return responseObject
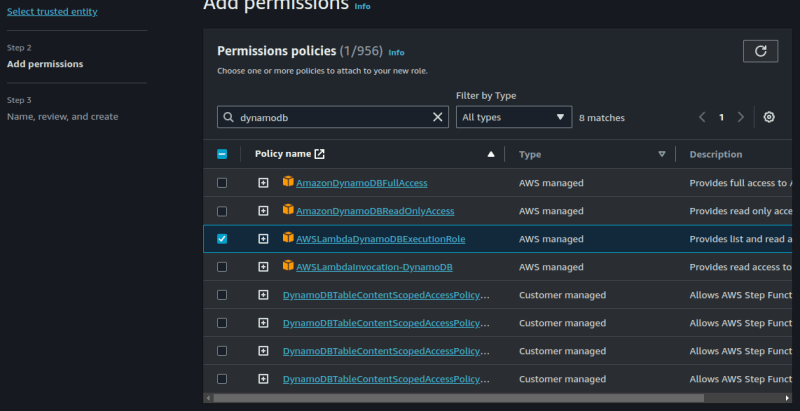
We must also modify the IAM permissions of the lambda function to enable access to Dynamodb.
Go to the IAM section, click on Create Role. Make sure the use case is set to lambda.

Click on Next.
For the sake of simplicity, select AmazonDynamodbFullAccess.
If you want more streamlined access, you can use the JSON permissions below to create a policy and then use that policy to create a role.
{
    "Version": "2012-10-17",
    "Statement": [
        {
            "Effect": "Allow",
            "Action": [
                "dynamodb:DescribeStream",
                "dynamodb:GetRecords",
                "dynamodb:GetShardIterator",
                "dynamodb:ListStreams",
                "dynamodb:Getitem",
                "dynamodb:Listtables",
                "logs:CreateLogGroup",
                "logs:CreateLogStream",
                "logs:PutLogEvents"
            ],
            "Resource": "*"
        }
    ]
}
After you are done creating your role, go back to your lambda function. Click on Configuration, then click on Permissions and then click on Edit. We will now replace the default role with our new role.
Click on save when you're done.

Step 3: Create An API Gateway
In this step, we will be creating an API gateway. The user interacts with an API gateway which will triger our lambda function. The lambda function in turn extracts the contents of the dynamodb table and returns it to the user via the API gateway.
On the API gateway console, there are a variety of API types to select from. Each of these types are built for different use cases. You can read more about API types here.
We will be using the REST API here.
Select the REST API and click on Build. You should be redirected to a page like this:
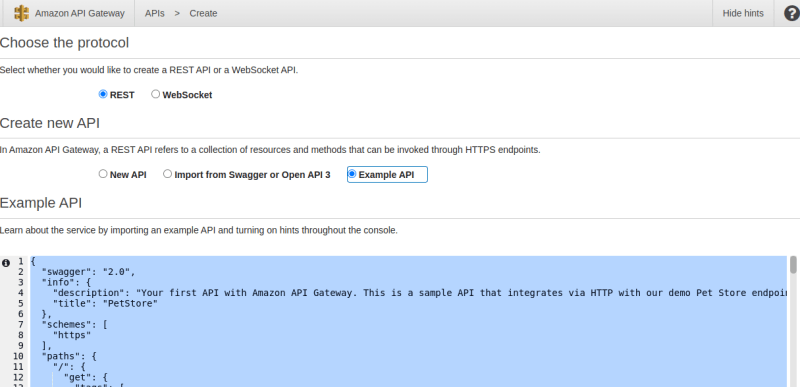
Click on New API, give your API a name and then click on Create API.

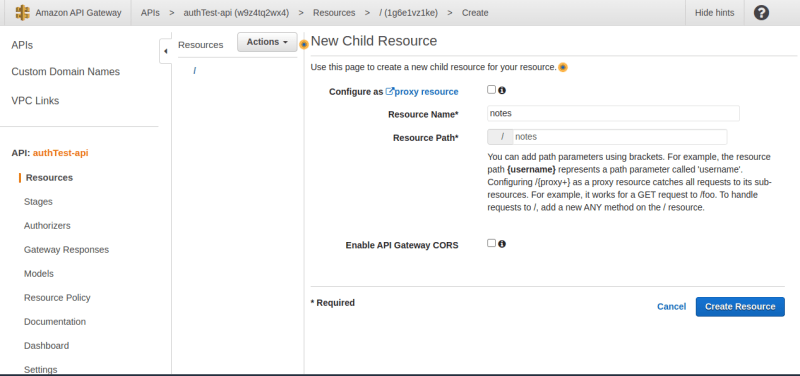
The first thing we want to do here is to create a Resource.
A resource is the actual endpoint of the API gateway.
Click on the "Actions" dropdown and click on Create Resource. Give your resource a name and then click on Create Resource.
Now, we have to create a Method. Methods are HTTP methods (GET, PUT, POST, DELETE) executed inside a resource.
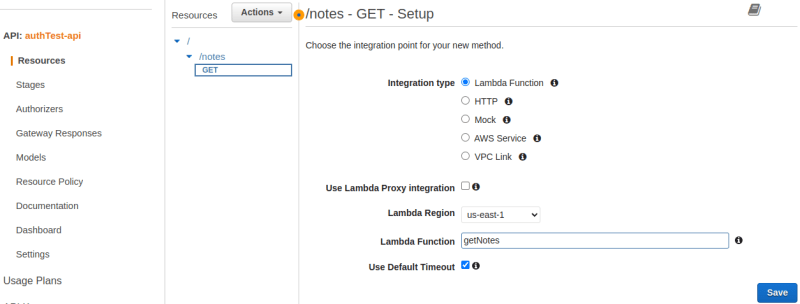
Click on the "/notes" resource and from the "Actions" dropdown, select Create method. From the ensuing dropdown, select a GET method. In the setup page, we will select our "getNotes" lambda function, then click on save. Make sure to check the box which says "use lambda proxy integration".
To actually get this API gateway running, we need to deploy it.
On the Get section, click on Actions and the click on Deploy API. you should see a page like this:
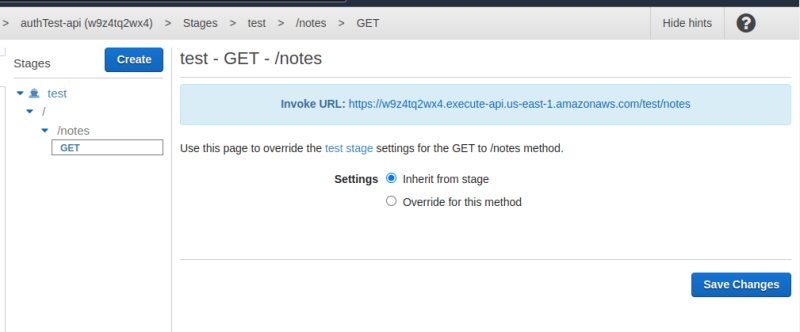
The URL highlihted in blue is our endpoint.
To test it out, copy te url and paste in a web browser. Also attach the query parameters to it. It shlould look like this: url?userId=[value]¬eId=[value].
This is how my page looks:

Stage 4: Secure The API Using Lambda Authorizer
This is where we implement authentication and authorization for our API Gateway.
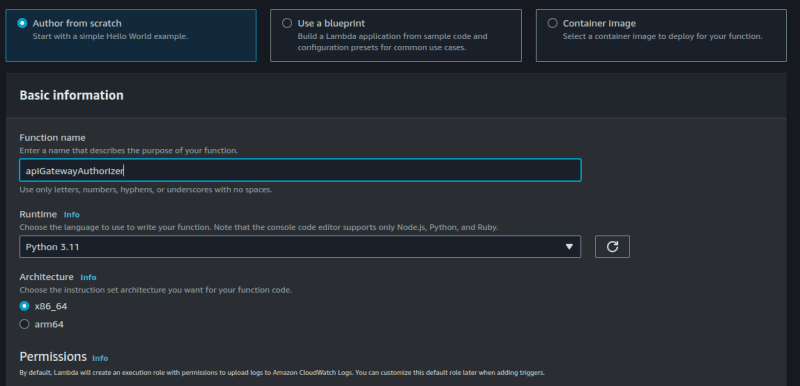
The first thing we want to do here is to create a lambda function. This lambda function will be used by the API Gateway to authenticate incoming requests.
Go to the lambda console, create a new lambda function.
Click on Code and insert the following code:
def lambda_handler(event, context):

    # Log event to cloudwatch
    print('*********** Auth Event: ************')
    print(event)

    # Check token validity
    if event['authorizationToken'] == 'abc123':
        auth = 'Allow'
    else:
        auth = 'Deny'

    # Construct and return response
    authResponse = {}
    authResponse["principalId"] = "abc123"
    authResponse["policyDocument"] = {
        "Version": "2012-10-17",
        "Statement": [
            {
                "Action": "execute-api:Invoke",
                "Resource": ["arn:aws:execute-api:us-east-1:[Account-Id]:[API-identifier]/*/*"],
                "Effect": auth
            }
                ]
    }
    return authResponse
For the code above, you must replace the first square bracket with your AWS account Id and the second with your API identifier. The identifier is the first part of your API gateway url endpoint. Mine is w9z4tq2wx4.
You can see it highlighted in the picture below:
![]()
Also note that by using "//*", I am applying this lambda function to all resources and methods within the API gateway. You could decide to be more granular by specifying which methods and resources your lambda function will apply to.
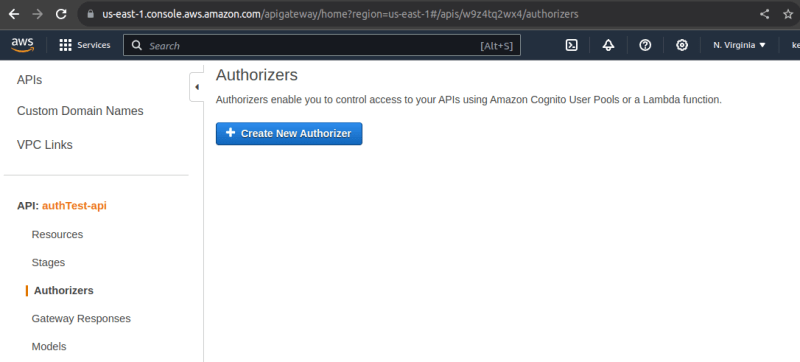
Back in the API Gateway console, click on authorizers and create new authorizer.
Give your authorizer a name, enter the name of our new lambda function and make sure the value of token source is same as in your lambda function. Click on Create.
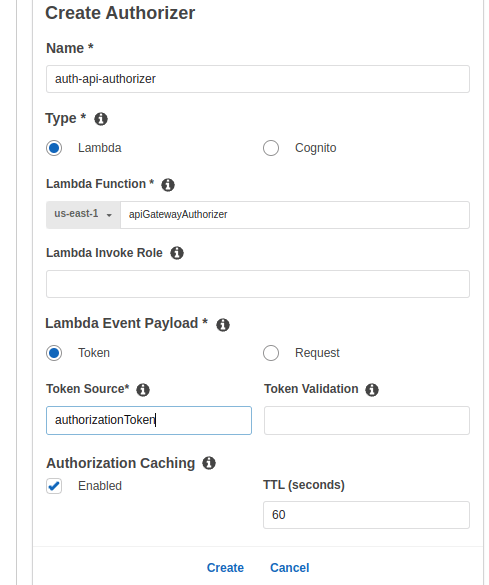
It should now look like this:
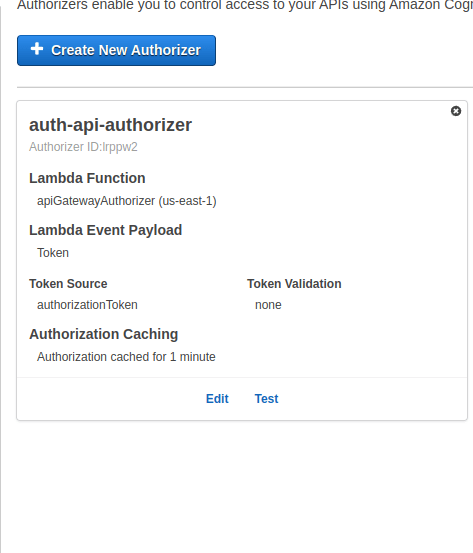
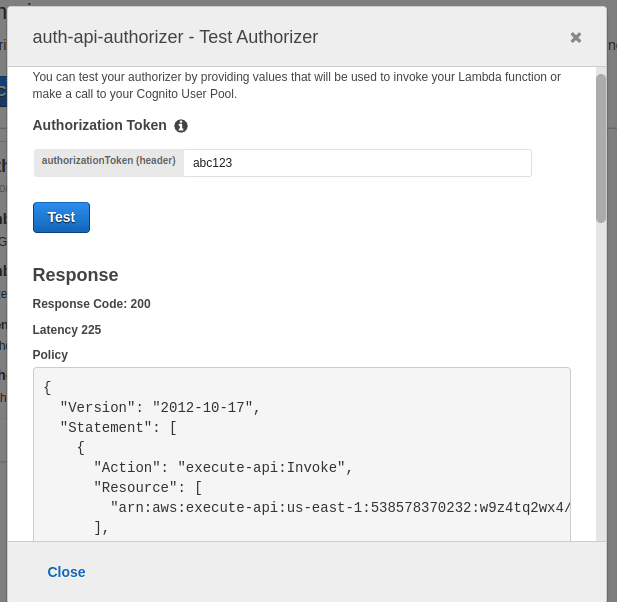
You can even test your authorizer on the spot.
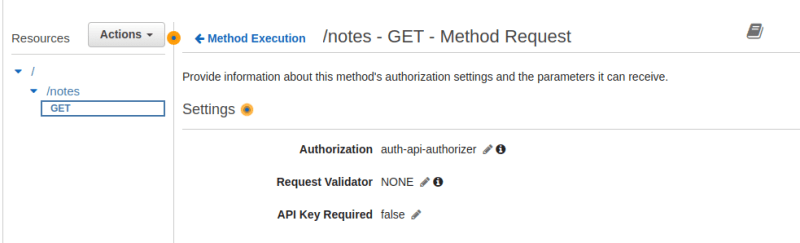
Finally, we now have to configure our API Gateway to use the authorizer.
On the API gateway console, go to Resources, click on Method Request
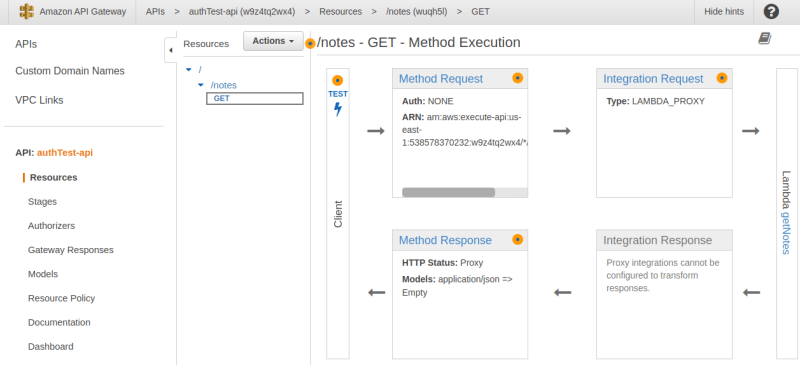
Under Authorization, we will select our auth-api-autorizer.
Note: make sure to refresh the page or this option may not be displayed.
Click the check mark beside it to register this selection.
For this to take effect, we must now redeploy our API.
Click on Actions, Deploy API and select your test stage.
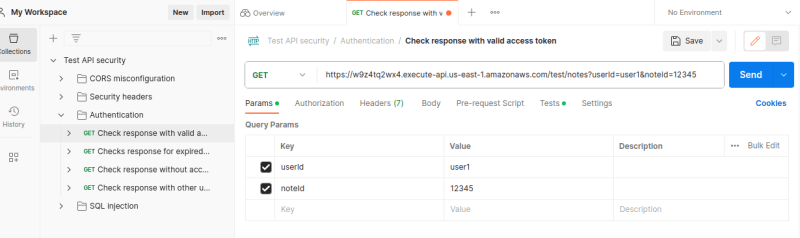
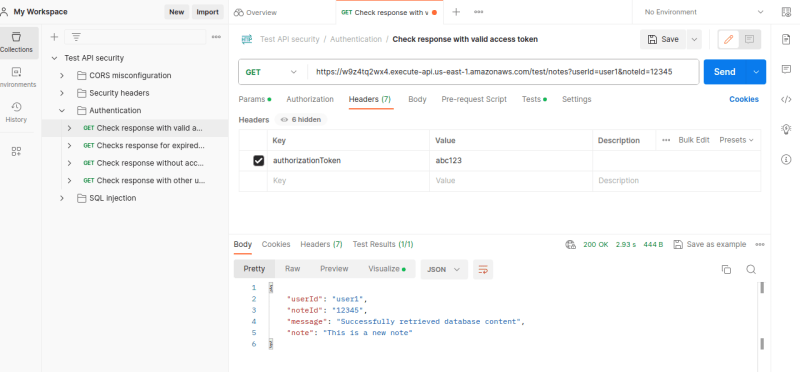
Notice that when I enter my url without the "authrorizationToken" parameter, I get an "Unauthorized" response.

When I pass the valid authorization token into the header, I become authorized and can now access my database once again.
I am going to use Postman for this.
As you can see, I am able to successfully authenticate and retrieve the database contents.
This is where we wrap it up for today. It was a lot, but it was quite worth it.
See you next time!
PS: I am open to remote DevOps/Cloud roles or technical writing gigs. Connect with me on LinkedIn.


Top comments (0)