I. Introduction
In this article you learn about Spring Boot JPA allowing to build simple backend applications by connect MySQL database container by write docker-compose file. Spring Data JPA is a great choice allowing to speed your development and focus on the business logic.
Technology you can learn in this tutorial:
- Spring Boot JPA
- Build Docker Compose for MySQL
- CRUD operation for simple
Tool support to implementation:
- IDE Intellij for coding (you can choose other IDE, it is up for you)
- Postman, for manipulate HTTP request
- Docker and Docker Compose, for build MySQL container. You can read more install on Ubuntu 18.04 Install Docker on Ubuntu 18,04, Install Docker Compose on Ubuntu 18.04
GitHub repository at here blog repository
Video reference for coding at here
II. Implement
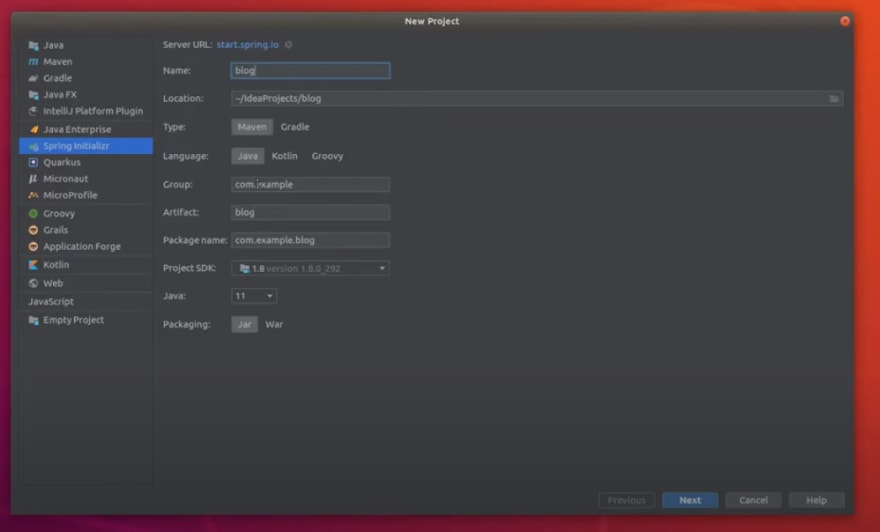
Step 1: Initial Project Spring Boot Maven
- In this project I will using Maven. Maven is a build automation tool used for primarily for Java project.
Open Intellij choose Spring Initializr edit name project, and choose Project SDK, Java version.
Option you can create project on website at here, click download and extract import project by Intellij.
You can pick add dependency when initial project Spring Data JPA, Spring Web, and MySQL Driver to exploring. or add manual in file pom.xml.
POM or Project Object Model. It is the fundamental unit of work in Maven. It is a file XML contain information about project and configuration detail used by Maven, read more detail at here.
 <dependency>
        <groupId>org.springframework.boot</groupId>
            <artifactId>spring-boot-starter-data-jpa</artifactId>
        </dependency>

        <dependency>
            <groupId>org.springframework.boot</groupId>
            <artifactId>spring-boot-starter-web</artifactId>
        </dependency>

        <dependency>
            <groupId>mysql</groupId>
            <artifactId>mysql-connector-java</artifactId>
            <scope>runtime</scope>
        </dependency>
 </dependency>
For the dependency you can see it is a format XML. It is a naming convention:
- groupId: A uniquely identified name of project or organization.
- artifactId: A unique name of project. It is mention about packages .
- version: The version of project.
-
scope: Specfic scope for denpendency. There are five scope available:
- compile: It is default when none specific scope provided.
- provided: The dependencies should be provided at runtime JDK or a container.
- runtime: The dependencies with this scope are required at runtime.
- test: Test is aren't transitive and are only present for test and execution classpaths.
- system: The scope is similar to the provided scope. The difference is that system requires us to directly point to the specific jar on the system.
Step 2: Implement docker-compose.file to start MySQL
Create file docker-compose.file in root project to run MySQL container.
-
Docker Compose is tool is defined and running multi-container. It is convention YML file to configuration your application's services. Using Compose a basically a three-step process:
- Create Dockerfile to define environment your apps. It can be reproduces anywhere.
- Create docker compose. Define in your app
docker-comse.yml. They can run together in an isolated environment. - Run docker compose up to start your application's services by command
docker-compose up.
Note: For now I skip Dockerfile. I will create Dockerfile in session later.
version: '3'

services:
  mysql:
    image: mysql:8.0
    container_name: blog_mysql
    volumes:
      - db_mysql:/var/lib/mysql
    environment:
      MYSQL_ROOT_PASSWORD: password
      MYSQL_USER: blogger
      MYSQL_PASSWORD: blogger
      MYSQL_DATABASE: blog
    ports:
      - 3306:3306

volumes:
  db_mysql:
- version: The version of compose. It is number spring format.
- services: The make up your application's services.
- mysql: The unique name specific service.
- image: Before colon is the name service you want use, and after colon is version service. Recommend specific version if image will be change in the future.
- container_name: The unique name container. It will be generate random if none provided.
-
volume: It is make persist data. if it finds any containers from previous runs, it copies the volumes from the old container to the new container. This process ensures that any data you’ve created in volumes isn’t lost. Before colon name
db_mysqlis a origin folder container script, after colon name is destination/var/lib/mysql. - environment: Is is make permission to access container MySQL to manipulate data.
-
port: The port to access container. Before colon is a port
3306for host machine connect, and after colon the port3306is MySQL Container.
Step 3: Configuration application.properties to connect MySQL
To connect MySQL Container we will be configuration from Spring Boot application at application.properties in resources folder
spring.jpa.hibernate.ddl-auto=update
spring.datasource.url=jdbc:mysql://localhost:3306/blog
spring.datasource.username=blogger
spring.datasource.password=blogger
spring.datasource.driver-class-name=com.mysql.jdbc.Driver
-
spring.jpa.hibernate.ddl-auto: It can be none, update, create, create-drop see the more detail Hibernate Document
- none: Default MySQL, no change is make database structure. It is good security for the production state.
- update: The database will be change by Hibernate if the entity given structures.
- create: Create database every time but does not drop it on close.
-
create-drop: Create database and drops when
SessionFactoryclose.
spring.datasource.url: Given URL connect to MySQL Container for datasource.
spring.datasource.username: Given username connect to MySQL for datasource.
spring.datasource.password: Give password connect to MySQL for datasource.
spring.datasource.driver-class-name: Given name driver MySQL for datasource.
Step 4: Create @Entity, Repository, @Controller
Define Blog class Entity. The Hibernate will be automatically translate entity Blog to table Blog in database.
package com.khanhnhb.blog.model;

import javax.persistence.Entity;
import javax.persistence.GeneratedValue;
import javax.persistence.GenerationType;
import javax.persistence.Id;

@Entity
public class Blog {

    @Id
    @GeneratedValue(strategy = GenerationType.AUTO)
    public Integer id;
    public String title;
    public String content;

    public Integer getId() {
        return id;
    }

    public void setId(Integer id) {
        this.id = id;
    }

    public String getTitle() {
        return title;
    }

    public void setTitle(String title) {
        this.title = title;
    }

    public String getContent() {
        return content;
    }

    public void setContent(String content) {
        this.content = content;
    }
}
-
@Entityannotation this tells Hibernate to make a table out of this class.
Define Blog Repository to manipulate interface CRUD records.
package com.khanhnhb.blog.repository;

import com.khanhnhb.blog.model.Blog;
import org.springframework.data.repository.CrudRepository;

public interface BlogRepository extends CrudRepository<Blog, Integer> {
}
- CRUD refers Create, Read, Update, Delete
- Spring automatically implements this repository interface into a beans the same name blogRepository.
Define Blog Controller to using HTTP request.
package com.khanhnhb.blog.controller;

import com.khanhnhb.blog.model.Blog;
import com.khanhnhb.blog.repository.BlogRepository;
import org.springframework.beans.factory.annotation.Autowired;
import org.springframework.stereotype.Controller;
import org.springframework.web.bind.annotation.*;

@Controller
@RequestMapping(path = "/blogs")
public class BlogController {

    @Autowired
    private BlogRepository blogRepository;

    @PostMapping()
    public @ResponseBody Blog createBlog(@RequestBody Blog newBlog) {
        return blogRepository.save(newBlog);
    }

    @GetMapping()
    public @ResponseBody Iterable<Blog> getAll() {
        return blogRepository.findAll();
    }

    @GetMapping(path = "{id}")
    public @ResponseBody Blog getOne(@PathVariable Integer id) {
        return blogRepository.findById(id).get();
    }

    @PutMapping(path = "{id}")
    public @ResponseBody Blog updateBlog(@PathVariable Integer id, @RequestBody Blog updateBlog) {
        Blog blog = blogRepository.findById(id).get();

        blog.setTitle(updateBlog.getTitle());
        blog.setContent(updateBlog.getContent());

        return blogRepository.save(blog);

    }

    @DeleteMapping(path = "{id}")
    public @ResponseBody Integer deleteBlog(@PathVariable Integer id) {
        Blog blog = blogRepository.findById(id).get();
        blogRepository.delete(blog);
        return blog.getId();
    }
}
-
@Controllerannotation it means that this class is a Controller. -
@RequestMappingannotation it means URL's start with /blog (after Application path) -
@Autowireannotation its means to get the bean called blogRepository. Which is auto-generated by Spring when application start, we will use it to handle the data. -
@PostMappingannotations its mean map ONLY POST Requests. -
@RequestBodyannotations its mean pass value in body request. -
@ResponseBodyannotations its mean returned object data type (Blog, Integer, ...). -
@GetMappingannotations its mean map ONLY GET Requests. -
@PathVariableannotations its mean can be use handle template variables in the request URL. -
@PutMappingannotations its mean map ONLY PUT Requests. -
@DeleteMappingannotations its mean map ONLY DELETE Requests.
Step 5: Make HTTP request with Postman
Create Blog
POST: localhost:8080/blogs
body:
{
    "title": "Exploring Spring Data JPA",
    "content: "Create first blog"
}

Read all Blog
GET: localhost:8080/blogs

Read blog by id
GET: localhost:8080/blogs/1

Update blog
PUT: localhost:8080/blogs/1
body:
{
    "title": "Exploring Spring Data JPA and MySQL",
    "content: "Modify first blog"
}

Delete blog
DELETE: localhost:8080/blogs/1

III. Conclusion
In this article you learn about Spring Boot JPA allowing to build simple backend applications by connect MySQL database container by write docker-compose file.
📚 Recommended Books
Clean Code:Book
HTTP: The Definitive Guide
Clean architecture: Book
📱 Social Media
Blog: KhanhNHB Tech
Twitter: KhanhNHB
Youtube: KhanhNHB Tech
GitHub: KhanhNHB
Youtube: KhanhNHB Tech
GitHub: KhanhNHB

Top comments (0)