The Document Object Model (DOM) is fundamental to modern web development. It represents the structure of an HTML document as a hierarchical tree. Each element, attribute, and text node is a part of this tree. JavaScript allows us to interact with, and manipulate this tree dynamically. Understanding how to manipulate the DOM with JavaScript is important for creating dynamic and interactive web applications. This guide will, in the end, cover everything you need to know about DOM manipulation, from selecting elements to handling events and creating dynamic content.
HTML elements are the building blocks of web pages. Each HTML element represents a specific part of the page's content or structure, such as headings, paragraphs, images, links, etc. HTML elements are defined by tags, attributes, and content. For example:
<! DOCTYPE html>
<html>
<head>
  <title>Document</title>
</head>
<body>
  <h1>Document Object Model</h1>
<img src="image.jpg" alt="image1">
  <p>This is a paragraph </p>
  <a href="https://link.com">Click for more details</a>
</body>
</html>
In the above Html code <h1>, <img>, <p>, and <a>, are HTML elements.
What is a DOM Node?
In the Document Object Model (DOM), every part of an HTML document is represented as a node. These nodes form a tree-like structure, where each node represents an object in the document. Each HTML element, attribute, and text node in the document corresponds to a node in the DOM tree. There are several types of DOM node, examples are:
Element Nodes: These represent HTML elements and form the structure of the document. For example,
<div>,<p>,<h1>, etc.Text Nodes: These represent the textual content within an element. For example, the text "This is a paragraph" in
<p> This is a paragraph </p>.Attribute Nodes: These represent attributes of an element. For example, the src and alt attribute of an
<img>element.Comment Nodes: These represent comments in the HTML code. For example, <!-- This is a comment -->.
Relationship Between HTML Elements and DOM Nodes
HTML (Hypertext Markup Language) elements and DOM (Document Object Model) nodes are closely related and linked together in a way that makes it difficult to mention one, without mentioning the other in web development. Understanding their relationship is necessary for manipulating and interacting with web pages using JavaScript. The code snippet below summarizes what a node is:
<!DOCTYPE html>
<html>
<head>
    <title>DOM Node Example</title>
</head>
<body>
      <h1>This is heading</h1>
  <p>This is a paragraph.</p>
  <img src="image1.jpg" alt="An image">
  <a href="https://link.com">Click on my link</a>
    <!-- This is a comment -->
</body>
</html>
The DOM tree of the above Html code looks like this:
Document (Node)
└── DocumentType: <!DOCTYPE html> (Node)
└── Element: <html> (Node)
├── Element: <head> (Node)
│ └── Element: <title> (Node)
│ └── Text: "DOM Node Example" (Node)
└── Element: <body> (Node)
├── Element: <h1> (Node)
│ └── Text: "This is heading" (Node)
├── Element: <p> (Node)
│ └── Text: "This is a paragraph." (Node)
├── Element: <img src="image1.jpg" alt="An image"> (Node)
├── Element: <a href="https://link.com"> (Node)
│ └── Text: "Click on my link" (Node)
└── Comment: " This is a comment " (Node)
In this tree, each HTML element is represented as an element node. The text content within each element is represented as text node. Attributes of elements are represented as properties of their respective nodes.
Accessing DOM Elements
When working with JavaScript and the DOM, one main interest is to interact with the elements of the webpage. This involves accessing these elements, to modify, update, or manipulate them, as the case may be. There are several methods to achieve this, and each has its own strengths and use cases.
<!DOCTYPE html>
<html lang="en">
<head>
    <meta charset="UTF-8">
    <meta name="viewport" content="width=device-width, initial-scale=1.0">
    <title>Accessing DOM Elements</title>

</head>
<body>

    <h1>Accessing Elements in the DOM</h1>

    <h2>getElementById method</h2>
  <div id="demo">Get this element using it's ID</div>

  <h2>getElementsByClassName method(.demo)</h2>
  <div class="demo">Access me by class (1)</div>
  <div class="demo">Access me by class (2)</div>

  <h2>getElementsByTagName method</h2>
  <span>This is a span tag</span> <br>
  <span>This is a span tag</span> <br>
  <!-- <span>This is a span tag</span> <br> -->

  <h2>Query Selector</h2>
  <div id="demo-query">Access me by query</div>

  <h2>Query Selector All</h2>
  <div class="demo-query-all">Access me by query all (1)</div>
  <div class="demo-query-all">Access me by query all (2)</div>
</body>
<script src="main.js"></script>

</html>
Below shows how the above code snippet looks like when inspected on a browser. This will be used henceforth here, to illustrate all methods of accessing Dom Elements:

Accessing Elements by ID: An element's ID can be targeted or grabbed with the getElementById() method of the document object. This is done by writing document.getElementById(), and then passing in the unique ID as a parameter, in-between two quotation marks inside the bracket.

Accessing Elements by ClassName:Unlike in the above, here we can use the same class multiple times. This means, an ID can only be for one element node, while Class can be for more than one. Accessing elements by ClassName can be done by using the getElementsByClassName() method on the document object. That is, as, document. getElementsByClassName(), and then passing in the class name of the elements as a parameter, in-between two quotation marks inside the bracket. Thus:

The above is unlike in getElementById() method of accessing element, where at the end only the node of the targeted element was outputted. Here in getElementsByClassName() method, we get an array-like (but not an array) output on the console, showing that there are two nodes having that class name. This is an HTMLCollection, not an array.
To see these element’s contents, and because there are other div elements in the Html code, store getElementsByClassName(‘demo’), in a variable, say classDiv. Then access each same way an index array is accessed.

Accessing Elements by TagName: This is kind of similar to getElementsByClassName() method, in that an HTMLCollection is derived when we grab them. document.getElementsByTagName() method is used to grab a collection of elements that have the same tag. For example, all <h2> tags on the webpage can be grabbed using this method.
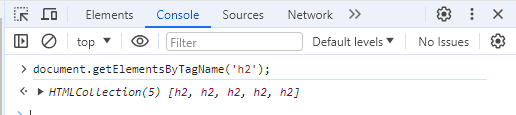
Again, as in getElementsByClassName() method, to access each content in this HTMCollection, showing there are five(5) h2 nodes in the Dom tree of the code above, it is done same way an index array is accessed

The querySelector(): The querySelector method is one of the most powerful and versatile method for selecting elements in the Document Object Model (DOM). It allows to select elements using CSS selectors, providing a flexible and concise way to target specific elements in a document. Its syntax is straightforward:
const element = document.querySelector(selector);
Where selector is a CSS selector string that specifies the elements to be selected, and element is the first element that matches the specified selector, or null if no matches are found.


While the outputs of each of the above queried Selectors are okay, we notice that in the case of selecting elements by their class logs out only one, instead of the two divs with the class name demo. The method, querySelector will always only output one of more than one content found in the selector used. That is, when the likes of tagname, classname, and other selectors that houses more than one node, or text node, are queried, only the first node found is displayed. For this reason, instead of the querySelector, querySelectorAll is preferred.
querySelectorAll():

Different from the case of getElementsByClassName() and getElementsByTagName() methods, where an HTMLCollection is outputted on the console when a group of element or content is targeted, with querySelectorAll() method, we get a NodeList, instead.
Now, with the above nodelist, we could select a particular div among the other div found within the selector used. Like others(targeting more than one node at the same time), each node is accessed same way an index array is accessed.

Traversing the DOM
To traverse is simply, to climb, descend, or visit all part of something. Traversing the DOM is a method for navigating the DOM tree. We could traverse from parent to child, vise-versa. The aim here is how to navigate from one node to another.
What is parentNode?: In the DOM, every element, attribute, and text node has a parent node, except for the root node (typically ). The parentNode property is a key feature that allows to move up the DOM hierarchy from a selected element to its parent node. It provides a reference to the parent node of a selected element. The example below explains this:
<!DOCTYPE html>
<html lang="en">
<head>
    <meta charset="UTF-8">
    <meta name="viewport" content="width=device-width, initial-scale=1.0">
    <title>Document</title>
</head>
<body>

    <body>
        <div id="parent">
            <p id="child">This is a child with ID, 'child', inside it's parent, having ID, 'parent'</p>
        </div>

</body>
</html>


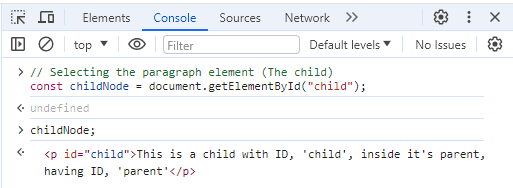
The paragraph element (The child node) can be selected, and the parentNode property can be used to access its parent. First step here is to select the paragraph element with the ID "child" using document.getElementById("child"), or any other method to access it. Then, its parent node can be accessed using the parentNode property. For this example, the result is stored in the variable - parentNode.

Parent nodes are often useful when removing, styling, or modifying elements. For example, the paragraph (child) inside the div (parent) can be removed, using removeChild() method, and passing in as parameter, the variable where the particular child to be removed is stored. Thus:

Notice now, that the parent node now is empty, with no child. The paragraph (child) can be added back to its parent node (div), using the appendChild():

There is another method that act same way as parent node, and returns exactly the same value. It is called, parentElement(). For example:

Now the div above, with ID parent acts as the parent, with three children, each with ID, child-1, child-2, and child-3, respectively. Just like parentNode() and childNode() above, both the parent and each child can be accessed.
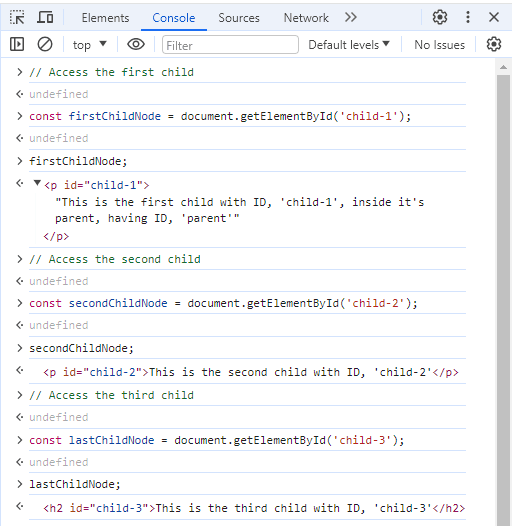
The above shows how each child can be accessed in the Dom tree. To access their parent, use any of the child. E.g. secondChildNode:

The parent before the above parent can be seen, by:

All of the above shows and explains how to traverse upward, especially from each child to their parent. We can as well go downward, from parent to children. The firstChild and lastChild property references the first and last child nodes of a parent.
To get the entire children (a collection of child nodes) of a parent, the childNode property is used. For example, the entire children of the parent node above can be gotten thus:
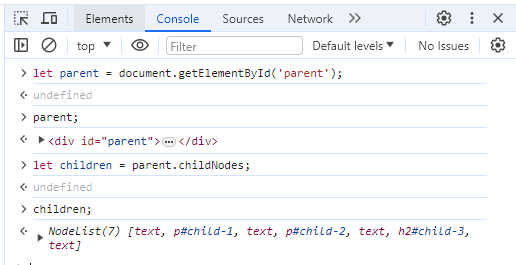
Because there is more than one child of this parent, it outputs a NodeList. Each child can be accessed same way elements in an index array are accessed, by using their respective index. Opening the NodeList reveals that the indexes to get each child seen before, are 1,3, and 5, and this displayed thus:

Another property that works to traverse downward from the parent node to give the children is, the children property.

Aside traversing downward, from parent to children, or upward from children to parent, the nextElementSibling and previousElementSibling properties makes it possible to traverse or move from sibling to sibling.

The firstSibling can be accessed again using the secondSibling. This can be achieved by using the previousElementSibling property, thus:

Manipulating DOM Content
Modifying Text Content
One important feature of Document Object Model (DOM) is its ability to modify text and Html contents. Two important properties help to achieve these:
- The textcontent
- The innerHtml property
<!DOCTYPE html>
<html lang="en">
<head>
    <meta charset="UTF-8">
    <meta name="viewport" content="width=device-width, initial-scale=1.0">
    <title>Document</title>
</head>
<body>

       <div id="parent">

        <p id="child">This is the paragraph</p>

       </div>

</body>

</html>
With the textContent we can output, change, or modify the text of the child node, having an ID ‘child’, in the above code. To do this, first grab and store the node in a variable. This is summarized in the example below:
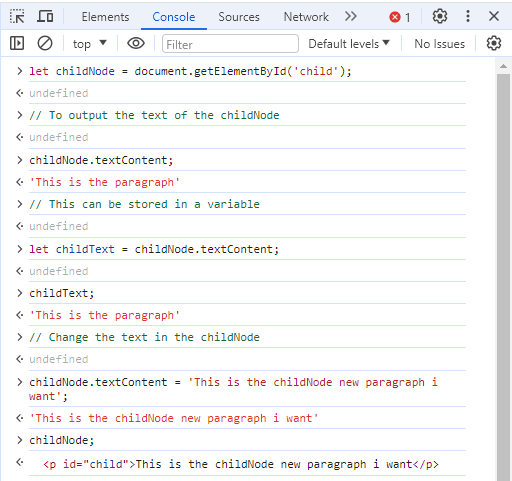
While the textContent handles adding new text, removing existing ones, and overall modifying the text on the Html document, the innerHtml helps to update the HTML. For example:
<!DOCTYPE html>
<html lang="en">
<head>
    <meta charset="UTF-8">
    <meta name="viewport" content="width=device-width, initial-scale=1.0">
    <title>Document</title>
</head>

<body>

    <p>This is a paragraph</p>

</body>

</html>
The above shows an Html code with a paragraph as its content in its body, which is displayed on the browser. Amongst others, with the innerText, it is possible change the already existing element and text node to something entirely different, directly with javascript.

Creating New Elements
The createElement() method, also part of the Document interface, allows to create new HTML elements dynamically using JavaScript. It takes the tag name of the element you want to create as a string argument.
const newElement = document.createElement('h2'); // Creates an <h2> element
newElement.textContent = "This is a dynamically created heading";

const parentElement = document.getElementById('parent');
parentElement.appendChild(newElement); // Append the new heading to the parent
This code will create an <h2> element with the text "This is a dynamically created heading" and add it as the last child of the element with the ID "parent" in your HTML document.
Events and Event Handling
Events are the signals that make web pages dynamic and engaging. These are actions or occurrences triggered by the user interacting with the page (clicking a button, submitting a form), or by the browser itself (loading a page, resizing the window). JavaScript allows us listen for these events and execute specific code in response. This mechanism, known as event handling, is important for creating interactive web experiences.
What is an Event Listener?
An event listener is a function that waits for a specific event to occur on a particular DOM element. When that event happens, the event listener function is executed, running the code that has been defined within it. For example, when you run the code below, and click the button, the clickButton function will be triggered, displaying the alert message " You just clicked this button ". This demonstrates how an event listener allows code to respond to user interaction with a button.
<!DOCTYPE html>
<html>
<body>

<button id="Button">Click here to continue!</button>

<script>
// Select the button element using its ID
const button = document.getElementById("Button");

// Define the function to be executed on click
function clickButton() {
  alert("You just clicked this button");
}

// Add the event listener to the button
button.addEventListener("click", clickButton);
</script>

</body>
</html>
Directly Modify the Style Property of Any Element
You can directly access the style property of a DOM element like any other property (e.g., element.style). This property acts like a CSS style declaration object. It allows to set individual style properties like color, backgroundColor, fontSize, etc., by assigning values directly (e.g., element.style.color = 'red'). For example, we can change the color of an <h2> element when a button is clicked:
// Accessing a paragraph element
Const pageHeading = document.getElementById('heading');

// Accessing a button element
const pageButton = document.getElementById('Button');

// Adding a click event listener to the button
pageButton.addEventListener('click', function() {
    // Change the color style of  pageHeading
    pageHeading.style.color = 'green';
});
The above code targets two elements from the HTML document: A paragraph element with the ID "heading" is stored in the pageHeading variable, and a button element with the ID "Button" is stored in the pageButton variable. It attaches a click event listener to the button element (pageButton). This means whenever the button is clicked, the code within the listener function will be executed. When the button is clicked, the code inside the listener function changes the color style of the paragraph element (pageHeading) to green. This is achieved by accessing the style property of the paragraph and setting the color property to "green".
Conclusion
The Document Object Model (DOM) serves as the bridge between web page's structure and its interactivity. It makes it possible to understand how HTML elements are translated into DOM nodes, making JavaScript’s ability to change the webpage live. This article has provided various ways of navigating and changing the DOM. It, in the end assists to understand how to select specific parts using selectors, traverse the DOM tree and change text value, attributes and even deleting them.

Top comments (1)
Wow. What an insightful and detailed article. Thank you so much for sharing this, Kingsley