
Some HTML
Why the Hell?

Wow, it's been awhile since I've actually written anything in Drupal based text editor. Feels like home.
Honestly, I'm not going to go into the "Why" of building this site. Maybe I'll do that later. Let's just say, there was an impetus to recreate the home we were forced to leave.
How the Blink?
Spinning Up a Server:
The first thing was deciding on a server. I didn't have much (um, any) experiencing in spinning up a server. But after a bit of reading, checking the bank account, and finding what would work for Drupal site, I chose Linode.
Definitely happy so far. Their business model seems to be no frills Linux servers which are fast to spin up--if you know what you are doing. Of course, I didn't. Still, they had a lot of fairly up to date walkthroughs.
Here are the walkthroughs I used (in order) to spin up this server:
This almost all the information needed to create this site's based. A couple of caveats:
sudo apt-get install php5 php-pear sudo apt-get install php5-mysql
Needs to be replaced with:
sudo apt-get install php php-pear sudo apt-get install php-mysql
This will install the latest version of PHP, for me, that was PHP7.
Also, the install directory is different for PHP7. This is important, since the php.ini file needs to be edited. In 7 it may be found:
/etc/php/7.0/cli
The last thing to do was relocate the Drupal 7 files to the directory where Apache can serve them up.
cd /var/www/html sudo wget https://ftp.drupal.org/files/projects/drupal-7.50.zip
If all the script-blogs are followed correctly, then when entering the web IP of the site in the browser you should see the following:

Design Goals:
Goals. It's good to have them. Thinking through what I'd like out of a new robot-home here are some of the concepts which seemed critical and important:
- An open place for anyone to express ideas, with minimum viable censorship.
- Responsive. Not just mobile friendly, but optimized for quick viewing of information.
- Shoutbox. Gots to have one.
- WYSIWYG and rich content editors:
- Iframes
- Image boxes
- Image storage system
- Code-highlighting including our favorite languages (and Ada for Mr. Bdk6)
- The primary features of our old home:
- Collect
- Chill-out Zone
- Forums
- Shoutbox, oh wait, already stated that.
- New features requested by members:
- Content rating
- Member points
- Wiki
- Anything we could dream of
Theme:
There are three layers to the theme:
- AdaptiveThemes was selected as the main
- Corolla over it
- FooTheme went over it.
In the /var/www/html/sites/all/themes/corolla/ directory there is a file called corolla.info inside a referenced was added for css/corolla_overrides.css.
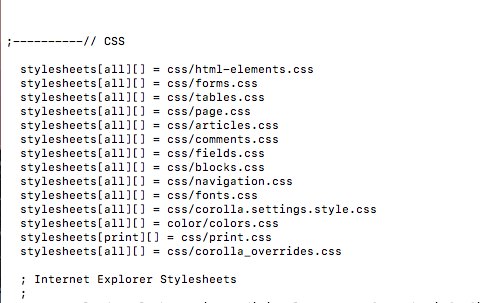
Then, in the /var/www/html/sites/all/themes/corolla/css directory the corolla_override.css file was made which includes several hackish css snippets:
    /* The title was originally set to -5px (weird) */
    #site-name a {
      letter-spacing: 0px;
    }

    .wrap-code {
      overflow-x: scroll;
    }

    /* These hide some uncessary shoutbox labels. */
    .shoutbox-interval-msg {
      visibility: hidden;
      display: none;
    }
    #edit-nick{
      visibility: hidden;
      display:none;
    }
Regarding the color scheme. The palettee can be edited in the Footheme "Color" section. This requires th Color (Drupal Core) module be enabled. The palettee was selected by using Pictaculous taking an image of Russian revolutionary art. This was meant to capture the feeling palette selected by an artist with a better understanding of color-emotion connections.

Fonts
Logo selection
Modules:
"Admin Tools is an addon module for the Admin module, which provides a sidebar navigation for selected roles. The Admin Tools module adds functionality and quick access for clearing caches, running cron and updates much like Admin Menu."
I hate cache errors. Mother-blinking cache!
Admin tools sped up development a lot. It basically simplifies the admin menu so 4th level items are exposed to one click.
Blog (core)
Allows the Drupal site act like a good old blog--for us, this allows multi-authoring content and management.
Block (core)
Allows a block design of the UI.
This is a dependency for other modules (a lot of others).

The CKEditor is the core of the Drupal blogging package. It is the editor used to create this post. However, it put up the most fight when trying to install. Actually, that's not fair. It wasn't the CKEditor it was the code highlighting which was such a pain. The code highlighting allows this:
    for(int i = 0; i < marioTouchesRobots; i++){
        aHackerSpiritDies();
    }
I'm going to list out the steps used to setup the CKEditor used for this article, but then discuss some of the pitfalls, which ended up costing a lot of development time.
Steps to Setup CKEditor with CodeSnippets and HighlightingJS:
- Download the CKEditor - WYSIWYG HTML editor module.
- Enable the CKEditor module.
- Go to Configuration-->CKEditor-->Edit CKEditor Global Profile
- Set the "Path to CKEditor" to //cdn.ckeditor.com/4.5.4/full-all. This will use the content delivery network to serve up the CKEditor JavaScript. It also lets you access a lot of plugins without having to manage them. The other option is to pull a copy on the local server--it's a lot more hassle managing.
- Go to Configuration-->CKEditor-->Profile X-->Edit (note, X = Text Editing profiles users will be able to select when blogging. These can be managed under content Content Authoring --> Text Formats).
- Go to Basic Setup. Here, add all the Text Formats this particular CKEditor profile should affect.

- Under Security make sure "Always run security filters for CKEditor" is Enabled (should default).
- Under Editor Appearance go straight to the check-box title "Plugin for inserting Code Snippets" and enable it.
- Also, enable what other CKEditor Plugins needed. Note, there are more plugins then this, but these are the ones provided through the Content Delivery Network.
- Scroll to the end and hit Save. Now, go back to Configuration-->CKEditor-->Profile X-->Edit. Go straight to Editor Appearance. There should be a new button available
- Add the Code Snippet button to the "Current Toolbar"
- This should enable the CKEditor and provide the Code Snippet button.
- Download the highlight js Drupal module. This should be installed in the modules directory
- Navigate to var/www/html/sites/all/libraries folder and make a directory called 'highlightjs', switch to it.
- The highlight js module is dependent on the actual highlightjs css libaries though. Download a package in the /var/www/html/sites/all/libraries/highlightjs folder.
- Unzip highlightjs here.
- Issue the command 'sudo mv higlight.pack.js highlightjs'. This is required or the highlight module can't find the libraries.
- And the command 'sudo chmod 666 highlightjs'.
- Go to the modules dashboard and enable Highlight JS Syntax. DO NOT enable Highlight JS Filtetr.
- Open the modules /var/www/html/sites/all/modules/ckeditor$
- Type sudo nano ckeditor.config.js
- Add each HighlightJS language you would like to show in the dropdown box in the CKEditor. The part on the left of the colon is should match the HighlighJS language code. The part between the ' 's will be what is displayed in the CKEditor dropdown. When adding supported languages, here's a good reference -- Supported HighlightJS languages (but it doesn't include custom languages, like Arduino). Don't forget to save when done.
        config.codeSnippet_languages = {
            php: 'PHP',
            python: 'Python',
            arduino: 'Arduino',
            c: 'C'
        };
-
 There is an issue with the HighlightJS module where the text escapes the divs. It took a long time to find the culprit. Apparently, the HighlightJS modules causes this whenever it renders HTML produced by CKEditor.
 - Go to /var/www/html/sites/all/modules/highlightjs
- Type sudo nano highlight_js.css
- Enter the following style and save:
    .field-items {
        width: 100%;
    }
And that should be it. A couple words of warning. Make sure you don't enable the HighlightJS Filter. This will essentially double encode the HTML entities inside the block. This causes >, <, and & to show as ">, <, &" respectively. This simple little issue took a lot of development time to solve--given the manual was lacking.
Color
Comment
Contextual Links
Dashboard
Database Logging
Entity API
Field
Field SQL Storage
Field UI
File
Filter
Five Star
Forum
Help
Highlighter JS Filter
Highlighter JS Syntax Highlighter
Image
IMCE
Libraries
List
Menu
Module Filter
Node (core)
Number
Options
Overlay
Path
Poll
RDF
Search
Shoutbox
Shoutbox Patch
Statistics
Statistics Counter
SysLog
System (core)
Taxnomy
Text (core)
Update Manager
User
Userpoints
Userpoints Service
Views
Views Content Panes
Views UI
Voting API

Top comments (0)