
As we move into 2024, the ideology behind faster development times has never been more critical. But, when building a Node.js Express app, that hasn't always been the case. In my experience, it usually takes a long time to bootstrap an Express API. This includes:
- Creating a boilerplate NPM project using
npm init. - Installing the required libraries - Express, Nodemon, Body Parser, and TypeScript to configure your Express Server
- Setting up ESLint and creating the perfect ruleset for the project
- Setting up Module Federation - If you want to share code between your Node.js and Express.js microservices.
This means you're spending more time on things that aren't adding value to your software. You'd be better off building a feature, but instead, you're configuring a linter or a build command.
How Can We Build Faster Express Apps?
The short answer is to treat your service as a component
It would help if you had a toolkit that lets you build your Express.js API as components where each component is designed, built, tested, and versioned in its isolated environment without you doing any configuration. Doing so allows you to start by building features without focusing on any operational needs.
To do this, you'd need to break your app down into two areas:
- The actual app
- The services
Your app and service could be treated as two components, where your service component holds the feature, while the app component provides a runtime to execute your service. By creating an independence of this nature, you can improve your development cycle time by testing your services without spinning up the app.
And one such tool that I've found that supports this component-driven approach is Bit.
Figure: Bit.dev
Bit is a next-generation build system for developing composable software. It let's you build your components in an isolated environment and uses services like Ripple CI to propagate changes up your component tree. For example, consider the diagram depicted below:
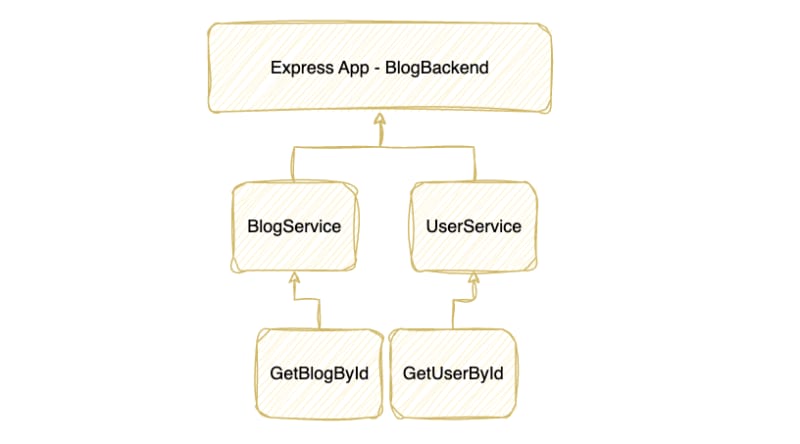
Figure: A sample component-driven API
Let's say that everything we've defined above is a component. And let's say that you change the logic on GetBlogById to return an error if Blog is not found.
If you make this change, it should automatically reflect the change in your BlogBackend route, right?
Well, this is what Bit does. It keeps track of the dependencies that your component uses, and if it detects a change, it propagates it up the tree, creating a Ripple effect, thus deploying the entire tree again to ensure that you're running on the latest change.
Sounds interesting. This is how I build my apps daily, and I thought I'd share my experience with it.
Building an Express.js App with Bit
Step 01: Pre-requisites
To build an Express.js app in under 5 minutes, you’ll need to install the Bit CLI using the command:
npx @teambit/bvm install
Next, you’ll need to verify that the CLI has been installed successfully by running the command:
bit --version
If you’ve installed Bit correctly, you should see the screenshot below.
![]()
Figure: Installing Bit Correctly
Next, you'll need to create an account on Bit Cloud. After you've created your account, go ahead and create a scope with the name blog:
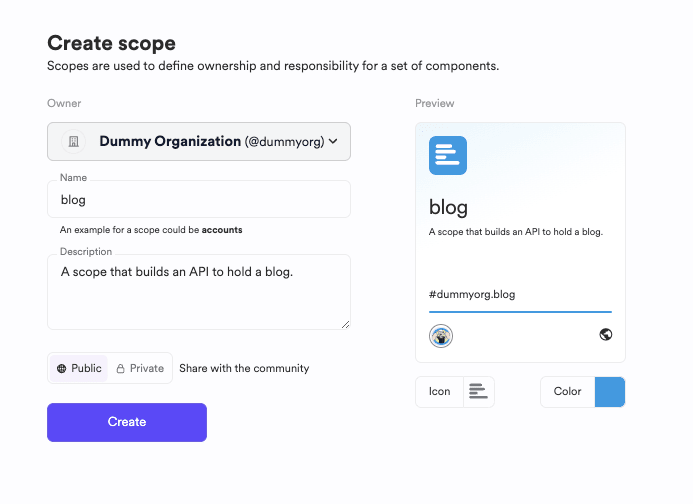
Figure: Creating a scope on Bit Cloud
A Scope is a remote server in which your components live. Think of it like a GitHub repository, but it's not language-oriented. You can store anything in a scope and let people contribute to it.
Step 02: Creating the Express.js App
Next, in a new directory, initialize a Bit workspace using the command:
bit init
By doing so, you'll create a space for local development. You'll see a file - workspace.jsonc. Open that file and update the defaultScope parameter with the following - <<YOUR-USERNAME>>.<<SCOPE-NAME>>. After you do so, it should look like the snippet I've attached below:
"defaultScope": "dummyorg.blog",
Replace this with your username, and scope we created in Step 01.
Notice that your workspace isn't tied to a programming runtime. So, you can create an Express API and immediately create a React/ Angular/ React Native/ Vue.js component to consume the API as well.
Next, let's create an Express App. This can be done in one command:
bit create express-app blog-api && bit install --add-missing-deps
If you've done this correctly, you'll see the output:

Figure: Creating the Express.js app
Next, you'll see a directory as below:
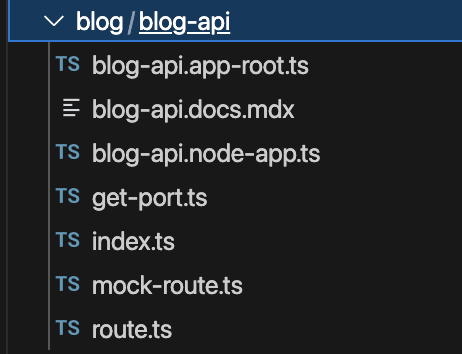 Figure: Exploring the project directory
Go ahead and open up your app root - blog-api.app-root.ts. You'll see the following code:
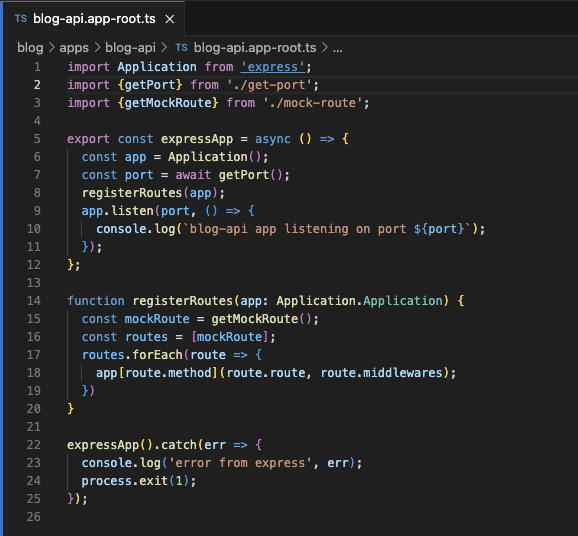
Figure: The code generated in the app root
The code above is enough to launch your app as a bare Express server. It initializes an app, registers routers, and then listens to a port that's resolved in the getPort function. To start this Express App, let's run the following commands:
bit use blog-api && bit run blog-api
After you've done so, your Express.js app should spin up:

Figure: Spinning up the Express App
Next, you can open the sample endpoint - localhost:3000/. This should launch your Express app and show the output:

Figure: The sample app
Okay, but, this doesn't truly speak about component-driven development. To see this in action, run bit start. You should see a development server spin up:

Figure: Viewing the Workspace
You can click on the blog-api and view it as its component:

Figure: Viewing the Express App component
Step 03: Adding Routes to the API
Next, let's add routes to our API. Let's do this by creating two new components:
- GetBlogs
- GetBlogById
But first, it's important to note that both of our Routes will use the same Entity - "Blog", and will have a single data source. So, let's first set up a Blog entity and a mock data set.
To do so, let's create the entity component first using the command:
bit create node entities/blog
You should see the output shown below:

Figure: Creating the Blog Entity Component
Next, let's define the entity component by adding the following code to the blog.ts file:
/**
 * An entity class that represents a Blog
 */
export class Blog {
  /**
   * the id of the blog post
   */
  private _id: string

  /**
   * the title of the blog
   */
  private _title: string

  /**
   * the plot of the blog (summarized version of the content)
   */
  private _plot: string

  /**
   * the day the blog was published - in milliseconds
   */
  private _publishedDate: number

  constructor(id: string, title: string, plot: string, publishedDate: number) {
    this._id = id;
    this._title = title;
    this._plot = plot;
    this._publishedDate = publishedDate;
  }

  getId() {
    return this._id;
  }

  getTitle() {
    return this._title;
  }

  getPlot() {
    return this._plot;
  }

  getPublishedDate() {
    return this._publishedDate;
  }
}
Now that we have an entity component, we can share this across all other components we create. This includes the sample data along with the other API Route components.
So, next, let's create the Sample Data component using the command:
bit create node mocks/sample-data
Next, open the file sample-data.ts and include the code:
import { Blog } from '@dummyorg/blog.entities.blog';

const data: Blog[] = [
  new Blog("001", "Sample Title 01", "Sample Plot 01", Date.now()),
  new Blog("002", "Sample Title 02", "Sample Plot 02", Date.now()),
  new Blog("003", "Sample Title 03", "Sample Plot 03", Date.now()),
  new Blog("004", "Sample Title 04", "Sample Plot 04", Date.now()),
  new Blog("005", "Sample Title 05", "Sample Plot 05", Date.now()),
]

export function sampleData(): Blog[] {
  return data;
}
As you can see, we're using the entity component that we created before.
The cool thing about this is that it will automatically check and update all of its usage whenever we change the entity component.
So, if we introduce a new field in the constructor for the Blog, the sample-data will fail its build in the Ripple CI as the component cannot handle the new change introduced into the Blog entity.
Next, if we head back to the development server and open the sample-data component, you should be able to see the component in action:

Figure: The Sample Data Component
Next, let's set up the two routes using the command:
bit create node routes/get-blogs routes/get-blog-by-id
This will create two Node components that will act as the two routes in our Express.js API:

Figure: Creating the Components
Next, you can define the implementations in the components as shown below:
// get-blogs.ts

import { Request, Response } from 'express';
import { sampleData } from "@dummyorg/blog.mocks.sample-data";

const blogs = sampleData();

export function getBlogs() {
  return blogs;
}

export function getBlogsRoute() {
  return {
    method: 'get',
    route: '/blogs',
    middlewares: [
      async (req: Request, res: Response) => {
        const results = await getBlogs();
        return res.json(results);
      },
    ],
  };
}


// get-blog-by-id.ts

import { Request, Response } from 'express';
import { sampleData } from "@dummyorg/blog.mocks.sample-data";

const blogs = sampleData();

export function getBlogById(id: string) {
  const blogById = blogs.find((blog) => blog.getId() === id);
  if (!blogById) {
    throw new Error('Blog not found')
  }
  return blogById;
}

export function getBlogByIdRoute() {
  return {
    method: 'get',
    route: '/blogs/:id',
    middlewares: [
      async (req: Request, res: Response) => {
        const { params } = req
        const results = await getBlogById(params.id);
        return res.json(results);
      },
    ],
  };
}
As you can see, we've not only implemented the business logic, but we've also exported two new "route" functions. These route functions create a middleware for each route and execute the business logic. We will leverage these middleware route functions in our API server to hook the routes to the app.
Next, head over to your development server to view the two components:
 Figure: Get Blogs Component
 Figure: Get Blog By ID Component
Step 04: Integrating the Routes to the API
Now that we've built our API routes let's hook the routes to the API. To do so, head back to your API Component and open the api-root file, and update the registerRoutes function with the code shown below:
import { getBlogByIdRoute } from '@dummyorg/blog.routes.get-blog-by-id';
import { getBlogsRoute } from '@dummyorg/blog.routes.get-blogs';

function registerRoutes(app: Application.Application) {
  const mockRoute = getMockRoute();
  // introduce new routes
  const routes = [mockRoute, getBlogByIdRoute(), getBlogsRoute()];
  routes.forEach(route => {
    app[route.method](route.route, route.middlewares);
  })
}
Next, all you have to do is launch the app by running the command:
bit run blog-api
Next, hit each endpoint to see the response:
- Route - localhost:3000/blogs

- Route - localhost:3000/blogs/001

And, there we have it! Our API is up and running, and it didn't even take 5 minutes!
Step 05: Sharing the API
Next, let's share the API for everyone to view and contribute using the command:
bit tag && bit export
This will automatically ship the components to the scope we created earlier and will kick off a Ripple Build.
 Figure: The Ripple Build
As you can see, Ripple CI knows the entire component tree and how each component is used.
Step 06: Automated Builds with Ripple CI
Ripple CI not only builds your components but also tracks differences in the tree in which your component is being used and builds the tree to support the changes.
For example, let's update the get-blogs.ts route to return the following:
export function getBlogsRoute() {
  return {
    method: 'get',
    route: '/blogs',
    middlewares: [
      async (req: Request, res: Response) => {
        const results = await getBlogs();
        return res.json({ results }); // Return JSON now.
      },
    ],
  };
}
We've update the res.json line to return a JSON object of results. Let's sync this change to the cloud using the command:
bit tag && bit export
Next, head over to Ripple CI to see the build:
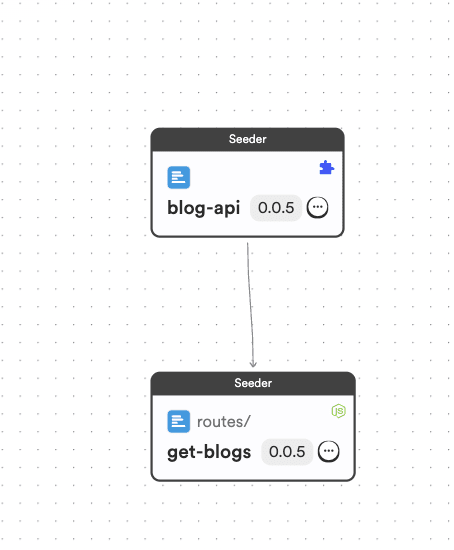
Figure: Ripple Build for Diff
As you can see, Ripple identified that get-blogs had changed, and as a result, it built the application as well. This ensures that our app is always up to date.
Furthermore, you can extend the deployment to ship your app off to servers for hosting automatically!
Wrapping up
Well, that was interesting. It's not every day that we build Express apps in under 5 minutes!
If you like what you see, check out the full implementation, which includes unit-testing and component composition development - all in my Bit Cloud Scope.
I hope you found this article helpful.
Thank you for reading.
Learn More

How To Update Multiple NPM Packages Effectively? | Lakindu Hewawasam | Bits and Pieces | Bits and Pieces
Use Bit to ensure that your NPM packages are always up-to-date
 blog.bitsrc.io

Top comments (0)