
We all like a pinch of animation in everything, don't we?
Curious by the word Hero in Flutter, I decided to check it out and implement a very basic, yet satisfying app that would just zoom a pic when clicked.

For Hero, there is no need for getting a separate dependency.
Get to the point!
Assuming you are familiar with Flutter, let's get started!
Create a new Flutter project
Feel free to name it anything you feel is right, I named it hero_animation. Open the main.dart file in the demo app Flutter provides and clear the body in the build method looks like this:
class _MyHomePageState extends State<MyHomePage> {
  @override
  Widget build(BuildContext context) {
    return Scaffold(
      appBar: AppBar(
        title: Text(widget.title),
      ),
      body: Column(children: <Widget>[]));
  }
}
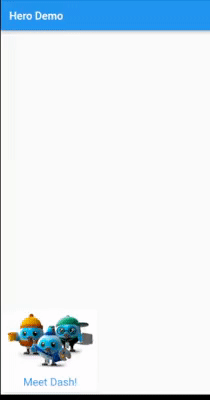
For visualising the Hero animation in a better way, I decided to put the image that I plan to animate at the bottom left of the screen using the MainAxisAlignment.end property of the column widget.
Before adding the hero effect, I would suggest you build the basic look of your app which is just an image and a text inside a card here.
I also noticed that the effect was so visually appealing when I used a transparent image.
I downloaded a transparent image as dashatars.png to the assets folder that I made in the root directory of my app. Don't forget to add the image in pubspec.yaml.
flutter:
  assets:
    - assets/
Making the card widget
Since my card had an image and text, I used a column widget as its child. I also added necessary paddings to make it look better than the default style.
Card(
  child: Column(
    children: [
      Padding(
        padding: const EdgeInsets.all(8.0),
          child: Image.asset(
            "assets/dashatars.png",
            height: 100,
          ),
        ),
       const Padding(
         padding: EdgeInsets.all(8.0),
           child: Text(
             "Meet Dash!",
             style: TextStyle(color: Colors.blue, fontSize: 20),
           ))]))
You can also use Image.network(url) instead of Image.asset(path).
Following my steps would have given you this screen 👇

This image is not clickable now, let's wrap the card with a GestureDetector and make it take us to the next page on tapping the card.
The wrapping can be easily done by 'Wrap widget with...' option in Ctrl + . in Visual Studio Code, or by clicking the small yellow bulb that pops up in the left.
GestureDetector(
  child: Card(...),
  onTap: () {
    Navigator.push(
      context,
      PageRouteBuilder(
        transitionDuration: const Duration(milliseconds: 2000),
          pageBuilder: (_, __, ___) => const SecondPage()));
  },
 )
The card should recieve clicks now.
Even though a MaterialPageRoute can be used easily, I chose PageRouteBuilder because it had the transitionDuration property which gave a nicer and more visible animation.
At this point, you would get an error stating SecondPage() does not exist. Let's fix that!
Make the second page
Inside the lib/ directory, create a new file, second_pg.dart. Make a stateless widget SecondPage.
Typing
stlessin VSCode would create all the boilerplate code and you will just have to type in the class name.
Now, this is where we would show the bigger image of Dash and write a short description.
Remove the container, and make it a Scaffold with a default AppBar and a body.
The body would have a Column wrapped in a Center widget with two children - the Dash image and the description.
I set the height of the image to 300 so that the growth of the image is clear. For the text description, I used an Expanded widget so that it looks good.
For the code to not be congested with the description, before the return statement of the build method, create a field const description = "This is Dash, a chubby hummingbird, the mascot of Flutter and Dart.\n\nDash was originally a Dart mascot, not a Flutter mascot.\n\nEarly on, a hummingbird image was used to represent Dart. The hummingbird represents that Dart is a speedy language.\n\nMega-Dash, a life-sized mascot is currently resting in a locked-down Google office."
body: Center(
        child: Column(
          children: [
            Image.asset(
                "assets/dashatars.png",
                height: 300,
              ),
            Expanded(
              child: Container(
                decoration: BoxDecoration(
                  color: Colors.blue.shade100,
                  borderRadius: const BorderRadius.only(
                      topRight: Radius.circular(30),
                      topLeft: Radius.circular(30))),
                child: Text(description,
                    style: TextStyle(fontSize: 16),
     ),),)],),)

Running the app should look like this. The screen just changes without any animation.
Now that the basic UI is done, let's make the image a hero
Make Dash fly like a Hero
Head to main.dart, wrap the GestureDetector with a Hero() widget. This will tell you that a parameter tag is required. Set the tag as "dash". This tag helps Flutter recognise a Hero in both pages so that the animation can be done.
The code now looks like this:
body: Column(
        mainAxisAlignment: MainAxisAlignment.end,
        children: <Widget>[
          Hero(
            tag: "dash",
            child: GestureDetector(...))])
Now, head to second_pg.dart and tell Flutter that the small image in the first screen should be grown to the image shown in second screen. Use the same tag "dash" here too.
 Center(
   child: Column(
     children: [
       Hero(
         tag: "dash",
         child: Image.asset(
           "assets/dashatars.png",
           height: 300,
          ),
        ),]))
Now run the app, you can see the small image gracefully growing when the screen changes. 🦸♀️
Making something fly in or out of the screen is far better than the default boring page transition. Advanced forms of Hero animations takes page transition to the next level and it gives a zest to the app with minimal effort.

Top comments (0)