
Introduction
Azure Linux Virtual Machines (VMs) are a part of Microsoft Azure's cloud computing platform that allows users to deploy and manage Linux-based virtual machines in the Azure cloud environment. These VMs provide flexibility, scalability, and various options for running different Linux distributions, applications, and workloads.
Procedure to create Azure Virtual Machine
Step 1: Sign in to Azure Portal
Visit the Azure Portal https://portal.azure.com and sign in using your Azure account credentials.
Azure has two means of achieving:
- Pay-As-You-Go subscription.
- Free subscription.
For the sake of learning, it is advisable to choose Free subscription.
Step 2: Search for Linux Virtual Machine on Web Browser
On the Azure web browser, search for Virtual Machine

Click on Create and Select Azure Window Machine

3. Create a virtual machine
To create the machine, we are going to work on the following Tabs:
Basics, Disks, Networking, Management, Monitoring, Advanced, Tags, Review + create
- Project details: This contains the Subscription and Resource group. The subscription should be left on default and the Resource group should be created otherwise, the existing one can be selected. In this case, the existing NovemberWorkload is selected.

- Instance details: The selected options are shown on the picture below


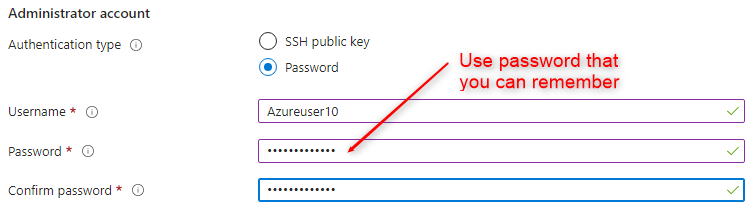
- Administrator account: On the Authentication type, Password is selected. This will enable you to create the user ID and password for the virtual machine.
- Inbound port rules: On Public inbound ports, click on Allow selected ports On the Select inbound ports, open ports HTTP(80) and SSH(22).

Note:
Port 22 (SSH - Secure Shell):
SSH is a standard protocol used for secure remote access to a server. It provides encrypted communication sessions over an unsecured network and allows users to log in to the VM remotely.
Opening port 22 allows administrators or users to securely connect to the Linux VM using SSH to perform various tasks like configuration, management, software installation, and more.Port 80 (HTTP - Hypertext Transfer Protocol):
Port 80 is the default port for unencrypted web traffic using HTTP. It is used to serve web content such as websites, web applications, or APIs.
By default, Azure might open port 80 to enable users to deploy web applications or host websites on the Linux VM.
4. Monitoring
Data, Networking and Management is left on default for now. However, on the Monitoring Tab, Booth Diagnostics is Disable. This is to make the activities seen only within the enterprise and not to the public domain.

5. Review and Create
The Advanced and Tags tabs are left on default. The activities is review for correction and it is created on the Review + Create tab. Note, it must shown Validation passed to move on


6. Deployment
Here you need to allow the deployment to be completed.

It is now completed:

Next is to click on Go to Resources
7. Creation of Virtual Machine and Connection


Now, click on Native SSH


You should allow this to show Configured
8. Open powershell on your computer and type in this command

Click on Run as Administrator

ssh username@Ipaddress

9. You need to be in root to continue or do anything on Linux.
Type in the command
sudo su


Type “Y” to continue.

Installation is now complete

Open your web browser, paste the ip address you copied into the browser and press the enter key to connect to the web server.


Hurray, now we have access to the web server


Top comments (0)