
Photo by Evgeniy Surzhan on Unsplash
As a continuation to the last post, in this post we further discuss on the topic of managing multiple cloud environments (in AWS) using IaC (Terraform). Specifically, using the workspace feature of Terraform. Also, as described in this post, here, our focus will strictly be on the backend components of the architecture, and not the backend components supporting frontend.
Thanks for reading Let's Do Tech! Subscribe for free to receive new posts and support my work.
What is not discussed here?
Every sub-prod and prod environments have varied scaling requirements. When using Terraform, various strategies are employed to achieve the same. Most common strategy is to use separate tfvar files.
This specific aspect is not part of this post, and requires a separate discussion. It would also be heavily influenced by the choice of CI/CD tool being used to automate cloud architecture deployment.
Terraform config and states
Terraform is a cloud-agnostic IaC tool of our choice to manage our cloud resources in AWS. If you are unaware of it, I would highly recommend going through the booklet titled “Terraform Tutorial - Basics“, which was written in collaboration with Spacelift. This free resource will help you get started with Terraform within a day.
So those who know how Terraform works, one question which is always asked is - how to effectively manage the state files. State files are the most critical piece of information which holds the information of resources deployed in real world, and their corresponding resource blocks defined in Terraform config. Every operation in Terraform depends on the state file.
TF config for replication and redeployment
Orgs and teams may have their reasons to create a separate config per environments. But then it doesn’t make sense. One of the core feature/purpose of using IaC is to be able to replicate the cloud architecture multiple times without human error.
Thus, even for us we would like to use the same configuration to replicate as well as redeploy the massive serverless infrastructure consistently and in an automated way.
We also want to be able to somehow tie the appropriate IAM role implicitly, so that changes are targeted in the correct AWS account.
This is where we leverage Terraform workspaces. Terraform workspaces are similar to how Git branches, but they are very different. With the help of workspaces it is possible to deploy same TF config multiple times. Workspaces inherently treat the deployments separate.
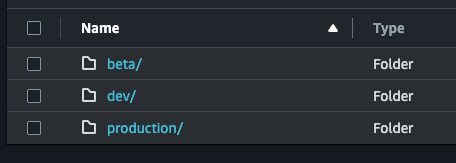
Every workspace is associated with a separate state file. Every time a new workspace is created or deleted, the corresponding state files are created and deleted. Name of the default workspace is “default” - unless we explicitly create and use a new workspace, all the changes belong to default workspace. If you are using S3 backend to store the state files, and create workspaces named “dev”, “beta”, and “production“, then corresponding subdirectories will be created in the S3 bucket as shown below.
[

Note that these sub directories are included in “env” parent directory. The default state is maintained along side the “env” directory, thus it is not seen here.
Mapping workspaces with IAM roles
One of the advantages of using workspace is that Terraform makes the name of the selected workspace available as an (interpolation) variable to be used in configurations. This means we can dynamically access the name of the workspace using “terraform.workspace” in our configuration.
This makes it easy to leverage this value dynamically and target our deployments. One may think that this would require us to set the workspace attribute in each resource. This is indeed cumbersome in large projects.
Instead, as discussed in this post, we will only use the interpolation variable to select appropriate role, and thus apply changes to the correct target AWS account.
To achieve this, we first declare an input variable in our Terraform configuration as shown below.
variable "workspace_iam_roles" {
  default = {
    dev = "arn:aws:iam::<AWS_Account_No>:role/OrganizationAccountAccessRole"
    beta = "arn:aws:iam::<AWS_Account_No>:role/OrganizationAccountAccessRole"
    production = "arn:aws:iam::<AWS_Account_No>:role/OrganizationAccountAccessRole"
  }
}
It is a map of strings, which holds the role ARNs for each target environments, a.k.a. AWS Accounts.
Next, we set the provider configuration to assume the role based on the selected Terraform workspace. The code below does the same by using the workspace interpolation variable.
provider "aws" {
  region = "ap-south-1"
  assume_role {
    role_arn = var.workspace_iam_roles[terraform.workspace]
  }
}
Now, when we select the “dev” workspace - the dev AWS Account role ARN will be picked, and all the changes will be applied to the same. Selecting different workspace would apply changes to the corresponding environment.
IMPORTANT
It should be noted that all of this discussion is heavily based on setting appropriate developer accessas found in the previous post.
I hope this was helpful to know.
Sumeet N.
Thanks for reading Let's Do Tech! Subscribe for free to receive new posts and support my work.

Top comments (0)