
Written by Chak Shun Yu✏️
In the world of software development, we’re bound to encounter certain repetitive, manual, and boring tasks. No developer likes to do them, but in the end, they need to happen. Think of maintenance tasks like making backups, sending out emails at certain intervals, triggering Slack notifications, updating databases, web scraping, creating time-based reports of data, integrating with third-party APIs — so much more.
This is where so-called cron jobs come in. Cron jobs are a way of scheduling specific code to run on a recurring frequency or at specific moments in time. It’s great for automating repetitive tasks that must be done on a particular schedule, like the list we just mentioned.
As of February 2023, cron jobs are also available for your Next.js project. In this article, we’ll explore how to configure cron jobs, dive into the setup process for adding them to your Next.js project, and cover how to use them in your Vercel deployment.
To help you get started even faster, we’ll provide additional pointers for configurations beyond the initial setup. Lastly, we’ll consider the current and known limitations of this feature that is still under development.
Jump ahead:
How to configure Vercel cron jobs
To configure the frequency and timing of a cron job, you have to use a specific syntax called cron expressions. A cron expression consists of five values, representing different time-related intervals. These range from minutes, hours, day of the month, the month, to the day of the week:
# Cron expression syntax
# ┌───────────── minute (0 - 59)
# │ ┌───────────── hour (0 - 23)
# │ │ ┌───────────── day of the month (1 - 31)
# │ │ │ ┌───────────── month (1 - 12)
# │ │ │ │ ┌───────────── day of the week (0 - 6) (0 is Sunday, 6 is Saturday)
# │ │ │ │ │
# │ │ │ │ │
# │ │ │ │ │
# * * * * *
You can configure each interval using a number from a specific range of values; this value will lock that interval to a certain schedule. Besides that, a wildcard (*) can also be used to make a cron job run at a certain frequency of that interval.
As an example, a usual cron expression would look something like:
42 10 * * 1
The first two numerical values result in the cron job triggering at 10:42 a.m. UTC. The following two wildcards mean that it should happen every day of the month and every month — so, basically every day of the year. Lastly, the final value locks it to only a certain day of the week, which in the case of 1 is Monday. So, ultimately, this cron job will trigger every Monday at 10:42 a.m.
It’s also possible to use something called step values using /, which configures the interval to recur on a specific frequency. Combining that into a more complex cron expression would look something like this:
42 10 */2 */3 *
It’s similar to the previous cron expression, but the main difference is that it now runs every two days of the month and every three months. Altogether, it will trigger at 10:42 a.m. every other day of every third month.
Creating cron jobs in Vercel
To get started with cron jobs in Vercel, there are essentially only two things you need:
- Either a Serverless or Edge Function in your Vercel project: This code will run every time we trigger a cron job. For more information about these functions, their differences, and how to implement them, please refer to the appropriate documentation
- A
vercel.jsonfile, if you don’t have one in your project yet. In general, this is where you can configure the Vercel-related behavior of your project, and includes anything related to cron jobs
In the vercel.json file, you’ll have to add a crons field, which accepts an array of cron job configuration objects. Every config object contains exactly two fields, path and schedule.
The first field is the path towards the function that we want to execute. This path always has to start with a /. The second field is the cron expression telling when and how often the cron job should be triggered:
// vercel.json
{
  "crons": [
    {
      "path": "/api/cron",
      "schedule": "0 5 * * *"
    }
  ]
}
This vercel.json file serves as your main point of configuration for everything related to cron jobs.
If you want to add a cron job, you’ll have to create a new entry in the array. If you want to update an existing one, you’ll have to change the cron expression or the function itself. To delete one, you need to remove its entry or the respective function. Then, everything will take effect after you redeploy the project once again.
Vercel cron jobs dashboard
Lastly, it’s also important to know about the cron jobs dashboard. You can find it on the settings page of your Vercel project, under the tab called Cron Jobs.
In this dashboard, you can disable and enable cron jobs as a whole across your project. If you enable cron jobs, you’ll be able to see all the cron jobs that you have configured on this dashboard.
There, you can do several things like check their configurations, trigger jobs manually, or review the logs of past executions in case it failed unexpectedly: 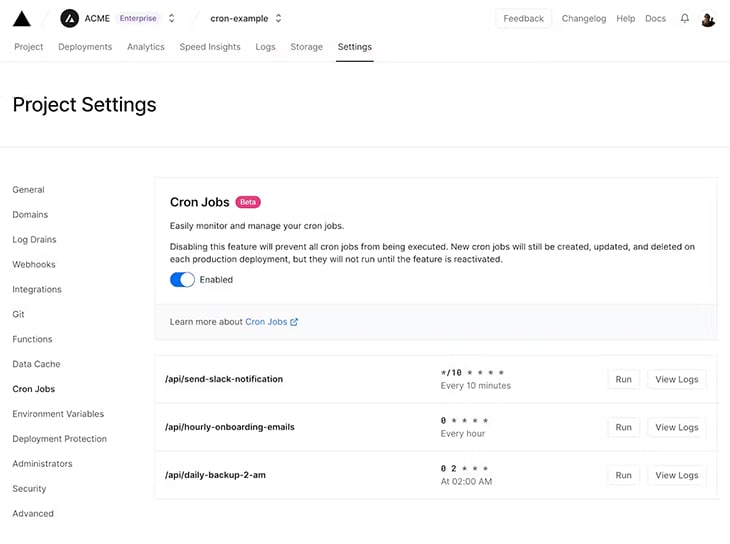
Additional pointers
As we can see, getting started with cron jobs in Next.js or other Vercel frameworks is relatively straightforward and easy. If you already have Serverless or Edge Functions set up in your project, it integrates even more seamlessly.
Beyond that, there are a few more things you should know to help you beyond the initial setup.
Securing Vercel cron jobs
In certain scenarios, it’s necessary to secure your cron jobs, i.e., prevent public usage.
Fortunately, Vercel provides an out-of-the-box solution for doing so through the special CRON_SECRET environment variable. To make use of it, you’ll need to add it to your Vercel project. You can find it under the Environment Variables sections of your Vercel project settings.
After adding it, the environment variable will be automatically included in the Authorization header of your cron job request together with a Bearer prefix. Your function code can then access it, compare it to the environment variable key, and proceed accordingly:
import type { VercelRequest, VercelResponse } from '@vercel/node';

export default function handler(
  request: VercelRequest,
  response: VercelResponse,
) {
  const authHeader = request.headers.get('authorization');
  if (authorization !== `Bearer ${process.env.CRON_SECRET}`) {
    return response.json(
      { success: false },
      {
        status: 401,
      },
    );
  }

  return response.json({ success: true });
}
Please note that at the time of writing this article, the way in which cron jobs can be secured in Vercel has changed at least once: it started out with including a key in the cron job path as a query parameter, to the setup that we have described above.
While the current approach — using CRON_SECRET — seems relatively stable, this particular aspect might be subject to change.
Creating dynamic routes for cron jobs
It’s also possible to create cron jobs for dynamic routes by including the dynamic part in the cron job’s path:
{
  "crons": [
    {
      "path": "/api/dynamic-cron-job/87DS8AD",
      "schedule": "0 5 * * *"
    },
    {
      "path": "/api/dynamic-cron-job/324JKHF",
      "schedule": "0 5 * * *"
    }
  ]
}
Just like with dynamic routes, you’ll need to explicitly indicate that the respective function file is dynamic using brackets. That function will then be able to pick up the dynamic part of the cron job path and use it accordingly in its code:
// /api/[dynamic-cron-job].ts
export default async function handler(req: NextRequest) {
  const dynamicApiPart = req.nextUrl.pathname.split('/')[3];

  // Use the dynamic part
}
Even though dynamic routes are supported in this way, it does require you to know and define all the variations in the vercel.json file beforehand. Long term, this setup might not scale in the best way possible.
Running Vercel cron jobs locally
Lastly, running cron jobs locally is fortunately relatively straightforward. Because of the way cron jobs are set up, they’re not different from API routes on your application.
To trigger them in your local environment, all you need to do is make a request to its respective path relative to your local development path. But unfortunately, cron jobs are not supported in development servers.
Limitations
The convenience of having cron jobs and the relative straightforwardness of setting them up in your Vercel project is extremely nice. It opens the door for additional features in your web application that weren’t possible before while keeping everything together in one project.
Despite this, there are also certain limitations to the (current) implementation of cron jobs in Vercel. At the time of writing this article, the feature is still in beta. While it’s still under development, it comes with several bandwidth limitations.
The only hard limitation is a maximum of 20 allowed cron jobs per project. It’s unclear whether the limitations we’ll discuss below will be addressed in the GA release, or if they are permanent, so please keep that in mind.
Syntax features
For cron expressions specifically, the syntax does not support a few features that are supported in the fully defined syntax.
First, only numerical values are supported. Second, the day of the month and the day of the week can’t be configured together: when either is set to a specific value, the other has to be set to *.
The biggest thing to keep in mind is that cron jobs are always run in the UTC timezone. If you’re planning on running cron jobs at specific times, it’s something important to take into account.
Ties to Serverless and Edge Functions
While, on paper, cron jobs are separate from Vercel’s Serverless and Edge Functions, in practice, they are actually very similar. In the end, functions are required under the hood because their respective code is what invokes our cron jobs.
This means that cron jobs implicitly also count towards your usage and billing for those categories. If you’re planning on heavily combining them together, you might hit your limits sooner than you expect.
Across the board, cron jobs also have a duration limit. These limits are the same as the duration limits for Serverless and Edge Functions.
Pricing
Though this is not an issue during the beta, there exist certain limitations depending on which Vercel plan you’re on. For the Hobby, Pro, and Enterprise plans, the number of cron jobs that will be allowed are two, 40, and 100, respectively.
Lastly, the Hobby plan has additional limitations in that cron jobs can only be scheduled once a day and that the timing can’t be guaranteed on a minute level, only on the hour level. So, if you configure a job to run at 15:00, it can trigger anywhere between 15:00 and 15:59. Again, if you need your cron jobs to be triggered at a very specific time, this is relevant to keep in mind.
Conclusion
In this article, we’ve taken a dive into an exciting new feature of being able to add cron jobs through Vercel to your Next.js projects. As we saw, the setup process is relatively straightforward, requires minimal configurations, and going beyond the initial basic setup is also possible.
But despite the feature sounding quite promising, there are still some caveats to this under-development feature. While these won’t be a dealbreaker in all scenarios, I would definitely recommend looking into how they impact your use cases.
LogRocket: Full visibility into production Next.js apps
Debugging Next applications can be difficult, especially when users experience issues that are difficult to reproduce. If you’re interested in monitoring and tracking state, automatically surfacing JavaScript errors, and tracking slow network requests and component load time, try LogRocket.

LogRocket is like a DVR for web and mobile apps, recording literally everything that happens on your Next.js app. Instead of guessing why problems happen, you can aggregate and report on what state your application was in when an issue occurred. LogRocket also monitors your app's performance, reporting with metrics like client CPU load, client memory usage, and more.
The LogRocket Redux middleware package adds an extra layer of visibility into your user sessions. LogRocket logs all actions and state from your Redux stores.
Modernize how you debug your Next.js apps — start monitoring for free.

Top comments (1)
this was a good read, thankyou for giving me so much info about cron jobs, I was always curious, after knowing this I will explore cron jobs in AWS.