
Written by Ibadehin Mojeed✏️
The Intersection Observer API is a native API provided by modern browsers. It empowers us to detect the visibility of an element relative to the viewport of the browser — or in some cases, relative to its containing element — with the aim of performing a certain action.
The react-intersection-observer package provides a way to implement this API in a React project. In this guide, we will explore how to utilize this library to monitor the visibility of different sections on a webpage and dynamically execute actions on the page header.
Jump ahead:
- Overview of our demo dynamic header project
- Creating a dynamic header using the Intersection Observer API
- Implementing dynamically active menu items
- Creating a dynamic header using
react-intersection-observer - How to disconnect the
IntersectionObserveror stop observing an element
To follow along with this tutorial, we recommend you have a basic understanding of React.
Now, let's dive right in and get started!
Overview of our demo dynamic header project
Consider a simple one-page site that I’ve put together: 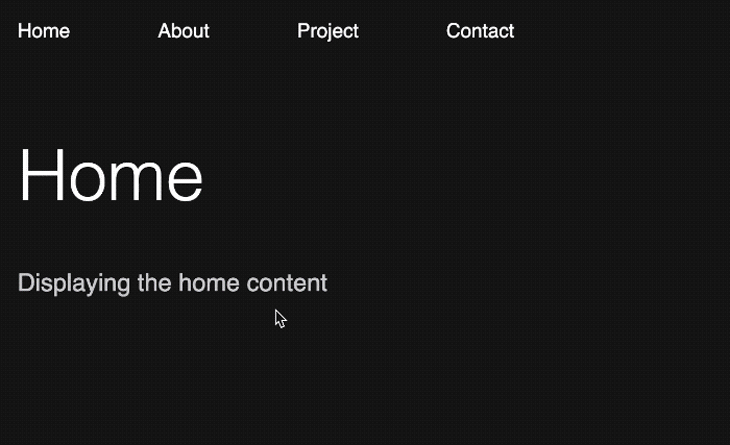 You can find the demo and source code on CodeSandbox.
In the showcased demo, a click on the menu item results in a seamless scroll to the corresponding page section.
Many single-page websites with a setup similar to this demo site allow users to scroll manually through different page sections while dynamically activating the corresponding menu items. In certain cases, websites even alter the header's background color as the user scrolls past a specific section.
To accomplish all of these functionalities, we can leverage the power of the Intersection Observer API. The following GIF illustrates the final project:  We can now dive into the details.
Creating a dynamic header using the Intersection Observer API
To better understand the react-intersection-observer package, we will first explore how detecting element visibility worked before the Intersection Observer API, then take a look at the API’s underlying functionality. Jump ahead within this section:
- Detecting element visibility before the Intersection Observer API
- Creating an
IntersectionObserver - Observing multiple elements with the
IntersectionObserver - Applying the Intersection Observer API in React
- Referencing elements with the React
useRefHook
Detecting element visibility prior to the Intersection Observer API
Before the Observer API was introduced, developers used to manage element visibility by listening for scroll events and then triggering a callback function to handle element detection as users scrolled through the page:
window.addEventListener('scroll', function (event){
 // Do something every time the user scrolls!
}
When using the traditional scroll event-based detection method, the event listener continuously fires for every scroll action and operates on the main thread. As a result, the system is prone to performance inefficiencies.
In contrast, the Intersection Observer API offers a solution that asynchronously observes changes and executes code off the main thread. Unlike the scroll event approach, it triggers a callback only when the observed element enters or leaves the viewport.
The way the Intersection Observer API works makes it more performant and preferable for handling element visibility efficiently. You can also read about some other use cases for this API, including lazy loading of images, infinite scrolling, and scroll-based animations.
Creating an IntersectionObserver
To monitor the visibility of an element within a parent or ancestor element, we’ll follow these steps:
- Obtain a reference to the target element
- Initialize a new
IntersectionObserverinstance by creating anobserverand providing a callback function - Use the
observe()method on theobserverand pass the target element as an argument
In its simplest form, here is the code implementation of the above steps:
const observer = new IntersectionObserver(callback);

const targetElement = document.querySelector("...");
observer.observe(targetElement);
The callback function of the observer will be triggered when a specified threshold is surpassed. For now, you can understand this threshold to be when the target element enters or exits the visible portion of the screen.
Observing multiple elements with the IntersectionObserver
In our project, we want to monitor intersection events on multiple sections of the page instead of just one. Therefore, we need to make some modifications to the code mentioned above.
First, we will obtain references to all the target sections. Then, we will iterate over each section and observe them individually.
Here is the updated code:
const observer = new IntersectionObserver(callback);

const targetElements = document.querySelectorAll("...");

targetElements.forEach((element) => {
  observer.observe(element);
});
Applying the Intersection Observer API in React
Now, let's implement the intersection logic in our React project. In the starter project, the components/Page.js file is responsible for handling each section:
const Page = ({ ... }) => {
  // ...
  return (
    <section id={title}>
      {/* ... */}
    </section>
  );
}

export default Page;
To monitor the visibility of the section element, we will first obtain a reference to it. Then, we will incorporate the intersection logic within a useEffect Hook. We can do all of that within the parent App component:
import { useEffect } from "react";
// ...

function App() {

  useEffect(() => {
    const targetSections = document.querySelectorAll("section");

    const observer = new IntersectionObserver((entries) => {
      console.log(entries);
    });

    targetSections.forEach((section) => {
      observer.observe(section);
    });
  }, []);

  return (
    // ...
  );
}

export default App;
We have utilized the querySelectorAll() method to obtain references to all the target <section> elements. However, in a later part of the lesson, you will learn how to achieve the same using React's useRef Hook.
If you observe the callback function closely, you will notice that it takes an entries parameter, which returns an array of objects containing various details associated with each target section:  Based on this information, we can determine whether a section is intersecting or not by checking the value of the
 isIntersecting property. If its value is true, it indicates that a threshold has been crossed for that section.
According to the default configuration, if at least one pixel of the section is visible, the threshold is considered crossed.
Using the target property, as shown in the image above, we can access the id attribute of the active section:
const observer = new IntersectionObserver((entries) => {
  entries.forEach((entry) => {
    if (entry.isIntersecting) {
      console.log(entry.target.getAttribute("id")); // home/ about/ project/ contact
    }
  });
});
The id of the section will match the href attribute of the corresponding menu link.
Referencing elements with the React useRef Hook
Instead of using methods like querySelectorAll() to obtain references to all the target <section> elements, we will utilize the useRef Hook provided by React.
Since we want to manage a list of refs, we will implement a ref callback function. This allows us to pass a function to the ref attribute, which we will attach to the target element, and maintain our own list.
To begin, we will pass a callback function to the ref attribute:
const Page = ({ section, refCallback }) => {
  // ...
  return (
    <section id={title} ref={refCallback}>
      {/* ... */}
    </section>
  );
};

export default Page;
In the parent component, we will create the callback function and ensure that we pass it down to the Page component:
function App() {
  // ...
  const refCallback = (element) => {
    if (element) {
      console.log(element);
    }
  };

  return (
    <>
      {/* ... */}
      <main>
        <div>
          {sections.map((section, index) => (
            <Page {...{ section, refCallback }} key={index} />
          ))}
        </div>
      </main>
    </>
  );
}

export default App;
If we take a look at the console, we have access to the target nodes: 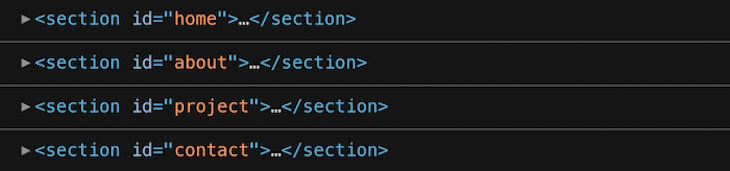 Remember, the
 querySelectorAll() method returns a collection of elements in an array-like NodeList, which we then iterate over. However, since these entries are not in a regular array that we can directly loop over, we will add them to a separate array to iterate over and manipulate them more easily.
To begin, we will create a reference and initialize it with an empty array. Then, in the refCallback function, we will update the array with the entries:
import { useEffect, useRef } from "react";
// ...

function App() {
  const sectionsRef = useRef([]);

  useEffect(() => {
    const observer = new IntersectionObserver((entries) => {
      // ...
    });
    // const targetSections = document.querySelectorAll("section");
    sectionsRef.current.forEach((section) => {
      observer.observe(section);
    });
  }, []);

  const refCallback = (element) => {
    if (element) {
      sectionsRef.current.push(element);
    }
  };

  return (...);
}

export default App;
To avoid recreating the refCallback function on every render, we will wrap it in a useCallback Hook:
import { useEffect, useRef, useCallback } from "react";
// ...

function App() {
  // ...
  const refCallback = useCallback((element) => {
    if (element) {
      sectionsRef.current.push(element);
    }
  }, []);

  return (...);
}

export default App;
Implementing dynamically active menu items
Now that we can observe the sections and obtain the current section ID, let's explore how we can utilize that value to dynamically add an "active" class to the corresponding menu item.
Jump ahead in this section:
- Styling the
"active"class for menu items - Styling the header background
- Utilizing
IntersectionObserverconfiguration options
Styling the "active" class for menu items
In the App component, where we render the header, we will create a state variable to manage the currently visible section of the page. We will initialize this state variable as the home page:
import { useState, useEffect, useRef } from "react";
// ...
const menus = ["home", "about", "project", "contact"];
// ...
function App() {
  const [visibleSection, setVisibleSection] = useState(menus[0]);
  // ...
  return (
    // ...
  );
}

export default App;
Next, we will check if the state value matches the current menu item on the li. If there is a match, we will add an "active" class to that menu item:
{menus.map((menu, index) => (
  <li
    key={index}
    className={visibleSection === menu ? "active" : ""}
  >
    <a href={`#${menu}`}>{menu}</a>
  </li>
))}
We will update the state whenever the status of the isIntersecting property of a section changes to true:
useEffect(() => {
  const observer = new IntersectionObserver((entries) => {
    entries.forEach((entry) => {
      if (entry.isIntersecting) {
        setVisibleSection(entry.target.getAttribute("id"));
      }
    });
  });
  //...
}, []);
To visualize the active menu in action, we will add style rules for the "active" class:
/* styling active menu */
ul li::before {
  content: "";
  width: 100%;
  height: 0.25rem;
  background: #23d997;
  position: absolute;
  bottom: 0;
  left: 0;
  transform: scaleX(0);
  transition: transform 0.5s ease;
}

ul li.active::before {
  transform: scaleX(1);
}
Now, as we scroll through the page sections, the menu item will become active as soon as at least one pixel of the corresponding section becomes visible: 
Styling the header background
As we observed in the final demo, we want the background color of the header to change from dark to white when the isIntersecting property is true for sections other than the home section.
To do this, let's obtain a reference to the header element:
function App() {
  const headerRef = useRef(null);
  // ...

  return (
    <>
      <header ref={headerRef}>
        {/* ... */}
      </header>
      {/* ... */}
    </>
  );
}

export default App;
Next, within the observer, we will define the logic that updates the class of the header element:
useEffect(() => {
  const observer = new IntersectionObserver((entries) => {
    entries.forEach((entry) => {
      if (entry.isIntersecting) {
        // ...
        entry.target.id !== "home"
          ? headerRef.current.classList.add("bg-white")
          : headerRef.current.classList.remove("bg-white");
      }
    });
  });
  // ...
}, []);
In the above code, we checked if the intersecting section is not the home section, and if it isn't, we added a class to the header element. The style rules for this class are declared below:
/* header background */
header.bg-white {
  background: white;
}

header.bg-white ul li a {
  color: black;
}
Utilizing IntersectionObserver configuration options
We have the ability to control when we want the callback of the observer to be invoked by passing configuration options into the IntersectionObserver() constructor.
useEffect(() => {
  const options = {
    root: null,
    rootMargin: "0px",
    threshold: 0
  };

  const observer = new IntersectionObserver((entries) => {
    // ...
  }, options);

  // ...
}, []);
In the code provided above, we have applied the default values for the IntersectionObserver options. Let's briefly discuss the properties:
- The
rootproperty allows us to specify an ancestor element that serves as the viewport for checking the visibility of the target. If this property is not specified or is assigned a default value ofnull, it means we want to observe the intersection relative to the browser's viewport - The
rootMarginproperty allows us to define margins around the root element to expand or shrink it. This can affect the point at which the target element is considered inside the viewport, which can be useful when we need to load data before it becomes visible, such as when lazy-loading images or implementing infinite scrolling- Specifying a positive value will expand the root element and trigger the callback even when the observed element is still away from entering the viewport
- Specifying a negative value will shrink the root element
- The
thresholdproperty allows us to specify the percentage of the elements that must be visible for it to be considered intersecting. It accepts a number value between0and1, and can also accept an array of numbers to create multiple trigger points- A default value of
0means the element is considered intersecting as soon as a single pixel becomes visible - Setting a value of
1means the entire element must be visible
- A default value of
In our project, we want to detect when visibility crosses the 50 percent mark. Therefore, we will update the configuration as follows:
useEffect(() => {
  const options = {
    threshold: 0.5
  };

  // ...
}, []);
See the source code and demo on CodeSandbox.
It may be beneficial to extract the functionality of the IntersectionObserver into a custom Hook to facilitate reusability. However, the react-intersection-observer package handles this seamlessly for us.
Creating a dynamic header using react-intersection-observer
After thoroughly understanding how the native Intersection API works with React, using the react-intersection-observer package should be straightforward and effortless.
Jump ahead in this section:
- Installing the
react-intersection-observerpackage - Using the
<InView>component API - Avoid updating the state of other components during render
- Passing in
react-intersection-observeroptions - Using the
useInViewHook
Installing the react-intersection-observer package
First, we’ll add the package to our project:
npm install react-intersection-observer
The react-intersection-observer library provides both a Hook and a component API that we can utilize to monitor the state of our target element. In the next section, we will begin exploring the component API.
Using the <InView> component API
Similar to React's render props pattern, we can pass a function to the <InView> component as the child prop. This function will return the JSX that the IntersectionObserver will monitor.
Below is a basic example of how to use the <InView> component API:
import { InView } from 'react-intersection-observer';

const Component = () => (
  <InView>
    {({ inView, ref, entry }) => (
      <div ref={ref}>
        <p>{`This paragraph is inside the viewport: ${inView}.`}</p>
      </div>
    )}
  </InView>
);

export default Component;
The function receives an object that contains the inView state, a ref, and the entry. The inView state returns a Boolean value based on the visibility of the target element. The function will be called with the new value whenever the state changes.
We can then assign the received ref to the element we want to monitor. Meanwhile, the entry object will provide access to all the details about the intersection state.
With this basic understanding, let's apply the API in our React project.
In the src/App.js file of our starter project, we can import the component from the react-intersection-observer package:
import { InView } from "react-intersection-observer";
Next, we need to ensure that we return the target JSX from the render props that we will pass to the <InView> component. Since the target <section> element resides in a child component, we will return the component itself instead. Let's locate the following code:
<div>
  {sections.map((section, index) => (
    <Page {...{ section }} key={index} />
  ))}
</div>
Then, update the code to the following:
<div>
  {sections.map((section, index) => (
    <InView key={index}>
      {({ ref: inViewRef, inView, entry }) => {
        return <Page {...{ section, inViewRef }} />;
      }}
    </InView>
  ))}
</div>
You may have noticed that we used an alias for the ref we passed to the child component. This is necessary because we can’t directly pass a named ref as props to a nested functional component unless we wrap the child component in a forwardRef() or use a custom prop, as we have done here.
Now, in the child component, we can assign the custom prop to the ref attribute of the target element:
const Page = ({ section, inViewRef }) => {
  // ...
  return (
    <section id={title} ref={inViewRef}>
      {/* ... */}
    </section>
  );
};

export default Page;
We can now define the logic that implements the dynamic header. Similar to what we did in the first project, we will obtain a reference to the header element and define a state for the component:
import { useState, useRef } from "react";
// ...
function App() {
  const [visibleSection, setVisibleSection] = useState(menus[0]);
  const headerRef = useRef();
  return (
    <>
      <header ref={headerRef}>
        <nav>
          <ul>
            {menus.map((menu, index) => (
              <li
                key={index}
                className={visibleSection === menu ? "active" : ""}
              >
                <a href={`#${menu}`}>{menu}</a>
              </li>
            ))}
          </ul>
        </nav>
      </header>
      <main>
        {/* ... */}
      </main>
    </>
  );
}

export default App;
After that, we’ll update the render props with the intersection logic:
<InView key={index}>
  {({ ref: inViewRef, inView, entry }) => {
    if (inView) {
      setVisibleSection(entry.target.getAttribute("id"));

      entry.target.id !== "home"
        ? headerRef.current.classList.add("bg-white")
        : headerRef.current.classList.remove("bg-white");
    }
    return <Page {...{ section, inViewRef }} />;
  }}
</InView>
Don’t forget to include the CSS rules:
/* styling active menu */
ul li::before {
  content: "";
  width: 100%;
  height: 0.25rem;
  background: #23d997;
  position: absolute;
  bottom: 0;
  left: 0;
  transform: scaleX(0);
  transition: transform 0.5s ease;
}

ul li.active::before {
  transform: scaleX(1);
}

/* header background */
header.bg-white {
  background: white;
}

header.bg-white ul li a {
  color: black;
}
Avoid updating the state of other components during render
Though the above code works, we’ll see the following React warning displayed in the console:
Warning: Cannot update a component (App) while rendering a different component (InView).
This warning occurs because the component is calling the setVisibleSection updater function of the parent component while it is still rendering. This creates a race condition.
To resolve this issue, we can either place the state updater logic in a useEffect Hook or ensure that we update the state when an event occurs.
Fortunately, the InView API provides an onChange prop option that is invoked whenever the inView state changes. Inside its handler function, we can access the inView status and the entry object, which we can use to define the logic that implements the dynamic header.
The updated code now appears as follows:
function App() {
  // ...
  const setInView = (inView, entry) => {
    if (inView) {
      setVisibleSection(entry.target.getAttribute("id"));

      entry.target.id !== "home"
        ? headerRef.current.classList.add("bg-white")
        : headerRef.current.classList.remove("bg-white");
    }
  };
  return (
    <>
      {/* ... */}
      <main>
        <div>
          {sections.map((section, index) => (
            <InView onChange={setInView} key={index}>
              {({ ref: inViewRef }) => {
                return <Page {...{ section, inViewRef }} />;
              }}
            </InView>
          ))}
        </div>
      </main>
    </>
  );
}

export default App;
Passing in react-intersection-observer options
We have the ability to pass IntersectionObserver options as props to the <InView /> component to control when the observer should be invoked.
Just like we did with the native API using the threshold, we can update the props of the <InView> component to include a threshold. Here is an example of how it can be done:
<InView onChange={setInView} threshold={0.5} key={index}>
  {/* ... */}
</InView>
See the source code and demo on CodeSandbox.
Using the useInView Hook
Implementing the useInView Hook follows a similar approach to monitor the state of our target element. This Hook accepts an optional configuration and returns the inView state, the ref, and the current entry.
Below is a basic example of how to implement the useInView Hook:
>import { useInView } from "react-intersection-observer";

const Component = () => {
  const { ref, inView, entry } = useInView({
    threshold: 0.5
  });

  return (
    <div ref={ref}>
      <p>{`This paragraph is inside the viewport: ${inView}.`}</p>
    </div>
  );
};

export default Component;
Let’s apply the Hook in our React project.
Once again, using the starter project, we will apply the useInView Hook in the components/Page.js file — the same file that renders the target section element.
In this file, let's import the useInView Hook and assign the ref to the section element that we want to monitor:
import { useInView } from "react-intersection-observer";

const Page = ({ section }) => {
  // ...
  const { ref, inView, entry } = useInView({
    threshold: 0.5
  });

  return (
    <section id={title} ref={ref}>
      {/* ... */}
    </section>
  );
};

export default Page;
In the same file, we will add the logic that implements the dynamic header within a useEffect Hook. This will result in the following code:
import { useEffect } from "react";
// ...
const Page = ({ section }) => {
  // ...
  useEffect(() => {
    if (inView) {
      setVisibleSection(entry.target.id);

      entry.target.id !== "home"
        ? headerRef.current.classList.add("bg-white")
        : headerRef.current.classList.remove("bg-white");
    }
  }, [inView, entry, setVisibleSection, headerRef]);

  return (
    // ...
  );
};

export default Page;
Alternatively, we can add the logic to the onChange option of the useInView Hook instead of using a separate useEffect Hook. This would result in the following code:
const { ref } = useInView({
  threshold: 0.5,
  onChange: (inView, entry) => {
    if (inView) {
      setVisibleSection(entry.target.id);

      entry.target.id !== "home"
        ? headerRef.current.classList.add("bg-white")
        : headerRef.current.classList.remove("bg-white");
    }
  }
});
Since we utilized the setVisibleSection function and headerRef variable in the logic, we will pass these variables from the parent component like so:
import { useState, useRef } from "react";
// ...
function App() {

  const [visibleSection, setVisibleSection] = useState(menus[0]);
  const headerRef = useRef();

  return (
    <>
      <header ref={headerRef}>
        {/* ... */}
            {menus.map((menu, index) => (
              <li key={index} className={visibleSection === menu ? "active" : ""}>
                {/* ... */}
              </li>
            ))}
          {/* ... */}
          {sections.map((section, index) => (
            <Page {...{ section, setVisibleSection, headerRef }} key={index} />
          ))}
        </div>
      </main>
    </>
  );
}

export default App;
Then, within the child component, we need to access the variables as props, like this:
const Page = ({ section, setVisibleSection, headerRef }) => {
  // ...
  return (
    // ...
  );
};

export default Page;
Finally, we’ll include the CSS rules for the added classes:
/* styling active menu */
ul li::before {
  content: "";
  width: 100%;
  height: 0.25rem;
  background: #23d997;
  position: absolute;
  bottom: 0;
  left: 0;
  transform: scaleX(0);
  transition: transform 0.5s ease;
}

ul li.active::before {
  transform: scaleX(1);
}

/* header background */
header.bg-white {
  background: white;
}

header.bg-white ul li a {
  color: black;
}
See the source code and demo on CodeSandbox.
How to disconnect the IntersectionObserver or stop observing an element
With the way we’re currently implementing the IntersectionObserver, the target sections are being continuously monitored as they enter and exit the viewport. While this behavior is suitable for our current use case, there may be situations where we do not want continuous observation.
For example, in certain scenarios, we may want to stop observing an element once it becomes visible. This behavior is commonly expected when lazy-loading images, where we want them to stay visible once they enter the viewport.
The unobserve() method
Let's explore how we can stop observing a target element after it enters the viewport. Using the native API, we can call the unobserve method on the observer itself, passing the target element as an argument:
const observer = new IntersectionObserver((entries, observer) => {
  entries.forEach((entry) => {
    if (entry.isIntersecting) {
      // ...
      observer.unobserve(entry.target);
    }
  });
}, options);
It's worth noting that the IntersectionObserver() constructor provides the observer instance as the second argument in the callback function.
The disconnect() method
It is important to disconnect the IntersectionObserver when it is no longer needed. To do this, we will invoke the disconnect() method on the observer inside a cleanup function within the useEffect Hook:
useEffect(() => {
  const observer = new IntersectionObserver((entries) => {
    // ...
  }, options);
  // ...
  // To disable the entire IntersectionObserver
  return () => {
    observer.disconnect();
  };
}, []);
By including the cleanup code, the IntersectionObserver will be disconnected when the component unmounts, preventing any potential memory leaks.
If you utilize the react-intersection-observer library, the observer instances will be disconnected automatically when they are no longer needed. This eliminates the need for manual disconnection, making the process more efficient in your React applications.
The triggerOnce option
With the react-intersection-observer package, we can configure the observer to trigger only once after the target element enters the viewport by using the triggerOnce Boolean option.
Implementing the <InView> component will look like this:
<InView
  // ...
  triggerOnce={true}
>
  {/* ... */}
</InView>
Meanwhile, using the useInView Hook will look like so:
const { ref, inView, entry} = useInView({
  // ...
  triggerOnce: true,
});
Remember, thanks to the library we’re using, the observer instances will automatically disconnect when they are no longer needed. In this case, whether we trigger the IntersectionObserver once or not, it will disconnect after the component unmounts.
Conclusion
In this article, we delved into the impressive capabilities of the react-intersection-observer package, using it to create a dynamic header within a React project. Diving into the inner workings of the native Intersection Observer API gave us a deep understanding of its functionality and versatility.
Another project that can be implemented using a procedure similar to the one we learned in this article is the dynamic table of contents. This feature is often used in blog posts to enhance the navigation experience. With the insights gained from this article, developing such a project should be straightforward.
If you found this lesson helpful, please consider sharing it with others. If you have any questions or contributions, feel free to share your thoughts in the comments section.
Get set up with LogRocket's modern React error tracking in minutes:
1.Visit https://logrocket.com/signup/ to get an app ID.
2.Install LogRocket via NPM or script tag. LogRocket.init() must be called client-side, not server-side.
NPM:
$ npm i --save logrocket

// Code:

import LogRocket from 'logrocket';
LogRocket.init('app/id');
Script Tag:
Add to your HTML:

<script src="https://cdn.lr-ingest.com/LogRocket.min.js"></script>
<script>window.LogRocket && window.LogRocket.init('app/id');</script>
3.(Optional) Install plugins for deeper integrations with your stack:
- Redux middleware
- ngrx middleware
- Vuex plugin

Top comments (0)