
Written by Tharaka Romesh✏️
Table of Contents
- What is Ultra?
- Features of Ultra
- Ultra vs Aleph.js
- The drawbacks to using Ultra
- Getting started with Ultra
- Building components in Ultra
- Deploying an Ultra app
In the world of frontend development, React is one of the most popular libraries for developing components for web applications. React v18 includes new features, such as concurrent rendering, and it supports SSR with React Server Components, all of which empower web developers to create more interactive UI.
In this article, you’ll learn about a new React framework called Ultra, which uses Deno and React and focuses on using web streams and native features within the browser.
What is Ultra?
Ultra is a modern streaming React framework in Deno that leans into a browser's native features and uses ES modules, import maps, and web streams. Ultra aims to simplify your workflow by reducing the complexity of tooling, allowing developers to focus on development.
Features of Ultra
Compatibility with TypeScript and JSX
TypeScript is a popular language in the web developer community, primarily because of its optional static typing and classes and the interfaces it provides to JavaScript. Ultra is:
- Easy to read and understand
- Offers better support for JSX
- Includes static type checking and better IntelliSense
- Easily maintainable
Includes a permissions module
Because Ultra is a Deno project, it comes with all the cool features of Deno, including its permission-based security module. Ultra uses the following permissions:
-
Allow-env: allows devs to use environment variables for their project -
Allow-read: tells the Ultra project to read the specified path -
Allow-write: this command tells the Ultra project to write the specified path -
Allow-net: this command adds Ultra to the list of URLs that devs use in their project
Data fetching with Ultra
Ultra uses the latest version of React, which brings more SSR and data fetching capabilities via React Suspense.
Streaming HTML in React 18
When you wrap your component with React Suspense, React doesn’t need to wait for the component to begin streaming HTML, so instead of rendering the component, React will send a placeholder, such as a spinner.
Selective hydration
Wrapping React Suspense around a component will enable selective hydration. Selective hydration will start hydrating HTML before JavaScript code loads to the browser, so the content inside the <Suspense> tags will not block the rest of the page from hydrating. If you interact with it, React will prioritize hydrating that area.
Lazy routing in Ultra
Ultra uses Wouter, a fully-fledged, lightweight, and Hooks-based routing solution for React. It also comes with a server-side integration.
Dynamic MDX
With Ultra, you can use MDX dynamically (MDX on demand) because it comes with a plugin that enables you to compile MDX on the server and run the result on the client or the frontend.
Comparing Ultra with Aleph.js
Aleph.js is a full-stack framework in Deno, used as an alternative to Next.js. Aleph.js offers features like ES module imports, file-system routing, SSR & SSG, and HMR with a fast refresh.
Ultra, however, mainly focuses on React 18’s new SSR features and treats every SSR response as a readable stream so that all data loads through React Suspense.
There is no bundling or build step in either dev or product, but we can consider Ultra as an opinionated and straightforward way to build applications with Deno and React.
The drawbacks to using Ultra
While Ultra seems like an excellent framework for working with Deno and React, it also has some drawbacks. Here are some factors to consider before starting with Ultra.
- Ultra is still in its early stages. Ultra recently released version 1.0, and it doesn't have a fancy CLI like most frameworks.
- Ultra doesn't support Native CSS modules or CSS Module Scripts yet, and there are no styling libraries or tools like Tailwind CSS.
- Ultra doesn't have first-class support with Deno Deploy even though they push more toward Deno Deploy for deploying.
- Ultra doesn't support native import maps yet, so Ultra in-lines your imports directly into the served ES modules.
Getting started with Ultra
Before starting development with Ultra, make sure you have Deno version 1.20.6+ and IDE on your machine.
Let’s create an Ultra application with create-ultra-app. Create-ultra-app is still in its early stages, so it's not a complete solution just yet. You can clone the project, which provides minimal setup to get started with Ultra.
You can find a file called importMap.json at the project's root.
{
  "imports": {
    "react": "https://esm.sh/react@18",
    "react-dom": "https://esm.sh/react-dom@18",
    "react-dom/server": "https://esm.sh/react-dom@18/server",
    "react-helmet": "https://esm.sh/react-helmet-async?deps=react@18",
    "wouter": "https://esm.sh/wouter?deps=react@18",
    "swr": "https://esm.sh/swr?deps=react@18",
    "ultra/cache": "https://deno.land/x/ultra@v0.8.0/cache.js",
    "app": "./src/app.tsx"
  }
}
The attribute "app" refers to the entry point of the application. The rest of the attributes are the imports required to run Ultra. Another important file will be deno.json, which is the default config file Deno uses:
{
  "tasks": {
    "dev": "mode=dev deno run -A --location=http://localhost:8000 --unstable --no-check server.ts",
    "start": "deno run -A --location=http://localhost:8000 --unstable --no-check server.ts",
    "cache": "deno cache --reload server.ts",
    "vendor": "importMap=importMap.json deno run -A --unstable https://deno.land/x/ultra@v1.0.1/vendor.ts"
  },
  "importMap": "importMap.json"
}
The tasks section defines what you can do to build, cache, or even start the development server. The most crucial part of this file is the "importMap" attributes, which specify your importMap path that holds the application entry point and dependencies. Let’s break down the rest of the code.
"Dev": this command is helpful to start the development server, and it will always force the re-importing of ESM files, enabling it to reload on save
"Start": this command is helpful in the production stage. It uses cached ESM imports and not a WebSocket reloader. It also uses whichever import map you have defined
"Cache": this command refreshes the Deno cache for server.js. It can be helpful if you run into any issues when swapping between vendor and CDN import maps
"Vendor": this is useful when you deploy the application, as it will download the dependencies into the ".ultra/x" directory and create a vendorMap.json import map file
Building components in Ultra
Let’s create a small Pokemon application that uses streaming SSR with Suspense. For this demo application, we will use the free Pokemon API. First, let’s start our project using the command deno task dev, which will spin up the Ultra development server on http://localhost:8000. If you open your browser, you will see something similar to the image below. 
Now, let’s create the components and pages required to build this app. Create directories called components and pages under the src directory, which will hold some common React and container components.
Let’s also add some CSS to the project. Ultra still doesn't have its own native CSS Modules, so we have to use traditional CSS in the style.css file under the src directory. Now, let's start with creating several components under src/components. Let's create two components, starting with the List.jsx component, displaying a Pokemon list.
import React from "react";
import useSWR from "swr";
import { useLocation } from "wouter";

const fetcher = (url: string) => fetch(url).then((res) => res.json());

type Pokemon = {
  name: string;
  url: string;
};

type SetLocationType = {
  (
    to: string,
    options?:
      | {
          replace?: boolean | undefined;
        }
      | undefined
  ): void;
};

const getId = (url: string): string => {
  return url.substring(url.lastIndexOf("/") - 1, url.lastIndexOf("/"));
};

const renderItems = (pokemons: Pokemon[], setLocation: SetLocationType) => {
  return pokemons?.map(({ name, url }: Pokemon) => {
    return (
      <div
        className="card"
        onClick={() => {
          setLocation(`/pokemon/${getId(url)}`);
        }}
      >
        <div className="card-body">
          <h5 className="card-title">{name}</h5>
        </div>
      </div>
    );
  });
};

const list = () => {
  const [location, setLocation] = useLocation();
  const { data, error } = useSWR(
    `https://pokeapi.co/api/v2/pokemon?limit=1000&offset=0`,
    fetcher
  );

  if (error) {
    return (
      <div className="alert alert-danger" role="alert">
        Unable to fetch data from pokemon API
      </div>
    );
  }

  return (
    <div className="card-columns">
      {renderItems(data?.results, setLocation)}
    </div>
  );
};

export default list;
Notice that we use the useSWR hook from swr API to fetch data from the Pokemon REST API.
Next, we must create the Pokemon.jsx component, which shows the detailed information of a selected Pokemon.
import React from "react";

type MovesType = {
  move: { name: string; url: string };
  version_group_details: [];
};

type PokemonPropType = {
  name: string;
  height: number;
  weight: number;
  xp: number;
  image: string;
  moves: Array<MovesType>;
};

const renderMoves = (moves: Array<MovesType>) => {
  return moves.slice(0, 5).map(({ move }: MovesType) => {
    return <li>{move?.name}</li>;
  });
};

const Pokemon = ({ name, height, weight, image, moves }: PokemonPropType) => {
  return (
    <div className="card" style={{ width: "40rem" }}>
      <img className="card-img-top" src={image} alt="Card image cap" />
      <div className="card-body">
        <h5 className="card-title">{name}</h5>
        <h6 className="card-subtitle mb-2 text-muted">
          Height :{height} Weight: {weight}
        </h6>
        <p className="card-text">
          <ul>{renderMoves(moves)}</ul>
        </p>
      </div>
    </div>
  );
};

export default Pokemon;
We must also create a list of berries by creating a component under the component directory called Berries.tsx.
import React from "react";
import useSWR from "swr";

type BerriesType = {
  name: string;
  url: string;
};

const fetcher = (url: string) => fetch(url).then((res) => res.json());

const getId = (url: string): string => {
  return url.substring(url.lastIndexOf("/") - 1, url.lastIndexOf("/"));
};

const renderItems = (berries: BerriesType[]) => {
  return berries?.map(({ name, url }: BerriesType) => {
    return (
      <div key={getId(url)} className="list-group-item">
        <h5 className="clickable">{name}</h5>
      </div>
    );
  });
};

const Berries = () => {
  const { data, error } = useSWR(`https://pokeapi.co/api/v2/berry`, fetcher);

  if (error) {
    return (
      <div className="alert alert-danger" role="alert">
        Unable to fetch data from pokemon API
      </div>
    );
  }

  return <div className="list-group">{renderItems(data?.results)}</div>;
};

export default Berries;
Now, let's display all these components on the home page in the file Home.tsx under src/pages.
import React, { Suspense } from "react";
import List from "../components/List.tsx";
import Berries from "../components/Berries.tsx";

const Home = () => {
  return (
    <div className="container-fluid">
      <div className="row">
        <div className="col-md-2"></div>
        <div className="col-md-4">
          <h3>Pokemons</h3>
        </div>
        <div className="col-md-4">
          <h3>Berries</h3>
        </div>
        <div className="col-md-2"></div>
      </div>
      <div className="row">
        <div className="col-md-2"></div>
        <div className="col-md-4">
          <Suspense fallback={<div>Loading</div>}>
            <List />
          </Suspense>
        </div>
        <div className="col-md-4">
          <Suspense fallback={<div>Loading</div>}>
            <Berries />
          </Suspense>
        </div>
        <div className="col-md-2"></div>
      </div>
    </div>
  );
};

export default Home;
Finally, let's define the application's routes and for the home, Pokemon, and error pages.
import React from "react";
import { SWRConfig } from "swr";
import { Helmet } from "react-helmet";
import { Route, Switch } from "wouter";
import ultraCache from "ultra/cache";
import { Cache } from "https://deno.land/x/ultra/src/types.ts";

import Navigation from "./components/Navigation.tsx";
import Home from "./pages/Home.tsx";
import Selected from "./pages/Selected.tsx";

const options = (cache: Cache) => ({
  provider: () => ultraCache(cache),
  suspense: true,
});

const Ultra = ({ cache }: { cache: Cache }) => {
  return (
    <SWRConfig value={options(cache)}>
      <Helmet>
        <title>Ultra Pokemon</title>
        <link rel="stylesheet" href="/style.css" />
      </Helmet>
      <main>
        <Switch>
          <Navigation>
            <Route path="/" component={Home} />
            <Route path="/pokemon/:id" component={Selected} />
          </Navigation>
          <Route>
            <strong>404</strong>
          </Route>
        </Switch>
      </main>
    </SWRConfig>
  );
};

export default Ultra;
Open up your browser to see something similar to this: 
This will display two lists: one for Pokemon and the other for berries. Now that we have built a basic application let's deploy it.
Deploying an Ultra app
You can deploy an Ultra app with Docker or with Deno Deploy. With Docker, create a Docker file that supports vendored dependencies, taking deno:1.20.6+ as the base image.
Deno Deploy is a distributed serverless execution system that allows you to run JavaScript and TypeScript. It comes with V8 runtime and minimal latency and, like Cloudflare Workers, enables you to run code on edge. Ultra supports the official Deno Deploy GitHub action, which will allow you to serve static files on Deno Deploy.
To do so, create a project in the Deno Deploy Dashboard and provide the necessary to create the Deno deploy project: 
Next, select the GitHub Action integration. After creating the project link in your GitHub repo, deploy it to Deno by clicking the Continue button and selecting your project from the list of repositories. Then, choose GitHub Actions as the deployment method. 
Finally, add the following to your project under .github/workflow/main.yml:
name: deno deploy
on:
  push:
    branches: [main]
  pull_request:
    branches: [main]

jobs:
  deploy:
    name: deploy
    runs-on: ubuntu-latest
    permissions:
      id-token: write
      contents: read
    steps:
      - name: Clone repository
        uses: actions/checkout@v2

      - name: Install Deno
        uses: denoland/setup-deno@main
        with:
          deno-version: 1.20.3

      - name: Build site
        run: root=https://example.com deno run -A https://deno.land/x/ultra/build.ts

      - name: Upload to Deno Deploy
        uses: denoland/deployctl@v1
        with:
          project: ultra-pokemon
          entrypoint: ULTRA.js
          root: .ultra
Now, commit all the changes and push your code to GitHub, which will trigger GitHub Action. If everything goes as planned, you will see something like this under the Actions tab in your GitHub repo. 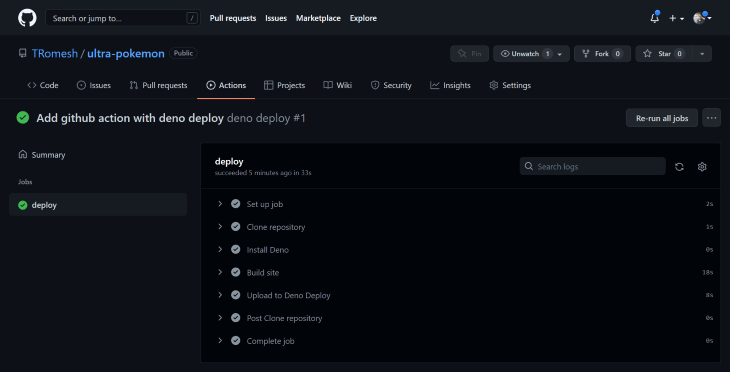
You can find the deployed link in the Upload to Deno Deploy section or in your Deno Deploy Dashboard.
Note: With the current version (v1.0) of Ultra, you will have to configure from the Deno Deploy end to get your application working. Log in to the Deno Deploy dashboard, add an environment variable called “root”, and pass the deployed URL as its value. This issue is a known bug in the current version of Ultra.

You can find the complete code for the above example through this GitHub repo. Also, check out the live application through this link.
Conclusion
Ultra is a great way to work with Deno and React, and its recently released version 1.0 includes many new features and improvements like ESbuild removal, integration with Markdown, and introduces create-ultra-app. However, it still has bugs, so monitor the GitHub repo for updates.
Ultra seems like a better way of building applications with Deno and React and has a great community you can find on Discord. Thanks for reading.
Full visibility into production React apps
Debugging React applications can be difficult, especially when users experience issues that are hard to reproduce. If you’re interested in monitoring and tracking Redux state, automatically surfacing JavaScript errors, and tracking slow network requests and component load time, try LogRocket.

LogRocket is like a DVR for web and mobile apps, recording literally everything that happens on your React app. Instead of guessing why problems happen, you can aggregate and report on what state your application was in when an issue occurred. LogRocket also monitors your app's performance, reporting with metrics like client CPU load, client memory usage, and more.
The LogRocket Redux middleware package adds an extra layer of visibility into your user sessions. LogRocket logs all actions and state from your Redux stores.
Modernize how you debug your React apps — start monitoring for free.

Top comments (0)