
Written by Ahmad Rosid✏️
webpack goes a long way toward simplifying and streamlining the complexities of modern web development with JavaScript. It takes care of bundling, minifying, code splitting, tree shaking, hot module replacement, and more.
Despite its popularity and longevity, webpack does have some drawbacks. Its primary downside is the amount of memory it takes when used in large projects. This memory management issue can also cause your app to run slowly.
In this article, we’ll explore Rspack, a web bundler that combines Rust and TypeScript for fast performance. We’ll look at the Rspack’s features and see how it compares to webpack.
Jump ahead:
- What is Rspack?
- Why should I choose Rspack?
- How to migrate from webpack to Rspack
- Comparing build time
- Comparing bundle size
What is Rspack?
Rspack was launched as open source in early 2023 and was designed to be an easy drop-in replacement for webpack. It was developed by ByteDance, the creators of TikTok, to provide improvements over other web bundlers in the following areas:
- Dev mode startup performance
- Build time
- Configuration flexibility
- Production optimization capabilities
Rspack rewrites parts of webpack in Rust to leverage multi-threading and improve performance. It has inbuilt features like parallelized operations, incremental compilation, and optimized hot module replacement. It is also compatible with webpack's configuration schema and loader architecture, such as babel-loader and less-loader.
Rspack has been used in some ByteDance internal projects, and those that were migrated from webpack achieved a 5–10x improvement in build time. These are encouraging results, but keep in mind that Rspack is still in early-stage development. For example, its APIs are not yet stable, and its cache only supports memory-level caching.
Rspack already meets the needs of many projects, but it still has some room for improvement. The development team has plans to build stronger cache capabilities, including migratable persistent caching and cloud caching, which will improve build time for monorepos and larger projects.
Why should I choose Rspack?
The main goal of the Rspack project is to improve web bundler performance. Here are some benchmarks comparing Rspack vs. webpack: 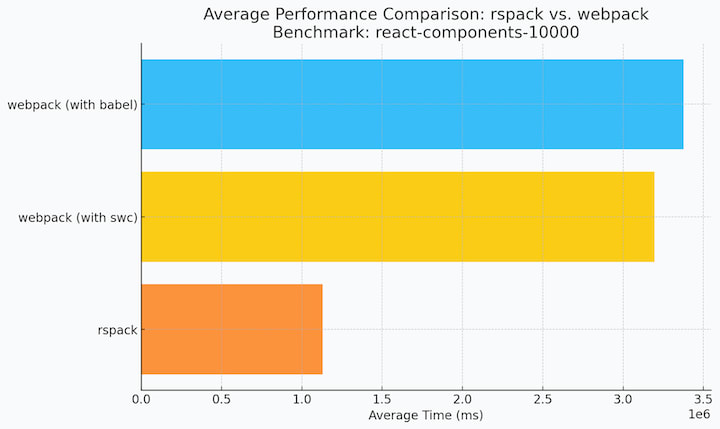 There are other web bundlers that also try to address webpack performance issues, but Rspack takes a different approach. Let’s look at a few comparisons:
Rspack vs. esbuild
- Rspack is implemented in Rust, whereas esbuild is implemented in Go
- Rspack is compatible with webpack’s configuration schema and loader architecture; esbuild is not
- Rspack has interoperability with the webpack ecosystem, whereas esbuild has a complete build pipeline
- Rspack supports parallel architecture and incremental compilation; esbuild does not
Rspack vs. Turbopack
- Rspack supports more loaders than Turbopack; Turbopack is a successor of webpack and supports some basic webpack configurations
- Rspack follows webpack’s architecture, making it easier to migrate a project from webpack to Rspack; Turbopack was built by the creator of webpack but has redesigned architecture and configuration
- Rspack is already used in production by Bytedance, whereas Turbopack is still in beta and is not ready for production
Rspack vs. SWC
- Rspack was designed to replace webpack, whereas SWC aims to replace Babel
- Rspack can be used with JavaScript, as well as other frameworks like CSS and PostCSS; SWC focuses on bundling JavaScript code that can be used in all major browsers
- Rspack is a standalone tool but can also be used with SWC; SWC can be used with other tools like Turbopack, esbuild, and Rspack
There’s a growing ecosystem for the Rspack project, and as more projects begin to adopt it, community support will grow and become stronger:
- Modern.js framework
- Nx plugin for Rspack
- Rspack community package
- Oxc (The Oxidation Compiler)
- Garfish
How to migrate from webpack to Rspack
Let’s see just how easy it is to migrate a project from webpack to Rspack and discover what kind of performance gains we might expect.
Creating the React project
We’ll create a simple React project that uses webpack and then migrate it to Rspack. We’ll create the project with Create React App. The source code is available on GitHub; here’s the code with webpack and here’s the code for Rspack.
We'll build a simple dashboard app that will look something like this: 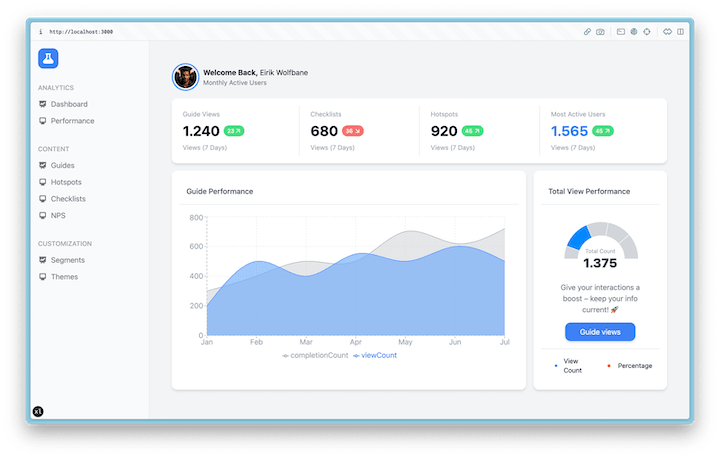 First, create a new project with create-react-app:
npx create-react-app my-dashboard-app
Now go to my-dashboard-app folder and install some dependencies for the dashboard app:
npm install @heroicons/react lucide-react recharts clsx
Next, add the tailwindcss package to take care of our CSS as dev dependencies:
npm install -D tailwindcss
Then, add the tailwindcss config to the tailwind.config.js file:
/** @type {import('tailwindcss').Config} */
module.exports = {
  content: [
    "./src/**/*.{js,ts,jsx,tsx}",
  ],
  theme: {},
  plugins: [],
};
Update the src/index.css file, like so:
@tailwind base;
@tailwind components;
@tailwind utilities;
Now let’s change the component App function to create the dashboard page src/App.js :
import { Sidebar } from "./components/sidebar";
import { Header } from "./components/header";
import { HighlightCard } from "./components/highlight-card";
import { TailwindIndicator } from "./components/tailwind-indicator";
import { ReportCard } from "./components/report-card";
function App() {
  return (
    <>
      <div className="flex min-h-screen">
        <Sidebar />
        <main className="p-12 flex-1 bg-gray-100 space-y-4">
          <Header />
          <HighlightCard />
          <ReportCard />
        </main>
      </div>
      <TailwindIndicator />
    </>
  );
}
export default App;
Next, create the Sidebar component in the src/components/Sidebar.jsx file:
import {
  BeakerIcon,
  PresentationChartLineIcon,
  DesktopComputerIcon,
} from "@heroicons/react/solid";
function NavItem({ children }) {
  return (
    <li className="flex gap-2 items-center text-gray-500 hover:text-blue-500 cursor-pointer">
      {children}
    </li>
  );
}
export function Sidebar() {
  return (
    <aside className="w-64 bg-gray-50 border-r border-gray-200 flex-shrink-0 sm:hidden lg:block">
      <div className="p-4">
        <button className="p-2 rounded-xl bg-blue-500">
          <BeakerIcon className="w-7 h-7 text-white" />
        </button>
      </div>
      <div className="px-4 py-3">
        <label className="font-medium text-gray-400 uppercase text-sm">
          Analytics
        </label>
        <ul className="space-y-3 py-3">
          <NavItem>
            <PresentationChartLineIcon className="w-5 h-5" />
            Dashboard
          </NavItem>
          <NavItem>
            <DesktopComputerIcon className="w-5 h-5" /> Performance
          </NavItem>
        </ul>
      </div>
      <div className="px-4 py-3">
        <label className="font-medium text-gray-400 uppercase text-sm">
          Content
        </label>
        <ul className="space-y-3 py-3">
          <NavItem>
            <PresentationChartLineIcon className="w-5 h-5" />
            Guides
          </NavItem>
          <NavItem>
            <DesktopComputerIcon className="w-5 h-5" /> Hotspots
          </NavItem>
          <NavItem>
            <DesktopComputerIcon className="w-5 h-5" /> Checklists
          </NavItem>
          <NavItem>
            <DesktopComputerIcon className="w-5 h-5" /> NPS
          </NavItem>
        </ul>
      </div>
      <div className="px-4 py-3">
        <label className="font-medium text-gray-400 uppercase text-sm">
          Customization
        </label>
        <ul className="space-y-3 py-3">
          <NavItem>
            <PresentationChartLineIcon className="w-5 h-5" />
            Segments
          </NavItem>
          <NavItem>
            <DesktopComputerIcon className="w-5 h-5" /> Themes
          </NavItem>
        </ul>
      </div>
    </aside>
  );
}
Then, create an avatar view in the src/components/avatar.jsx file:
export function Avatar({ src }) {
  return (
    <div className="p-1.5 rounded-full bg-blue-400">
      <img
        src={src}
        className="w-12 h-12 rounded-full ring ring-white"
        alt="avatar"
      />
    </div>
  );
}
Next, create the Badge view in the src/components/badge.jsx file:
import clsx from "clsx";
export function Badge({ children, className }) {
  return (
    <div
      className={clsx(
        "rounded-full bg-blue-400 text-white text-xs flex font-medium px-2 py-1",
        className
      )}
    >
      {children}
    </div>
  );
}
Now, create a Card view in the src/components/card.jsx file:
import clsx from "clsx";
export function Card({ children, className }) {
  return (
    <div className={clsx("rounded-xl bg-white shadow-md p-4", className)}>
      {children}
    </div>
  );
}
Create the Header view in the src/components/header/jsx file:
import { Avatar } from "./avatar";
export function Header() {
  return (
    <div className="flex gap-2 items-center">
      <Avatar src={"/img/eiric-wolfbane.png"} />
      <div>
        <p>
          <strong>Welcome Back, </strong>Eirik Wolfbane
        </p>
        <p className="text-gray-500 text-sm">Monthly Active Users</p>
      </div>
    </div>
  );
}
Build the HighlightCard function in the src/components/highlight-card.jsx file:
import { Badge } from "./badge";
import { Card } from "./card";
import { ArrowUpRight, ArrowDownRight } from "lucide-react";
export function HighlightCard() {
  return (
    <Card>
      <div className="grid grid-cols-1 sm:grid-cols-2 md:grid-cols-2 lg:grid-cols-4 bg-gray-200 gap-px">
        <div className="text-gray-400 p-2 bg-white">
          <p className="text-sm">Guide Views</p>
          <div className="flex gap-2 items-center py-2">
            <h3 className="text-black text-3xl font-bold">1.240</h3>
            <div>
              <Badge className={"pr-1.5 bg-green-400"}>
                23 <ArrowUpRight className="w-4 h-4" />
              </Badge>
            </div>
          </div>
          <div className="text-sm">Views (7 Days)</div>
        </div>
        <div className="text-gray-400 px-6 py-2 bg-white">
          <p className="text-sm">Checklists</p>
          <div className="flex gap-2 items-center py-2">
            <h3 className="text-black text-3xl font-bold">680</h3>
            <div>
              <Badge className={"bg-red-400 gap-0.5 pr-1.5"}>
                36 <ArrowDownRight className="w-4 h-4" />
              </Badge>
            </div>
          </div>
          <div className="text-sm">Views (7 Days)</div>
        </div>
        <div className="text-gray-400 px-6 py-2 bg-white">
          <p className="text-sm">Hotspots</p>
          <div className="flex gap-2 items-center py-2">
            <h3 className="text-black text-3xl font-bold">920</h3>
            <div>
              <Badge className={"bg-green-400 gap-0.5 pr-1.5"}>
                45 <ArrowUpRight className="w-4 h-4" />
              </Badge>
            </div>
          </div>
          <div className="text-sm">Views (7 Days)</div>
        </div>
        <div className="text-gray-400 px-6 py-2 bg-white">
          <p className="text-sm">Most Active Users</p>
          <div className="flex gap-2 items-center py-2">
            <h3 className="text-blue-500 text-3xl font-bold">1.565</h3>
            <div>
              <Badge className={"bg-green-400 gap-0.5 pr-1.5"}>
                45 <ArrowUpRight className="w-4 h-4" />
              </Badge>
            </div>
          </div>
          <div className="text-sm">Views (7 Days)</div>
        </div>
      </div>
    </Card>
  );
}
Now build the ReportCard function in the src/components/report-card.jsx file:
import { Card } from "./card";
import { PerformanceChart } from "./performance-chart";
import ViewPerfomanceChart from "./view-performance-chart";
import { Dot } from "lucide-react";
export function ReportCard() {
  return (
    <div className="flex sm:flex-col xl:flex-row gap-4">
      <Card className="flex-1 p-0">
        <div className="space-y-4">
          <div className="border-b border-gray-200 p-4">
            <h3 className="text-gray-700 font-medium">Guide Performance</h3>
          </div>
          <div className="pb-4">
            <PerformanceChart />
          </div>
        </div>
      </Card>
      <Card className="w-full max-w-[18rem] p-0">
        <div className="p-4 border-b">
          <h3 className="text-gray-700 font-medium">Total View Performance</h3>
        </div>
        <div className="relative">
          <ViewPerfomanceChart />
          <div className="text-center absolute inset-x-0 bottom-2">
            <div className="text-xs text-gray-400">Total Count</div>
            <p className="text-[1.7em] font-extrabold leading-tight text-gray-700">
              1.375
            </p>
          </div>
        </div>
        <div className="text-center py-4 px-6 text-gray-500 space-y-4">
          <p>Give your interactions a boost – keep your info current! 🚀</p>
          <button className="py-2 px-8 rounded-xl text-white bg-blue-500 shadow-md">
            Guide views
          </button>
        </div>
        <div className="p-4 border-t">
          <div className="flex justify-between gap-4">
            <p className="inline-flex items-center text-sm">
              <Dot className="w-10 h-10 text-blue-500" /> View Count
            </p>
            <p className="inline-flex items-center text-sm">
              <Dot className="w-10 h-10 text-orange-500" /> Percentage
            </p>
          </div>
        </div>
      </Card>
    </div>
  );
}
Finally, create the last component in the src/components/view-performance-chart.jsx file to display engagement data:
import React from "react";
import { PieChart, Pie, Cell } from "recharts";
const data = [
  { month: "Feb", viewCount: 1500, percentage: 85 },
  { month: "Apr", viewCount: 3400, percentage: 110 },
  { month: "May", viewCount: 2500, percentage: 125 },
  { month: "Jun", viewCount: 2800, percentage: 140 },
  { month: "Jul", viewCount: 3000, percentage: 160 },
];
const COLORS = ["#d1d5db", "#0088FE", "#d1d5db", "#d1d5db"];
const ViewPerfomanceChart = () => {
  return (
    <PieChart width={260} height={150} data={data}>
      <Pie
        dataKey="viewCount"
        startAngle={180}
        endAngle={0}
        data={data}
        cx="50%"
        cy="80%"
        innerRadius={50}
        outerRadius={80}
        fill="#8884d8"
        label={false}
      >
        {data.map((entry, index) => (
          <Cell key={`cell-${index}`} fill={COLORS[index % COLORS.length]} />
        ))}
      </Pie>
    </PieChart>
  );
};
export default ViewPerfomanceChart;
Bundling the project with webpack
Run npm run build to bundle the project so it will be ready to deploy into production: 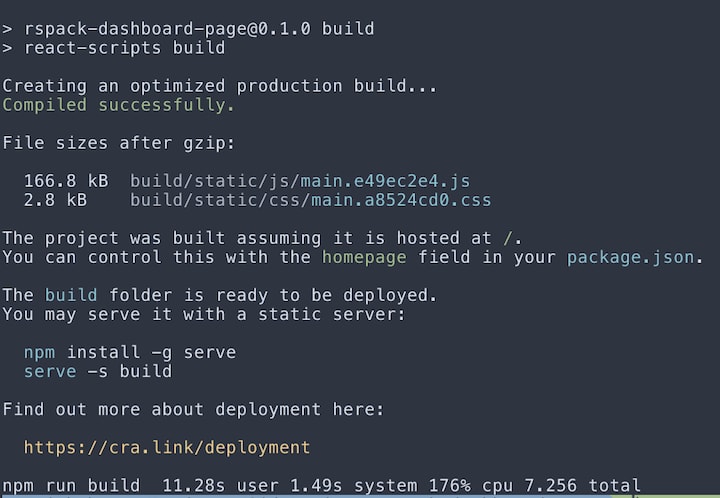 Using webpack, it takes approximately 11.28s to run the production build from.
Migrating the project
We’ve finished crafting our simple dashboard page. Now let’s start the real work of migrating our project to Rspack.
Start by installing Rspack dependencies:
npm install -D @rspack/cli
Next, update react-scripts in the package.json file:
...
"scripts": {
    "start": "rspack serve",
    "build": "rspack build"
  },
...
Now create the Rspack configuration file, rspack.config.js, to complete our migrations. Let’s start with an empty config:
/** @type {import('@rspack/cli').Configuration} */
const config = {
}
module.exports = config
Next, configure the entry point of the React project. As a first step, rename the src/index.js file as src/index.jsx so that Rspack can compile it properly:
const config = {
  entry: {
    main: "./src/index.jsx",
  },
}
Remove the default CRA html file from the public folder:
rm public/index.html
Now, create the custom index.html template:
<!DOCTYPE html>
<html lang="en">
  <head>
    <meta charset="UTF-8" />
    <meta name="viewport" content="width=device-width, initial-scale=1.0" />
    <link rel="icon" href="/favicon.ico" />
    <title>React Dashboard Page</title>
  </head>
  <body>
    <div id="root"></div>
  </body>
</html>
Next, update the rspack.config.js file by copying the public folder asset as well as the template index.html file:
  builtins: {
    html: [
      {
        template: "./index.html",
      },
    ],
    copy: {
      patterns: [
        {
          from: "public",
        },
      ],
    },
  },
Configuring the compiler
We’ll need to do a bit of configuration to be able to run the compiler for Tailwind CSS. You can read the official documentation here.
First, install the tailwindcss dependencies:
npm install -D tailwindcss autoprefixer postcss postcss-loader
Next, create a postcss.config.js file. This config will run postcss to compile tailwindcss and will use cssnano to minify the CSS for a smaller production build:
module.exports = {
  plugins: {
    tailwindcss: {},
    autoprefixer: {},
    ...(process.env.NODE_ENV === "production" ? { cssnano: {} } : {}),
  },
};
Now, import the config into the rspack.config.js file:
...
const postcssConfig = require("./postcss.config");
...
  module: {
    rules: [
      {
        test: /\.css$/,
        use: [
          {
            loader: "postcss-loader",
            options: {
              postcssOptions: postcssConfig,
            },
          },
        ],
        type: "css",
      },
    ],
  },
...
Next, let’s add the config to enable the development server in rspack.config.js. This config will serve the public folder as a static asset. We’ll also enable the source-map in development mode and disable it on the production build:
...
  devServer: {
    static: {
      directory: path.join(__dirname, "public"),
    },
    compress: true,
    port: 3000,
  },
  devtool: process.env.NODE_ENV === "development" ? "source-map" : false,
...
For easy reference, here’s the full rspack.config.js file:
const path = require("path");
const postcssConfig = require("./postcss.config");
/** @type {import('@rspack/cli').Configuration} */
const config = {
  mode: process.env.NODE_ENV === "production" ? "production" : "development",
  target: "web",
  entry: {
    main: "./src/index.jsx",
  },
  builtins: {
    html: [
      {
        template: "./index.html",
      },
    ],
    copy: {
      patterns: [
        {
          from: "public",
        },
      ],
    },
  },
  module: {
    rules: [
      {
        test: /\.css$/,
        use: [
          {
            loader: "postcss-loader",
            options: {
              postcssOptions: postcssConfig,
            },
          },
        ],
        type: "css",
      },
    ],
  },
  devServer: {
    static: {
      directory: path.join(__dirname, "public"),
    },
    compress: true,
    port: 3000,
  },
  devtool: process.env.NODE_ENV === "development" ? "source-map" : false,
};
module.exports = config;
Comparing build time
Run npm run build to bundle the project with Rspack so it will be ready to deploy into production:  With Rspack, build time was 10.7s, compared to 11.28s with webpack.
Comparing bundle size
In our demonstration, we achieved good build performance with Rspack, but as of this writing, Rspack does not provide complete optimization like webpack. As a result, you may end up with a bundle that is quite large.
Here’s the bundle size of our project using webpack:
du -h build/static/js/main.e49ec2e4.js
596K    build/static/js/main.e49ec2e4.js
Here’s the bundle size of our project using Rspack:
du -h dist/main.js
624K    dist/main.js
The difference is around 100kB right now, and it will likely improve as Rspack is further developed.
Conclusion
Rspack is still in early-stage development, but it shows promise as a performant successor to webpack. In this article, we demonstrated that migrating from webpack to Rspack can improve build performance.
If you have an ongoing project that uses webpack, consider migrating to Rspack. Rspack leverages Rust for the critical parts of the bundling process that enable parallelization, and incremental build can provide 4-5x faster build speeds than webpack.
If you are interested in adopting Rspack, see the official documentation for additional details and examples.
Get set up with LogRocket's modern error tracking in minutes:
- Visit https://logrocket.com/signup/ to get an app ID.
- Install LogRocket via NPM or script tag.
LogRocket.init()must be called client-side, not server-side.
NPM:
$ npm i --save logrocket

// Code:

import LogRocket from 'logrocket';
LogRocket.init('app/id');
Script Tag:
Add to your HTML:

<script src="https://cdn.lr-ingest.com/LogRocket.min.js"></script>
<script>window.LogRocket && window.LogRocket.init('app/id');</script>
3.(Optional) Install plugins for deeper integrations with your stack:
- Redux middleware
- ngrx middleware
- Vuex plugin

Top comments (0)