
Written by Rishabh Rawat✏️
If you’ve ever done an API integration, you’d know it. Whenever something breaks or doesn’t work, an API owner needs to communicate a bunch of basic details, including status codes, happy paths, required parameters, and authentication mechanisms.
This approach requires a constant context switch and is clearly not productive. Here, the OpenAPI Specification can help; you might already have it, but is it scalable? In this article, we’ll learn how to create an OpenAPI Specification document that is readable, scalable, and follows the principle of extension without modifying the existing document.
We’ll use a sample Node.js API that uses the Express framework. We’ll write the specification document for this API and learn how to create a scalable and easy-to-maintain OpenAPI specification along the way. Let’s get started!
Jump ahead:
- What is the OpenAPI Specification?
- Why write an OpenAPI Specification?
- What does an OpenAPI Specification look like?
- Writing a specification for our sample Node.js API
- Writing possible responses
- Best practices for writing an OpenAPI Specification
- Visualizing the specification with Swagger UI
What is the OpenAPI Specification?
When it comes to working with any API, we all know how important having a well-written documentation is. An incomplete, or worse, incorrect documentation results in wasted time and effort. T
he OpenAPI Specification aims to solve this problem by providing a standard, language-agnostic interface to understand and interact with the API in a way that is easier for both humans and computers.
An OpenAPI specification document describes the complete API in an industry-standard manner. It is battle-tested, meaning you won’t miss out on any useful information.
Why write an OpenAPI specification?
In a world where we’re constantly working on the next big thing, it’s pretty boring to spend time writing documentation. However, having detailed written documentation can benefit the rest of your team as well as any end users. Writing scales, and anyone can refer to the documentation and understand the API from the inside-out.
This alone is enough motivation to incorporate an OpenAPI specification in your APIs. But, the benefits don't stop there. For one, by providing the specification, you can generate API code in any language, which helps in quick prototyping if you want to replicate any API using a different programming language.
In addition, because the specification is aware of all the possible request parameters and corresponding responses, you can use it to generate test cases for your API and make sure your API is working as expected.
What does an OpenAPI specification look like?
An OpenAPI specification consists of several different components, each having a dedicated and important purpose. Let’s take a look at each one.
info
The info object provides metadata about the API, like its title, version, and contact information. You can use this information to identify the API and understand its purpose.
server
The server object describes the URLs of the API, including the base URL as well as any variables that are used in the URL.
paths
The paths object describes the endpoints of the API and the operations that can be performed on them. This includes the HTTP methods, like GET, POST, and PUT, as well as the parameters and responses for each endpoint.
components
The components object is a container for reusable objects like schemas, examples, and security schemes. You can reference these objects from elsewhere in the specification, making it easier to maintain and update the specification.
Schemas
Schemas help you define the data type of input and output objects. Any request parameter, request body, or response object that you use in the specification can be abstracted as a schema object and reused wherever required.
A schema object can be understood as a variable in your Node.js application. Both promote reusability but aren’t involved unless used in the code.
responses
The responses object contains all the possible API responses mapped to the HTTP status code.
security
The security object describes the security requirements for the API, including the types of authentication and authorization that are supported, as well as the scopes that are required for different operations.
tags
The tags object describes a list of tags used by the specification with additional metadata. This can be used to group related endpoints together and organize the specification.
Writing a specification for our sample Node.js API
Now that we have the basic understanding of the OpenAPI Specification, why it is important, and what components comprise it, let's document our sample Node.js API.
It’s very important to make sure that the specification is scalable. Putting everything inside of a single file defeats the purpose of human readability, but unfortunately, it is a common practice.
We’ll create a better, more human-readable specification that achieves all of the things it promises. Before we get to it, let’s make sure to create a docs/ folder at the root of the project. The folder structure looks like the following:
|- docs/
|----schemas/
|----responses/
|----paths/
|----index.json
|- src/
|- package.json
|- package-lock.json
Once it’s done, we can install the required dependencies.
Installing dependencies
We'll need two packages to create a scalable OpenAPI specification; run the following command to install them:
npm install @apidevtools/swagger-cli
Creating a schema
We need to create schemas for the common and reusable entities in our REST API. Since we only have one major entity, we’ll create a schema for Item in docs/schemas/item.json:
{
  "type": "object",
  "required": ["name", "hash", "rating", "price"],
  "properties": {
    "name": {
      "type": "string"
    },
    "rating": {
     "type": "string",
      "example": "4"
    },
    "price": {
      "type": "number"
    },
    "hash": {
      "type": "string"
    }
  }
}
Writing possible responses
There are three possible responses that our API will return to the clients:
-
200: Success -
500: Internal server error -
400: Bad request
Keeping our API's behavior in mind, we’ll create three response files documenting these scenarios.
Successful response
For a successful API response, we'll use the code below:
{
  "description": "Response for operation successful",
  "content": {
   "application/json": {
      "schema": {
        "type": "object",
        "properties": {
          "message": {
            "type": "boolean",
            "enum": [true],
            "example": true
          },
          "item": {
            "$ref": "../schemas/item.json"
          }
        }
      }
    }
  }
}
Internal server error
While your API serves a request, issues can occur. For example, the database connection might time out, the network connection can get lost, your API might over-utilize resources like CPU, RAM, etc., causing a shutdown.
Whenever our API fails to serve the request, by no fault of the client, we return an internal server error response, a 500 HTTP status. Below is our specification document for such an error:
{
  "description": "Response for operation successful",
  "content": {
    "application/json": {
      "schema": {
        "type": "object",
       "properties": {
        "message": {
         "type": "string",
            "example": "Something went wrong while creating a new item!"
          },
          "item": {
            "type": "object",
            "enum": [null]
          }
        }
     }
   }
  }
}
Bad request
And, finally, we give a bad request response to the client if it passes invalid or incompatible details that break our API contract:
{
  "description": "Response for operation successful",
  "content": {
    "application/json": {
      "schema": {
        "type": "object",
        "properties": {
          "message": {
            "type": "string",
           "example": "Something went wrong while creating a new item!"
         },
         "item": {
            "type": "object",
            "enum": [null]
          }
        }
      }
    }
  }
}
Adding security schema
The sample API doesn’t enforce any form of authentication. That’s not our goal; the goal is to understand how to write the specification, which can handle authentication. To solve this issue, we’ll require an authentication header with a bearer token scheme and apply it globally.
Below is our security schema:
{
  "bearerAuth": {
      "type": "http",
    "description": "JWT authorization header using the bearer scheme",
     "scheme": "bearer",
      "bearerFormat": "JWT"
  }
}
You can make authentication mandatory by adding it to the root of your OpenAPI specification document:
"security": [
    {
        "bearerAuth": []
    }
  ]
Putting it all together in the paths section
Finally, add the following scripts in the package.json file:
"scripts": {
  "docs:debug": "swagger-cli validate -d docs/index.json",
  "docs:generate": "swagger-cli bundle docs/index.json --outfile openapi.json",
}
To generate the final OpenAPI specification file, simply run the following command:
npm run docs:generate
To validate your specification for syntactical correctness, run the code below:
npm run docs:debug
You can even choose to combine the validation and specification generation commands to automatically validate the specification every time you generate one:
"scripts": {
  "docs:debug": "swagger-cli validate -d docs/index.json",
  "docs:generate": "npm run docs:debug && swagger-cli bundle docs/index.json --outfile openapi.json",
}
You can also automate the OpenAPI specification generation by adding the docs:generate script above to your Husky pre-commit hook. Therefore, you’ll always have a valid and up-to-date specification on every commit:
"husky": {
    "hooks": {
      "commit-msg": "commitlint -E HUSKY_GIT_PARAMS",
      "pre-commit": "npm run docs:generate && npm run codefix && git add ."
    }
  }
Why wouldn’t any automation enthusiast do this? I’ve already added this to the sample Node.js API, so you can clone the project and play around with it.
Best practices for writing an OpenAPI specification
With that, we’ve finished writing our OpenAPI Specification, and it looks clean. There are certain practices that we should follow to increase the quality of our specification and ensure that it’s scalable.
Don't add redundant context in names
When writing schemas, responses, or any other component of the specification, you should avoid adding unnecessary context that complicates the name. For example, using response/success.json is much more concise and readable than response/successResponseFromHTTPRequest.json.
Choose generic responses whenever possible
When creating response components for your OpenAPI Specification, you should try to make the responses as generalized as possible as long as it doesn’t contradict the way your API is written. This promotes reusability and makes your specification scalable.
Visualizing the specification with Swagger UI
You can use the specification file and share it with other teams during integration requirements. Swagger UI makes the specification interactive, so it’s easier to consume and understand.
Since we’ve already created the specification, it’s just a matter of plugging the Swagger UI Express package and creating a dedicated route to host the interactive documentation. First, let’s install it:
npm install swagger-ui-express
Once it’s done installing, create a route for hosting the documentation with the code below:
const swaggerUi = require('swagger-ui-express');
const openApiDocumentation = require('../openapi.json');
app.use('/docs, swaggerUi.serve, swaggerUi.setup(openApiDocumentation));
And with that, we’re done! You can now visit the URL and start interacting with the documentation: 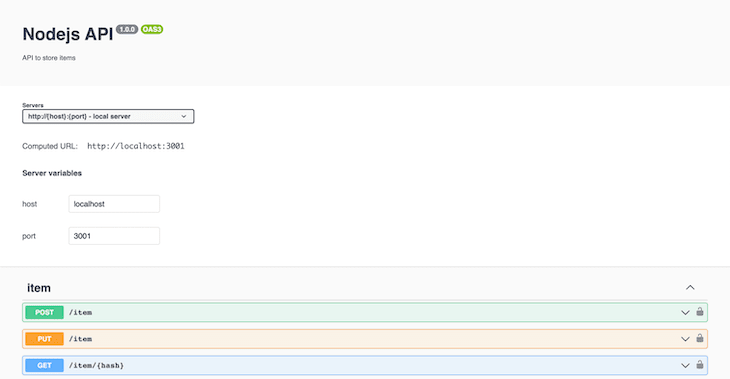
Conclusion
In this tutorial, we’ve successfully created a scalable OpenAPI specification for our sample Node.js API. Instead of just blindly following the OpenAPI specification trend, we first reviewed it in detail. I hope that this article helped you understand why the OpenAPI Specification is essential and learn how you can write one for your Node.js applications.
If you have any questions, feel free to leave a comment below. Happy coding!
200’s only ✔️ Monitor failed and slow network requests in production
Deploying a Node-based web app or website is the easy part. Making sure your Node instance continues to serve resources to your app is where things get tougher. If you’re interested in ensuring requests to the backend or third party services are successful, try LogRocket.

LogRocket is like a DVR for web apps, recording literally everything that happens on your site. Instead of guessing why problems happen, you can aggregate and report on problematic network requests to quickly understand the root cause.
LogRocket instruments your app to record baseline performance timings such as page load time, time to first byte, slow network requests, and also logs Redux, NgRx, and Vuex actions/state. Start monitoring for free.

Top comments (0)