
This is a basic guide to deploying a bare-bones Laravel project on Heroku with a free-tier PostgreSQL database. (No billing info required.)
Steps:
My setup:
- Laravel Framework 8.83.16
- macOS High Sierra
1. Create A New Laravel Project
To create a Laravel project, we're going to need composer. So if you don't have it installed yet, open a terminal and run:
composer global require laravel/installer
cd to the directory where you want to create the new project directory. I'll be doing this in /Desktop.
Create a new Laravel project. I'm naming it 'laravel-heroku':
~/.composer/vendor/bin/laravel new laravel-heroku
Open the Laravel project directory that was just created in an IDE.
To check everything is working so far, serve the project locally:
php artisan serve
The terminal should spit out a line like:
Starting Laravel development server: http://127.0.0.1:8000
Open the given URL in a browser. You should see a screen like this:
To complete the setup for a fresh Laravel project, install the dependencies of the package.json:
npm install
2. Create Heroku App + Database
Next we're going to create a Heroku app and add a database to it.
So, create an account on Heroku if you don't have one yet and head over to https://dashboard.heroku.com/new-app.
Fill in a name, change the location if desired, and hit Create app.

On the next screen you can handle the deployment of the project. But we won't do anything with that yet. First we're going to make sure Laravel can connect to a database on Heroku.
So, head over to the Resources tab, and in the Add-ons search bar, type 'heroku postgres'.
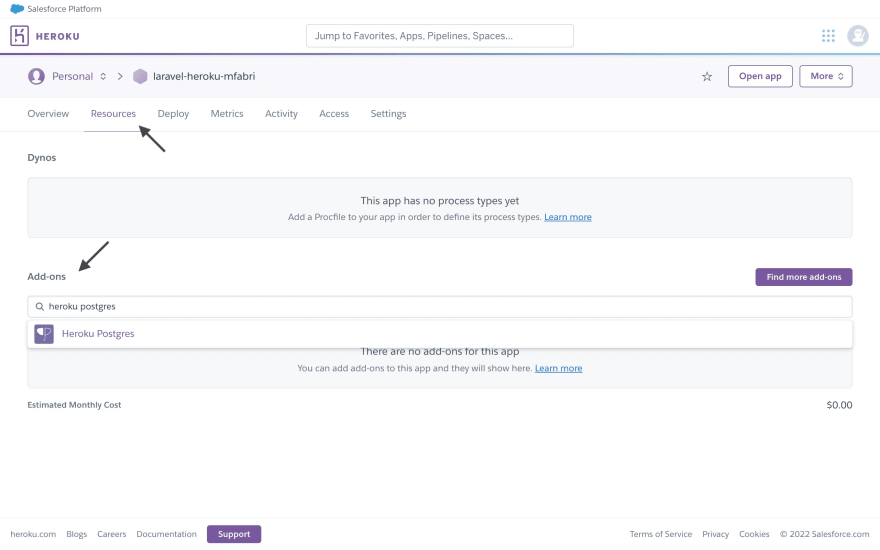
Select Heroku Postgres, and click Submit Order Form on the modal that pops up.
No worries: it's completely free and no billing info has to be given for this add-on.
Now head over to the Settings tab, click Reveal Config Vars.
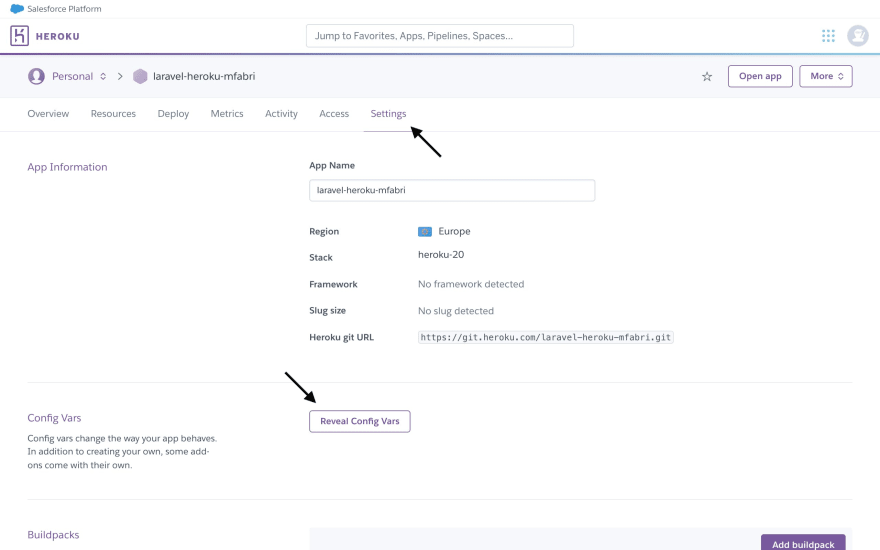
and copy the DATABASE_URL

We'll need this in a moment.
3. Connect To The Database
Now we're going to connect the Laravel app to the Heroku database we just created.
Open /config/database.php in your Laravel project directory.
3.1 Change Connection Parameters
First, let's get this chunky database URL off your clipboard!
Scroll down to the connections array, which contains a pgsql array, which contains a url key (line 68 for me). It should look like this:
'url' => env('DATABASE_URL'),
Now slap in the database URL as a second argument to env(), so that it looks something like this:
'url' => env('DATABASE_URL', 'postgres://blablabla:blablabla@bla-bla-bla.compute.amazonaws.com:5432/blablabla'),
This makes it so that Laravel will first look for the DATABASE_URL environment variable (which it won't find until we deploy to Heroku) and otherwise will use the database URL that we just pasted in.
Side note:
This database URL has an expiration date, as Heroku changes it every once in a while. But we're only using it briefly here to check if the database connection is being made successfully before deploying to Heroku, so we don't care about that.
3.2 Change Database Type
Now scroll back up. Near the top (line 18 for me) you should see the following line:
'default' => env('DB_CONNECTION', 'mysql'),
Change this to:
'default' => 'pgsql',
Because we want Laravel to go straight to the pgsql parameters in the connections array below, instead of checking the environment (currently supplied by .env) for indications on what database connection to use.
3.3 Populate The Database
To finish setting up the database, run:
php artisan migrate
Side note:
If the following error is encounteredIlluminate\Database\QueryException SQLSTATE[HY000] [1045] Access denied for user 'root'@'localhost' (using password: NO) (SQL: select * from information_schema.tables where table_schema = laravel_heroku and table_name = migrations and table_type = 'BASE TABLE')go back to the 'Change Database Type' step and make sure you followed it correctly.
3.4 Check If It's Working
To check if the database connection is functional, we're going to add some code to /resources/views/welcome.blade.php. Just inside the body tag, before the first div, copy-pasta the following snippet:
    <body class="antialiased">

        // start of snippet

        // we'll allow ourselves a bit of bad practice for a quick test ;)
        <?php
            $migrations = Illuminate\Support\Facades\DB::table('migrations')->get();
        ?>

        <h3>Migrations List</h3>

        <ul>
            @foreach ($migrations as $migration)
                <li>
                    {{ $migration->migration }}
                </li>
            @endforeach
        </ul>

        // end of snippet

        <div ...
This, very unceremoniously, pulls the entries in the migrations table from the database and tosses them on the screen.
Refresh the browser tab that's displaying the Laravel project. It should now look something like this:
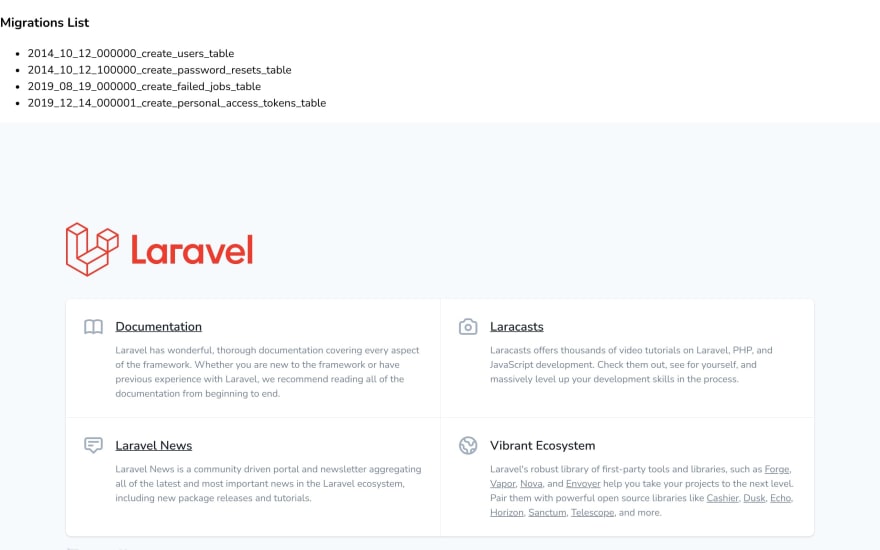
It ain't pretty, but it proves that the database is connected and the migrations succeeded.
Don't remove it again right away. We should keep it until after deploying the project to Heroku and making sure the database connection is still alive and kicking.
4. Deployment
We're finally ready to start deploying!
4.1 Add A Procfile
However ✋, we first need a Procfile.
A Procfile "specifies the commands that are executed by the app on startup" - sauce. We need to add one with the particular commands that our project requires to the root of the project directory. No biggie; just run this command:
echo "web: vendor/bin/heroku-php-apache2 public/" > Procfile
Important
Make sure it's in the root of the project directory and that file is created exactly the way it is in the above command. Heroku is sensitive about its Profiles.
4.2 Push To Heroku
In order to push directly to Heroku we're going to need the Heroku CLI. So if you don't have it yet
👉 https://devcenter.heroku.com/articles/heroku-cli
Start the Heroku login process with the following Heroku CLI command:
heroku login
and follow the onscreen instructions. (These may include the creation of a new SSH public key)
In the root of the project directory, initialize a git repo:
git init
Side note:
No need to worry about pushing unwanted files. Laravel already provided an appropriate .gitignore for us.
Link the repo to the Heroku app by adapting the following command (remove < & >):
heroku git:remote -a <YOUR APP NAME HERE>
Important
Make sure you use your app name as you set it on Heroku; not the Laravel project name.
Execute the remaining commands to push the project to Heroku:
git add .
git commit -am "First commit"
git push heroku master
A bunch of stuff will appear in the terminal. At the end it will spit out two URLs. The first one is a link to the deployed app. That's the one you want. The second one will just give you a 'Method Not Allowed' if you open it in the browser.
If you open it right away, you'll fall into the warm, welcoming embrace of a 500 | SERVER ERROR screen. No worries! There's simply one last, little thing we have to do. 👇
4.3 Set APP_KEY
In order for Laravel and Heroku to play nice together, we need to generate a Laravel app key and pass it to Heroku. Like so:
heroku config:set APP_KEY=$(php artisan --no-ansi key:generate --show)
Now give it a refresh. Is it working? 🤞
Hopefully everything went well.
If not, check out the info below. 👇
Enable Debug Mode
In case something doesn't go as planned and Heroku is having some issues running the app, it's good to enable debug mode, as this will give you much more detailed and helpful error messages. Enable it like so:
heroku config:set APP_DEBUG=true
Important
Don't forget to turn it back to false when you're done, as it can expose sensitive information.
Common Errors
403
Forbidden
You don't have permission to access this resource.
Possible cause: no or bad Procfile
Possible solution: redo step 'Add A Procfile', then (add,) commit and push.
500
No application encryption key has been specified.
Possible cause: Laravel app key wasn't set or incorrectly
Possible solution: redo step 'Set APP_KEY'

Top comments (0)