Congrats! you’ve just opened a brand new AWS account. What now? Beside getting rid of the root account, the second most wise action to do before doing anything is setting some control for bills.
I’m writing this post because some months ago I incurred in a 20 - something dollar bill from AWS for one of the accounts I opened in order to do some exercises. The account hadn’t much going on, but I left a disconnected elastic IP on for about a week… thus the mishap.
So let’s see what I’d love to have done in that situation, of course along with the respective Cloudformation templates.
Activate cost explorer
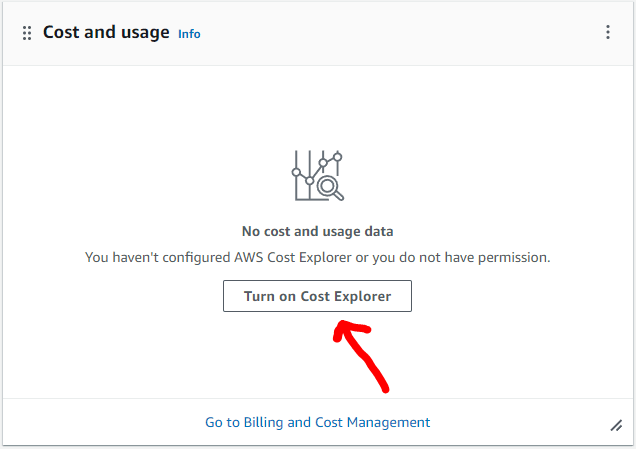
While being with the root account, you might want to turn cost explorer on. You can do it from two places: in the main UI you should see a box with “Cost and usage”, and at its center a button stating “Turn on cost explorer”
Or you can go in the upper left corner of the webpage, open the dropdown of the account by clicking on it, and go to “Billing and cost management from there”

A little wait
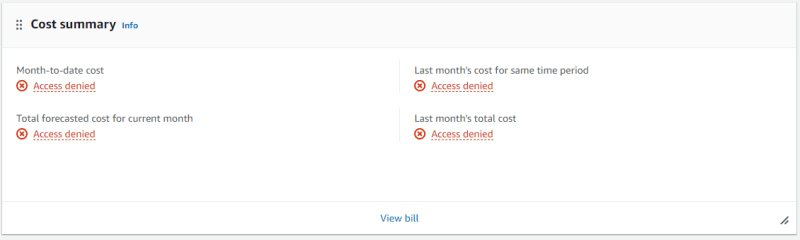
The AWS cost explorer needs more or less 24 hours to set up itself and start collecting spending data. Because of this, even with a root account you might see an “access denied” on the cost explorer UI once activated.
While waiting for AWS to set up its data, you can create a new admin user that you will use to manage the account and view the bills
Create a new IAM user
I’ll go quick over this procedure, since there are a lot of step by step tutorials out there.
Log in into root account and, using the search bar on the top left of the webpage, search for IAM. There will be a bunch of warning such as: “your root account does not have MFA enabled”, let’s skip those. Search for “Users” and, on the page you’ll be directed to, click on “Create user”. You’ll get to a page like this one:
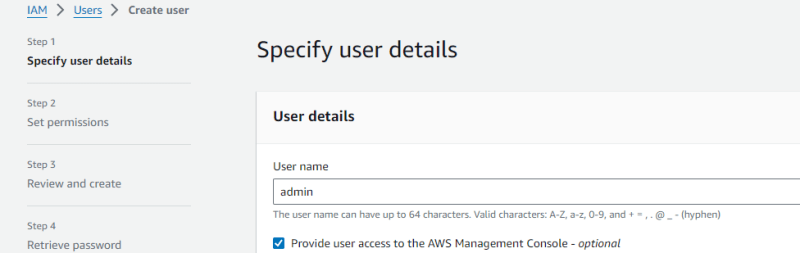
Be sure to flag “Provide user access to the AWS Management Console - optional“. This will trigger some other warnings about how users are created. Since this user will be an administrator and will be used also for creating cloudformation stack later, we’ll skip those. I’m specifying the password on creation and unflag the “ask password on login” for simplicity.
Next, let’s give our newly created user the administrator powers. To do so, AWS already provides a policy that can be attached directly to the user that basically states “can do anything on any resource”. Below is the policy choice:

After linking the policy to the user, we have now an admin account that has all the power we need without being the root account. However, if we login with this user and search for Cost explorer, we’ll still see “access denied”, as shown below:

So, it’s time to log back with the root account (for the last time) and enable IAM cost control.
Enable IAM cost control
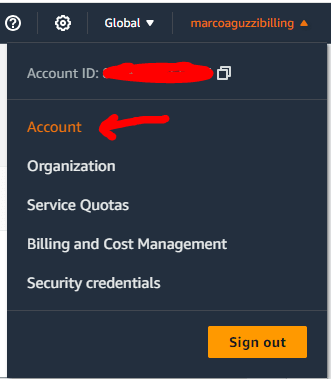
While logged in as the root user, search for “account” settings in the user menu on the top right of the page:
Scroll down on the page and search for “IAM user and role access to Billing information”:

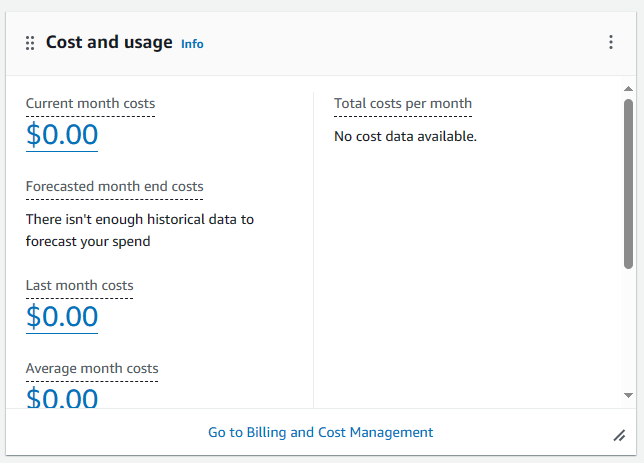
Click on the edit button and activate it. Now you can get back to the admin user and, if you were being logged in another browser, hit refresh and you should see the cost explorer enabled, stating a reassuring 0 USD expenses.
You can now go to billing and cost management and search for the cost monitor. As expected both budget and monitor require setup. Below is what you should see before configuring both. Please note two things:
- Depending on when you create the account, you can see a default cost monitor already setup, with 100 USD and 40% usage thresholds
- You should still see an “access denied” below the “Total forecasted month costs”, but that’s fine, it’s only because the account has just been created.

After some time, the cost explorer preview in the home page should look like this:

As you can see, the costs are split by service and by month, and it should be clear which is the service spending more money. Now let’s get to Cloudformation.
Create Budget and Monitor
The Cloudformation file that is going to setup budget and monitor is quite simple. I’m showing the whole file first, and then I’ll get to the highlights.
Here it is what to expect after running the CloudFormation template:

Parameter section
This stack will have one input parameter: the email address were we want to send the notifications when eventually the budget or the monitor will hit the thresholds. That will go from line 3 to 8. The same email address will be used both for the budget and the monitor.
The budget
The whole section goes from line 11 to line 41. The resource type is AWS:Budgets:Budget. Some info about the properties:
- Budget: You’ll have the BudgetLimit, with the amount and the unit. Even after switching my billings to EUR, the only accepted value seems to be USD. Anyway, it’s stating that the expenses should not exceed 6 bucks
- TimeUnit: Here we’re saying 6 bucks a month, max
- BudgetType: Just COST here. Other values would have pointed to usage or reserved instance usage, or saving plans. We’re not doing anything that fancy here
- NotificationsWithSubscribers: Where to send the email when the threshold gets hit. In this case it’s stating that if the forecast is greater than 80% of the threshold (6 dollars), the email will be sent.
The budget can also be set for taking actions such as “run stuff if costs are too high”, but the architecture for this website isn’t a good fit for an actual example.
Let’s see how a budget line should show after the stack has been created:

Clicking on the line, you can see the configuration of the budget and if any alarm has been fired:

The monitor
This section goes from line 42 to the end of the file. Also in this case the instructions are for sending an email if the thresholds are hit, but in a different flavor. Lines 45 to 47 state how the costs are looked after, and lines 50 to the end tell that the monitor will scan the costs every day (Frequency:Daily, line 55), checking if any of the service in use is spending more than 10 USD. If so, the email will be sent.
In this file the monitor specification are kept as simple as possible, thus SERVICE is a mandatory value, and the type is DIMENSIONAL.
The monitor could also split the costs with a finer grain (e.g. by tags on resources), but (idk if luckly or unluckly) my costs are too low and the resources involved wouldn’t fit for such an analysis.
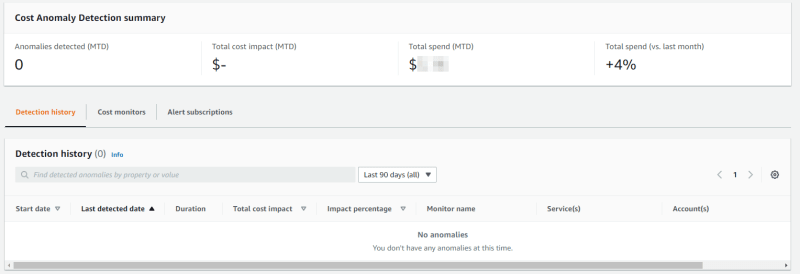
Here’s the page of the monitor details, showing the history of fired anomalies (luckly, none so far).
Cloudformation CLI setup
I’m going for multiline with the CLI instruction in order to minimize scrolling.
There’s no dev or prod environment in this case, since both are under the same AWS account.
Create stack
aws cloudformation create-stack --stack-name cost-control-stack \
--template-body file://cost-control.json \
--parameters ParameterKey=EmailAddressForNotificationParameter, \
ParameterValue=<email\_address>
Update stack
The only relevant point here is to use UsePreviousValue=true in order to leave the email notification parameter untouched.
aws cloudformation update-stack --stack-name cost-control-stack \
--template-body file://cost-control.json \
--parameters ParameterKey=EmailAddressForNotificationParameter, \
UsePreviousValue=true

Top comments (0)