
Salesforce Marketing Cloud's tracking codes are essential to unlocking many of its advanced marketing automation features. Whether you're simply wanting to send an email based upon what product(s) a subscriber has viewed or start up Einstein's recommendation engine - it begins with correctly installing tracking codes.
Unfortunately, figuring out how to install the codes that track subscriber behavior can prove challenging for non-experts. This step-by-step guide will help get you started installing the collect codes on any standard Shopify store - without the need of any additional applications.
This guide assumes you've uploaded an initial product catalog, created the standard Einstein Recommendation data extensions, understand personalization strings and know the basics of editing the theme code of a standard Shopify store.
Step 1 - Base Collect Code
Every webpage that uses a Marketing Cloud tracking code will need the Base Collect Code installed first. Install the following code in the theme.liquid file before the closing tag:
Make sure to replace the MID with your business unit unique identifier, not only for the Base Collect Code but for all of the below code.

Step 2 - Start appending Subscriber ID or Subscriber Key to outbound links
Next, we need a way to identify a specific Marketing Cloud subscriber's behavior on the website. One relatively easy way to do this is by passing the subscriber key or id as a parameter in links from Marketing Cloud emails.
You could use Marketing Cloud's Parameter Manager to automatically append the same parameters to all links - but this can interfere with other links you build that rely on other parameters. Instead, I recommend working with Marketing Cloud's support team to alter the Conversion Tracking Link that can be enabled on specific links in an email.

For example, I used the default 'sfmc_sub=%%subscriberid%%' used by checking the Conversion Tracking Link box in Email Studio on links that lead to the Shopify store.
Step 3 - Tracking Users
Now that we have parameters in links to help identify subscribers, we can use javascript to use the parameter in the User Collect Code. Here is an example of the javascript to install at the bottom of theme.liquid template:
Remember to replace the MID - and 'sfmc_sub' with the name of the parameter used for the unique Subscriber's ID or Key.
Don't be tricked by the use of 'email' in the collect code, we can use any unique identifier that Marketing Cloud can map to the subscriber. In fact you should NOT use an email address or any other Personal Identifying Information in the tracking codes.
Ignore Salesforce instructions on only installing the User tracking code on login pages. We want to be able to identify subscribers and track their behavior by establishing a cookie regardless of whether they log into the Shopify store.
While this method has the benefit of establishing cookies for subscribers without requiring them to log into the Shopify store, it can cause issues when subscribers forward their email to others or copy/paste it into a website.
Step 4 - Track Products Views
With subscribers being identified through the User collect code, it's time to track what products they're viewing. Install the following code in the product.liquid template file in your Shopify theme:
Remember to change the MID to your Marketing Cloud ID.
Step 5 - Streaming Catalog Updates
Tracking item views is easy - keeping your product catalog up to date is a bit more difficult. No one wants to constantly be uploading a new catalog every time you add, remove or adjust a product on Shopify.
There are essentially two options for automatically keeping the catalog up to date: batch uploads and Streaming Catalog Updates. Batch uploads are a possible solution, but require regularly exporting a .csv from your Shopify store to Marketing Cloud's SFTP - but this will require either an additional application or API development. Many of the Shopify applications once capable of automatically exporting a catalog are no longer compatible with Salesforce's strict SFTP rules.
Instead, let's use Streaming Catalog Updates in Shopify by installing the following code on your product.liquid template:
Remember to update the MID and the domain of your Shopify store for the url attribute. This is a simple product catalog, with a single primary category attribute and multi-value Tags attribute. If your catalog requires more attributes, you'll need to map them to the Shopify object here.
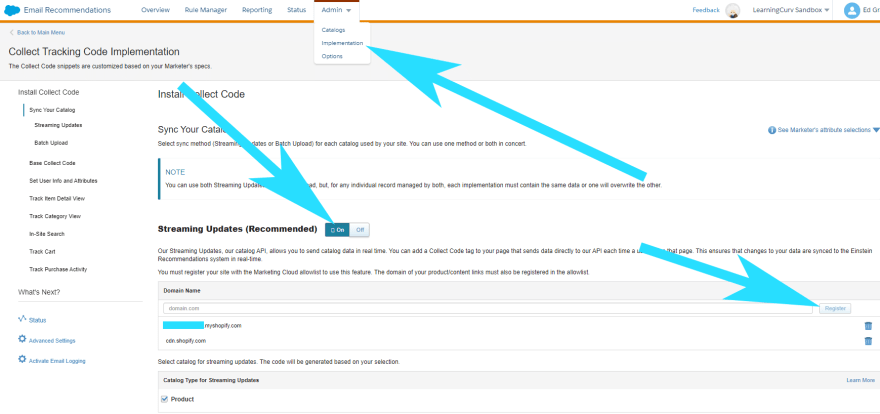
Make sure to turn on Streaming Catalog Updates in the Implementation dashboard. Next, whitelist the domain of your store - and the standard cdn.shopify.com domain where product images may be hosted.
Step 6 - Troubleshooting Collect Codes
With the Base, User, Item View and Streaming Catalog Update codes installed, it's time to check if they are working. Navigate to the Status dashboard under either Web or Email Einstein Recommendations to see which of the installed codes are working.

Remember, you won't get identified sessions until users click on a link that passes their Subscriber ID or Key. Test the User code by sending a test email to yourself.
Unless you're a superhuman coder, there are likely to be mistakes to work through - it happens. Don't worry, the remaining of the tracking codes are relatively simple - the Streaming Catalog Updates and User Code are the tricky ones that we must get to work first.
You can use the Network tab in Chrome's Developer Inspector tool - filter for 'IGO' and make sure any kind of ad or script blockers are turned off. Navigate the website and check the payload of the tracking codes to see what needs fixed.

Step 7 - Track Cart Activity
To track what items are in a subscriber's cart, we'll use JavaScript to listen for the Add-to-Cart button is clicked on a product's page. Add-to-Cart buttons can vary depending on your Shopify theme - so you will need to know the CSS class or ID for JavaScript to identify the button(s) that should trigger the event.
This Shopify's store Add-to-Cart button has a class of '.product-form__cart-submit'. When a button with that class is clicked, the cart tracking collect code will be triggered. Remember to replace it with the class of your Shopify store's Add-to-Cart button(s).
It's important to note that the cart tracking code will overwrite any existing information in the subscriber's cart. That's why the tracking code needs to loop through all the items that are already in their Shopify cart - while adding the new product as well.
Next, we should also track cart activity on the actual cart page by inserting the following code into the cart's liquid template:
The above code will let Marketing Cloud know when a subscriber's cart is empty. As always, remember to change the MID to your Marketing Cloud's unique identifier.
Step 8 - Track Purchases
Instead of updating a liquid template file, we'll be adding the following collect code to the additional scripts section of the checkout settings in Shopify:
We need to include the base tracking code again because Shopify's checkout process is handled on a third-party site.

Since shoppers may return to their order confirmation page several times, we should included liquid code that will only initiate the purchase tracking code the first time a user visits the page.
Step 9 - Track Searches
Next, replace the MID and install the following code in the search liquid template file:
Step 10 - Track Category Views
Categories are referred to as collections in Shopify. Install the category collect code in the collection liquid template:
Congratulations: your Shopify store is now tracking the behavior of your Marketing Cloud Subscribers! Check the Status dashboard again to make sure everything is working properly - and fix any issues.
Step 11 - Check IGO Data Extensions
With the catalog uploaded and collect codes now installed, the IGO data extensions should start populating.
You'll notice the user_id is mapped to the Subscriber ID or Key in the 'email' column of the IGO_Profiles extension. This user_id is the external key to map the subscriber's activity inside the IGO_Views and IGO_Purchase extensions.
Finally, with some SQL queries and the _Subscribers data view - you're ready to set up some sendable data extensions based upon what products a subscriber viewed or purchased. With some more time and data, you can also start using the Einstein email and web product recommendations and behavioral triggers.
(This content was made while working as a Marketing Cloud consultant for LearningCurv in Austin, TX)

Top comments (0)