Introduction
When developing medium and large applications, UI/UX testing becomes a challenge. To verify the design and form interactions, we often need to understand the entire business flow, like how to navigate from Sign In Form to Add PayPal payment details form.
This frequently requires:
- Creating test users
- Configuring necessary permissions
- Populating the database with test data

In such conditions, design validation becomes a struggle for developers, designers, and project managers.
Decouple UI/UX Testing from the Backend
I believe that UI and UX validation should be independent from the backend. There is no reason to understand the entire business process just to:
- Open User Profile view;
- Verify that the save button is enabled only after valid input;
- Ensure error messages appear appropriately when invalid data is entered.
How to Achieve This?
The only solution is to develop custom dev tools at least that:
- Mock API calls
- Modify application stores
- Enable quick navigation within the UI
This allows:
✔️ Rapid validation of new frontend features;
✔️ UI/UX testing without backend dependencies;
✔️ Comparing current designs with previous versions.
Presets, dynamically change backend response, navigate between views.
With dev tools, the desire to automate visual regression testing comes to mind. This leads us to the next topic: screenshot testing. Screenshot testing is the name for the assertion, not the type of testing. Screenshot testing could be e2e (for example playwright or selenium support screenshot snapshots), or unit tests.
However E2E is slow, moreover they require a lot of business knowledge and sometimes infrastructure knowledge from developers. And do we really want to run the e2e test after changing the button padding? I don’t think so. The front-end unit test should care about consistency of design after changing the button padding. But true is
FRONTEND TESTS DON’T CARE ABOUT STYLES AT ALL
It doesn’t make any sense for me, because even if it is just a small padding, it could create such a mess. Why do frontend developers ignore that? That is how I was working:
- testing-library - utils for testing React
- jest for running test
- node - javascript environment
The problem in such an approach is: I don’t see the browser in the list. Where are we testing frontend units? Inside the virtual js-dom, it even doesn’t have 100% compatibility with the Browser DOM. Application behavior heavily depends on the device and environment:
📱 Android, iOS
💻 MacBook, Windows, Linux
🌐 Chrome, Safari (even browser versions affect performance!)
And here we are, frontend developers, who believe that js-dom inside nodejs runtime is a good idea to run tests.
After discovering of the screenshot tests, I stopped testing UI unit test that are:
- Ensuring DOM elements are rendered.
- Verifying the presence of a
<div id="test">, or any other tests related to rendering, view or styles.
However, unit testing with jest/node is still essential for logic independent from rendering. This is why separating view from model and state is crucial! But testing frontend view without styles or Browser APIs is like tasting a cake by only reading the recipe.
Environment
Storybook
Devtools for quickly navigating around UI components or pages is not something I created. Actually, it’s a pretty old issue which, in my opinion, has been solved by Storybook.js. What it could do now is quite impressive, and I only used like 25% of all Storybook features. Storybook is incorporated inside the frontend repository, and it has direct access to all UI components and code, but it doesn’t leave a trace in code. It’s like a jest unit test, but with different name extension:
Login.test.tsx→Login.story.tsx
You could write stories as just plain stupid components, or you could make an actual story: full flow of some user activity. For more details on what is a storybook, you could check the official storybook page.
Storybook showcase I like: React95
Docker
Docker needs for several reasons:
- Minimal requirements to run screenshot test, just have docker installed
- Make you dev setup platform agnostic
- Chrome browser image (to have the same version of chrome across all developers and env)
- DPI and other OS setup/configuration affects the screenshots.
Loki
Bunch of scripts for starting chrome, getting a list of stories, making screenshots and comparing them with references.
Below you could find the example configuration for loki. It shows that you could run tests on chrome in laptop or mobile emulator (not a real mobile emulator, but the one in desktop devtools), and ios, android (never tested).
"loki": {
    "chromeSelector": "#my-decorator > *",
    "configurations": {
      "chrome.laptop": {
        "target": "chrome.app",
        "width": 1366,
        "height": 768
      },
      "chrome.iphone7": {
        "target": "chrome.docker",
        "preset": "iPhone 7"
      },
      "chrome.a4": {
        "target": "chrome.aws-lambda",
        "preset": "A4 Paper"
      },
      "ios": {
        "target": "ios.simulator"
      },
      "android": {
        "target": "android.emulator"
      }
    }
  }
Loki stores screenshots in folder .loki:
./loki/reference
Screenshots in this folder are references for loki, they are gold standard. When loki runs a test, it compares the screenshot from this folder with the current test screenshot.
./loki/current
Screenshots in this folder are the screenshots from the latest run tests. Using them you could check the style, design and state of your current working tree.
./loki/difference
This folder contains an image diff between screenshots from current and reference.
How to write a screenshot test
1) Write a react component
import React from 'react';

import './button.css';

export interface ButtonProps {
  /** Is this the principal call to action on the page? */
  primary?: boolean;
  /** What background color to use */
  backgroundColor?: string;
  /** How large should the button be? */
  size?: 'small' | 'medium' | 'large';
  /** Button contents */
  label: string;
  /** Optional click handler */
  onClick?: () => void;
}

/** Primary UI component for user interaction */
export const Button = ({
  primary = false,
  size = 'medium',
  backgroundColor,
  label,
  ...props
}: ButtonProps) => {
  const mode = primary ? 'storybook-button--primary' : 'storybook-button--secondary';
  return (
    <button
      type="button"
      className={['storybook-button', `storybook-button--${size}`, mode].join(' ')}
      style={{ backgroundColor }}
      {...props}
    >
      {label}
    </button>
  );
};
2) Write a story for this component. It’s really easy. All file is basically story configuration
import type { Meta, StoryObj } from '@storybook/react';
import { fn } from '@storybook/test';

import { Button } from './Button';

// More on how to set up stories at: https://storybook.js.org/docs/writing-stories#default-export
const meta = {
  title: 'Example/Button',
  component: Button,
  parameters: {
    // Optional parameter to center the component in the Canvas. More info: https://storybook.js.org/docs/configure/story-layout
    layout: 'centered',
  },
  // This component will have an automatically generated Autodocs entry: https://storybook.js.org/docs/writing-docs/autodocs
  tags: ['autodocs'],
  // More on argTypes: https://storybook.js.org/docs/api/argtypes
  argTypes: {
    backgroundColor: { control: 'color' },
  },
  // Use `fn` to spy on the onClick arg, which will appear in the actions panel once invoked: https://storybook.js.org/docs/essentials/actions#action-args
  args: { onClick: fn() },
} satisfies Meta<typeof Button>;

export default meta;
type Story = StoryObj<typeof meta>;

// More on writing stories with args: https://storybook.js.org/docs/writing-stories/args
export const Primary: Story = {
  args: {
    primary: true,
    label: 'Button',
  },
};
3) Build storybook (good for CI/CD or one-time run) or run storybook server (option for HMR to speed up development)
4) Run loki to create a reference screenshot
From this moment, if something will change the design (also UX) of the button, loki will let you know with a FAILED test.
Rules to write stories
Best story is a story isolated from the backend. The best way of thinking about a story is a unit test.
Isolate stories from each other. It’s a unit test, the same story should produce the same output every time. It means avoid SIDE EFFECTS, avoid GLOBAL STORE.
Component is a function. Story is a function. Even OOP languages under hood are functions (all languages send instructions to CPU, not a Class Animal, but the instruction CPU is required to perform). Our life is the list of functions. Everything is a function. That is why it’s important to remember The Pure Function Rules:
- the function return values are identical for identical arguments (no variation with local static variables, non-local variables, mutable reference arguments or input streams, i.e., referential transparency)
- the function has no side effects (no mutation of local static variables, non-local variables, mutable reference arguments or input/output streams).
Conclusion
Screenshot unit tests are fast (faster then classical e2e tests), they are informative (you could see we current state of ui), they are useful (you are not mocking browser environment in node runtimer). From my own experience two hundreds screenshot tests run in 2min 30s on machine with 1gb RAM and 2 CPU.
Lets consider that you update button style and want to merge it in main branch. In this case you need:
- Run
loki testsand approve new screenshots - Add new screenshots to commit and create a PR
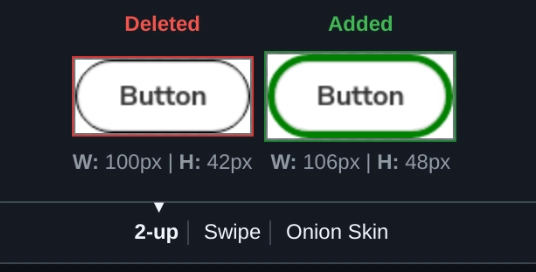
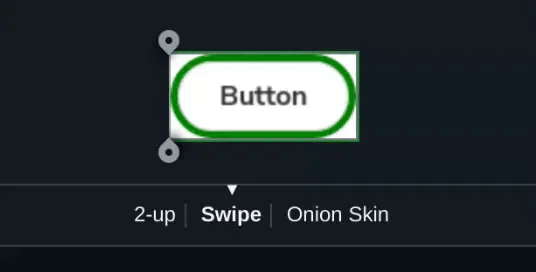
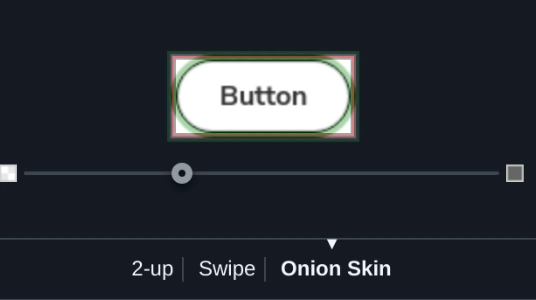
Goog thing about remote gits (gitlab, github, bitbucket) is all of them supports diff of images. You could check this PR in demo-screenshots repository and check how it's cool! You have options to compare old and new button story in three modes:
Side-by-side
Swipe
Blend mode
In the next part I will write you in details how to integrate loki in development workflow and which options you have to store your screenshots in your repo (git, git lfs, parallel repository).
Resources
1) Storybook
2) Visual tests by Storybook (Chromatic)
Premium and cloud solution for screenshot testing. Basically, we
replicate it itself, but on our own.
3) Loki
Basically a driver to run a storybook and make a screenshots. It is not so big, and storybook/chrome interface is pretty stable, so I didn’t have unsolved problem in about last two years.
cp .config/.env.example .config/.env.development
cp .config/.makerc.example .config/.makerc
make run SERVICE=loki

Top comments (0)