I've recently set up the whole CI/CD workflow for a project at work, this was the first time I was really diving into CI configuration and automated deployment with this stack. With the combination of the tools below, I feel we have achieved the right mix of confidence / automation for our current needs.
Tools and their responsibilities
- CI : We use CircleCI for running all our tests / linting / type checking for both front end and backend. It also orchestrates backend deployment for Firebase function
- Vercel : We use Vercel to deploy our front end. It is linked to our github repo to automatically deploy the front-end.
- Firebase : We use Firebase for the backend (serverless functions as well as database and authentication). Generally we'll use one project for development and one project for prod.
Overview
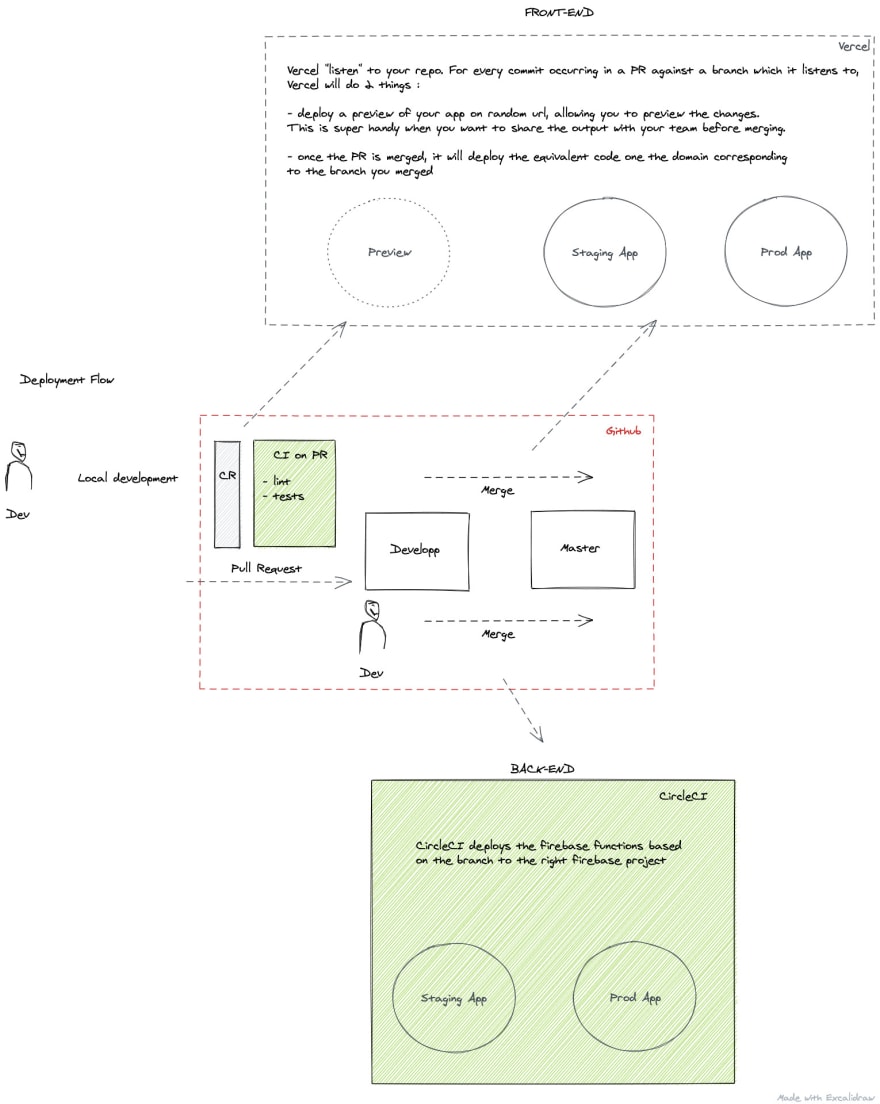
Front-End
Our client is basically a NextJs React app. It pairs really well with Vercel since they are the ones behind NextJs, the integration / tooling is really fluid.
To get started you'll need to:
- Have 2 branches on github (usually I go with develop and master)
- Register your prod and dev domains on Vercel
- Link your 2 domains to the right github branch
This should be enough to get you started and being able to deploy automatically whenever you merge on your configured branch on vercel.
If you need to customize the build-step, whereas it is the command or the output folder, you can follow their documentation
Environment variable
All your environment variables can be set up directly on Vercel
If you need to provide different values in your codebase based on the branch you're on (and therefore whether you target your staging or prod domain) you can rely on the System Env Variables
export const getEnvVar = (key: string): string => {
    const isProd = process.env.NEXT_PUBLIC_VERCEL_GITHUB_COMMIT_REF === 'master';

    switch (key) {
        case 'NEXT_PUBLIC_FIREBASE_API_KEY':
            return isProd
                ? process.env.NEXT_PUBLIC_PROD_FIREBASE_API_KEY
                : process.env.NEXT_PUBLIC_FIREBASE_API_KEY;
        default:
            throw new Error(`key ${key} is not recognized `);
    }
}
Note on firebase hosting :
To deploy it we were initially using firebase hosting, but it was rather slow as you need to rely on a serverless function from firebase to serve the server side content.
If you want to use Firebase Hosting you would be limited to a function in us-central1. This is a known limitation and for the meantime if you want to serve dynamic content you would have to configure Google Cloud Run instead
Back end - firebase serverless functions
This part is a bit trickier between local and prod setup. There are a few firebase key concepts behind it.
- Firebase project : usually you use a firebase project for your prod, and one for your staging. Meaning that you will need to switch between project whenever you want to deploy code on staging or on prod. This will be automated through CI.
- Service account : This is one of the way to authenticate yourself as an admin of a firebase project. Your service account can be generated in the firebase console
-
RuntimeConfig : this is the config you can set up through
firebase CLIusually to add env variables associated to your firebase project. - Firebase CLI : The command line tool which allow you to perform several tasks on firebase like :
- login into your firebase project.
- adding/selecting the project you're currently working on
- adding env variable to your project
- generate the firebaseToken needed to deploy through the CI
We'll go through each of them in the setup below, don't worry (I'm mostly speaking to myself for the next time I need to configure this 😄)
Setup commmon to both local and staging/prod
Firebase Project Configuration :
- You'll therefore first need access to one or two firebase projects. This setup will mostly walkthrough having 2 firebase projects (staging and prod) with each their own authentication and database. Just log on firebase and follow the steps
- Install firebase-cli
npm install -g firebase-tools
- Login through firebase-cli. This allows the next steps
firebase login
- Once you're logged in you'll be able to add different firebase projects to your current configuration by :
firebase use --add
This should result in .firebaserc file in your project where you'll have a list of your projects. This is important as we'll rely on those aliases to target the right project to deploy based on the branch later on. Would you have any issue you can refer to firebase-cli documentation which rather good.
Environment variable :
For your env variables you can add them directly to your firebase project through firebase CLI :
firebase functions:config:set someservice.id="THE CLIENT ID"
You can later on access it through :
const functions = require('firebase-functions');
...
const id = functions.config().someservice.id,
Note :
Those environment variables are stored directly in your project on firebase and as such you don't need them locally. Usually you download them locally to verify a value manually. Might be a good idea to gitignore them, just in case.
Initialize admin SDK :
To configure and add your firebase-admin sdk, you'll need to add a service account.
This will result in a local .json file, that you will place under a specific gitignore folder on your machine.
Firebase then recommends putting the path of the file in an environment variable (previous section) - you can refer to the firebase docs if needed
import * as admin from 'firebase-admin';
...
const config = functions.config();

const app = admin.initializeApp({
            credential: admin.credential.cert(config.credentials.google_application),
            databaseURL: `https://${config.credentials.project_id}.firebaseio.com`
        });
Local Setup
To develop locally, usually I end up using the staging project for database/auth and serverless function. This can be achieved by :
- select your firebase project manually through firebase CLI with
firebase --use XXX
Note :
Pay attention to which project you're currently using, sometimes you want to run a script against prod and you end up using firebase --use master which will be the selected project untill you reselect staging / your test env
We want to avoid deploying the serverless functions manually at this stage and want to pass this responsibility to the CI
CI Setup
The CI will be responsible for deploying our functions to firebase.
There is obviously some constraints :
- you don't want to expose your serviceAccount in your repo
- you need to switch the project used to deploy based on the branch
To achieve those goals we have to configure a few things :
- take the path to where your service account is supposed to be stored and save it as an env variable on CircleCI.
- take your local serviceAccount and encode it to base64 to save it as an env variable on circleCI. This allows CircleCI to store complex structure as a string.
- a good practice is to add
BASE_64at the end of your variable name. Usually I end up with 2 var in circleCI, something like :FUNCTION_PROD_SERVICE_ACCOUNT_BASE64andFUNCTION_STAGING_SERVICE_ACCOUNT_BASE64 - take the serviceAccount from circleCI and decode/copy it through the CI to your build folder :
command: echo << parameters.key_env_name >> | base64 -di > ./keys/<< parameters.key_path >>
- Now your code should be ready to be deployed, but you still need to make sure you have the token to allow your CI to handle the deployment. This can be done with the firebase token. This is done only once - you don't need to do it each time you switch the project you're using.
- From there you should be able to deploy your serverless functions based on your branch like so :
command: ./node_modules/.bin/firebase deploy --token "$FIREBASE_TOKEN" -P << parameters.environment >> --only functions:hubspot,functions:users
This can only be triggered based on the branch you're running the merge against. Like so
- functions_deploy:
    requires:
      - functions-build
    environment: staging
    key_path: $STAGING_SERVICE_ACCOUNT_PATH
    key_env_name: $FUNCTION_STAGING_SERVICE_ACCOUNT_BASE64
    filters:
      branches:
        only: develop

- functions_deploy:
    requires:
      - functions-build
    environment: prod
    key_path: $PROD_SERVICE_ACCOUNT_PATH
    key_env_name: $FUNCTION_PROD_SERVICE_ACCOUNT_BASE64
    filters:
      branches:
        only: master
functions_deploy:
  executor: node
  parameters:
    environment:
      type: string
    key_path:
      type: string
    key_env_name:
      type: string
  working_directory: ~/project/app/functions
  steps:
  - checkout:
      path: ~/project
  - attach_workspace:
      at: ~/project
  - run:
      name: add service account
      command: echo << parameters.key_env_name >> | base64 -di > ./keys/<< parameters.key_path >>
  - run:
      name: Firebase Deploy
      command: ./node_modules/.bin/firebase deploy --token "$FIREBASE_TOKEN" -P << parameters.environment >> --only functions:hubspot,functions:users
That should be it and you should now have a fully automated deployment with Vercel and Firebase for both the front end and backend on your staging and prod environment.
I hope this has been helpful to you and that you learned a few things along the way, I surely did !

Top comments (1)
Thanks for the detailed article, saved it for later, btw. is there any other way to manage environments (prod and test for example) other than creating whole new projects?