Not my usual content but over the weekend I took the plunge again and successfully this time in getting Ubuntu dual booting with my Razer Blade Stealth 13″ 4K that I picked up mid pandemic last year (why oh why did I do that during a pandemic and no travel) This post will cover the steps I took to make sure that this would work on the laptop, I expect for many other laptops this process would also work especially if you had Windows pre-installed on the device.
You might also want to check the warranty if you are going to do this, I did not check because there is always a fallback plan if you have a backup! But you have been warned.
Dual boot Ubuntu with Windows 10
For this walkthrough, I will be having Windows 10 pre-installed and wanting to carve out some space to have Ubuntu 20.10 running as a dual boot operating system on the laptop. There are some prerequisites within Windows that we must ensure is done before this will work (This is the reason for the blog, I lost many battles)
We are going to need the following:
- A backup of your Windows 10 machine! (cannot stress this enough, given what I do for a living) (free tools out there hint hint, Veeam Agent for Windows)
- Ubuntu ISO downloaded – https://ubuntu.com/download/desktop (I am using the Ubuntu 20.10 image)
- Software to create a bootable USB – https://www.balena.io/etcher/
- A USB Drive (I used a 4GB capacity drive, I did not test smaller options)
- Free disk space on your existing Windows OS or another disk available, I decided to shrink down the 500GB disk I have available and carve out 150GB for my new Ubuntu Installation.
Create a bootable USB drive
Using the downloaded Ubuntu ISO and the Balena Etcher software downloaded and installed on your machine we can now begin to create a bootable USB Drive. This software is super simple but will show all three steps and completion.

First, select the Ubuntu ISO.

Next, select the USB Drive, when I am doing things like this I tend to just use one at a time so I do not complicate things.

Then hit flash!
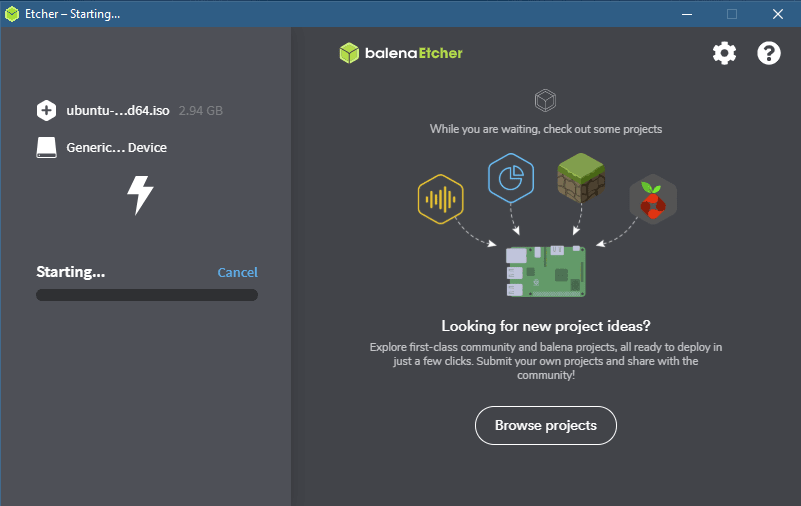
This process should take around 5 minutes, remove the drive safely when complete and put it to one side for now.
Windows Configuration Steps
There are a few steps we must complete so that we maintain the Windows OS we already have installed on the laptop.
Shrinking the disk.
For the record, this is not the system I used but the process is the same, open disk management you can find this by typing in disk management into the search bar next to the start menu.

Locate the disk you wish to use, my laptop only has one disk so that was straight forward, this system has multiple disk options. A warning here if you have a 500GB disk and it has 400GB of data (windows should prevent you from doing this) but don’t try and shrink it below what is being used. Right-click on the disk and you will see in the context menu “Shrink Volume”
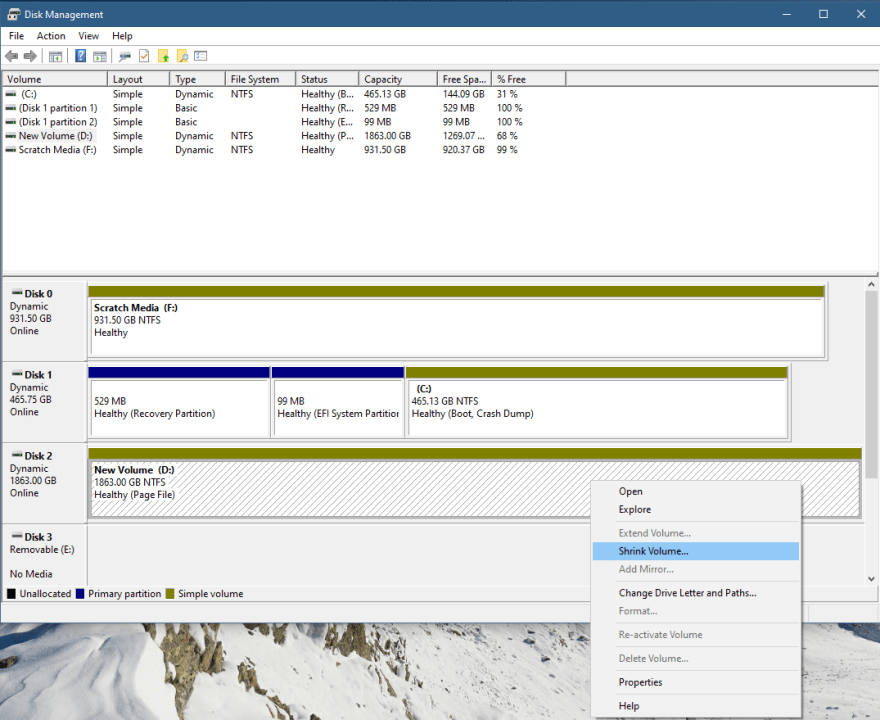
Select Shrink Volume, enter in the amount you wish to shrink in MB I wanted 150GB so I made those changes. If you are working in GB which you will be then a quick Google for “150gb in mb” will give you a quick number to use.

Then select Shrink and your disk management should look like this below image and show an unallocated space, this is what we will use later for the Ubuntu Installation.

Secure Boot
This must be done for you to get things working. Secure Boot I think was a feature that came in with Windows 8. It was initially again I believe for security reasons to prevent boot viruses and the like, well in order for us to dual boot with our Ubuntu OS we need to turn it off. We start by searching for Advanced Start-up and we choose the top option in the menu below.

We then need to select Restart now, WARNING this is going to reboot your machine so if you are on the machine and reading this blog then you will be losing it and the next steps.

Your system is going to reboot into what I can describe as a safe mode option or boot mode. From here we are going to select “Troubleshoot”

Next is Advanced Options

Next is UEFI Firmware Settings
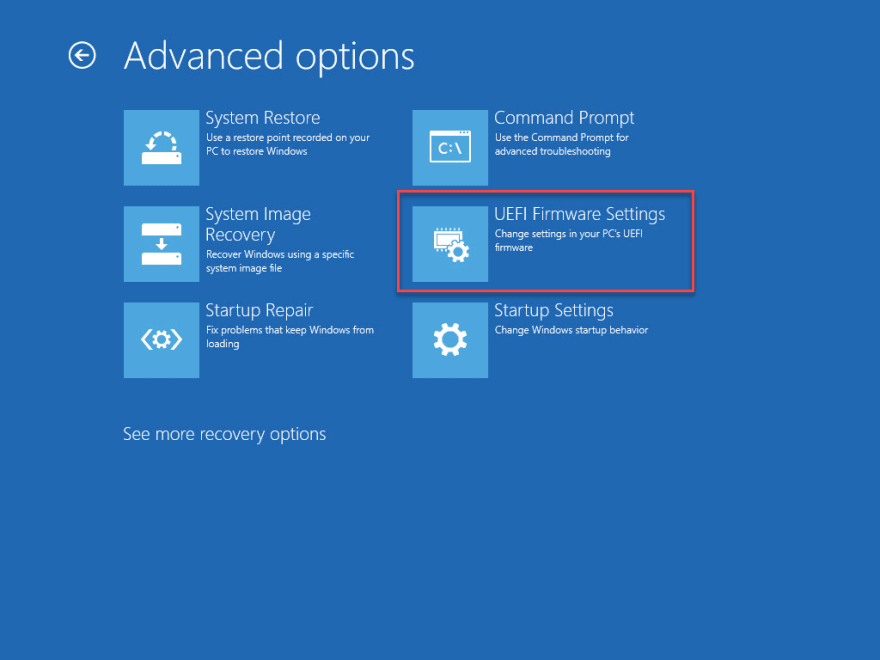
Then finally (well finally in this nice blue set of screens at least) hit restart

Next, you will find yourself in the BIOS of the system, use the arrow keys to move along to security.
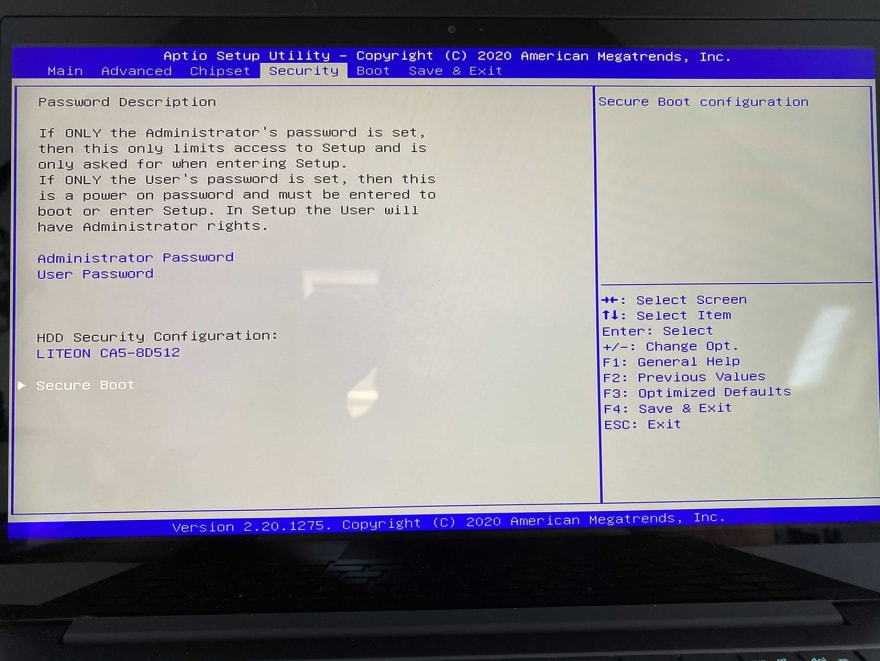
Navigate down to secure boot and make sure this is disabled. Then save and exit, you will then be booted into Windows again.

Ubuntu Installation
Now we are finally ready to get Ubuntu installed on our system. You have your USB drive; you will need to reboot Windows and then make sure that the boot menu goes to the USB drive. On the Razer Blade Stealth, you need to press F12 on boot to access the boot menu. I am not going to walk through each step as this has been done a hundred times across the internet, The first and thorough walkthrough I found from a google search was this one here.
The only bit that I need to mention is taking that free 150Gb space we carved out in previous steps, this is where we need to state a few things here. There are three options that you will get that is not covered in the above walkthrough and they are: On this menu, we should choose “Something Else”

Then you will be back in a similar process to the linked walkthrough article and I have modified the images and hope the author doesn’t mind. Based on the free space that we now see in our list of drives, we need to select that and then the + we need to create 3 partitions as highlighted below. We will first create the system partition and we will make this 20GB, we will create an 8GB swap area partition and then the final partition in your home (where you store your documents etc) and this number will be the remaining total available from that 150GB so it should be around the 120GB mark.

Click through the rest of the wizard and you will be asked to create user accounts and join your networks. Out of the box this all worked for me, there are lots of stories out there about the graphics drivers but out of the box, Ubuntu used the open-source option which I later changed to NVIDIA drivers for the 1650TI. I did go through and then start installing my apps and updates and everything is running super smooth so far. I am yet to find anything that does not work, even the 4K touch panel works! Which I was shocked but equally pleased about as this was one of the reasons I went for the 4K option.

Another note is that the GRUB loader is super tiny, if anyone knows how to increase the size of this that would be super helpful although I can read it, it is very tiny on the 4K screen. I think that covers everything, if you have any questions then please reach out to me on Twitter @michaelcade1 and I will gladly help or improve this article to help others.

Anyone that has done this will then see the GRUB loader be super tiny and almost unreadable on the 4K version of the Razer Blade Stealth. This may not bother you as by default this is going to boot into your Ubuntu desktop and you can just about select the Windows boot option there as well.
To fix this we have to make 1 tiny little change to the grub.cfg which can be found at etc/default/grub.cfg you need to remove the # from the
GRUB_GFXMODE=640x480
line.
I did the above change using VI in the terminal, once you have made that change then run
sudo update-grub
and reboot your system, providing you made the correct change you should now actually be able to read the text on the GRUB loader.

The post How to Dual Boot – Windows and Ubuntu – Razer Blade Stealth first appeared on vZilla.

Top comments (1)
Try wsl, it may be better option for you.