
When we talk about developing a front end application with ReactJS, we can find three main options:
CRA: focuses on building single-page web applications but has difficulties with SEO positioning.
Gatsby: focuses on static site generation with great performance and cool SEO and data-fetching.
NextJS: in my opinion, the best way to write ReactJS web applications nowadays since it offers server-side rendering with the option of making it client-side, cool built-in routing, zero-configuration philosophy and, since NextJS 9, this framework provides API routes which is a really easy way to provide back-end code to our react app and, this is what we are using for this post.
In this post, we are going to learn how we can implement a GraphQL API running over an API route.
The basic NextJS app
As I mentioned before, NextJS focuses on a zero-configuration philosophy we can easily configure but, to make it even easier, let's just type npx create-next-app todo-app in our terminal to have it ready to use. Once the project is setup, let's run cd todo-app and type yarn dev to run the server and see that everything is running.
The API Route
Cool!, We now have our NextJS web app up and running. Let's create a new file inside pages/api/ called graphql.js and let's add the following code:
export default (req, res) => {
  res.statusCode = 200

  res.send("GRAPHQL")
}
And, if we go to localhost:3000/api/graphql, we'll be able to see the text GRAPHQL written. Easy!. Let's now configure GraphQL!.
GraphQL setup
Install it
First, let's add a dependency called apollo-server-micro by writing yarn add apollo-server-micro
Our Schema
The next thing we need to work with GraphQL is writing our schema, which will define the Queries and Mutations we have and how the data is structured. For now, we want to have a query called hello which will return a string. So, let's add the following to the top of our route.
import { ApolloServer, gql } from 'apollo-server-micro'

const schema = gql`
  type Query {
    hello: String!
  }
`;
Resolvers
We have just written our schema, but now GraphQL needs the resolvers of our schema, which tell GraphQL where to fetch our data from. Below the schema, let's add our resolvers:
const resolvers = {
  Query: {
    hello: (_parent, _args, _context) => "world!"
  }
}
The server
Now, let's create our server with our schema and resolvers.
const apolloServer = new ApolloServer({
  typeDefs: schema,
  resolvers,
  context: () => {
    return {}
  }
})
Cool! With this instance, we can access a handler, which is in charge of handling all the requests and responses and, as we are actually working with NextJS, we need to specify that we don't need bodyParser in our requests.
Let's remove the last export default and change it for the following code:
const handler = apolloServer.createHandler({ path: "/api/graphql" });

export const config = {
  api: {
    bodyParser: false
  }
};

export default handler;
We have now a basic configuration of a GraphQL server; why don't we go to localhost:3000/api/graphql and see what we have now?

And, if we run the following:
query {
    hello
}
We will have our response from the resolver.
CORS
We need another thing to use this API from the front-end so, let's add a new package by typing yarn add micro-cors and let's add the following:
import  Cors  from  "micro-cors";

const cors =  Cors({
    allowMethods:  ["POST",  "OPTIONS"]
});

// Here is how we connect our handler with CORS.
export default cors(handler);
Data from Postgres with Knex.
At some point, our app would need some sort of access to a database to persist some data. For this, we will need to set up some stuff so let's do it! First, let's add Knex and Postgres with yarn add knex pg
Create a file called knexfile.js with our database configuration:
module.exports = {
  development: {
    client: "postgresql",
    connection: "postgres://postgres@localhost:5432/todo",
    migrations: {
      tableName: "knex_migrations"
    }
  },
};
Next, let's create our first migration, which will tell Postgres how to create our tables. Let's start by typing yarn run knex migrate:make create_todo and inside the folder migrations we will have a new file generated, let's open it and add how we want our table to be created:
exports.up = function(knex) {
  return knex.schema.createTable("todos", function(table) {
    table.increments("id");
    table.string("description", 255).notNullable();
    table.boolean("done").defaultTo(false).notNullable();
  });
};

exports.down = function(knex) {
  return knex.schema.dropTable("todos");
};
And let's build our table by running yarn run knex migrate:up
Now, we need to create a constant which will help us manage the database inside our code. Let's open /pages/api/graphql.js and add the following:
import knex from "knex";

const db = knex({
  client: "pg",
  connection: "postgres://postgres@localhost:5432/todo"
});
Updating our schema
Why don't we change our schema and resolvers?
const schema = gql`
  type Query {
    todos: [Todo]!
    todo(id: ID!): Todo
  }

  type Todo {
    id: ID!
    description: String!
    done: Boolean!
  }
`;

const resolvers = {
  Query: {
    todos: (_parent, _args, _context) => {
      return db
        .select("*")
        .from("todos")
        .orderBy("id")
    },
    todo: (_parent, { id }, _context) => {
      return db
        .select("*")
        .from("todos")
        .where({ id })
        .first()
    }
  }
}
If we now go to localhost:3000/api/graphql, we'll finally be able to fetch and play with our data!
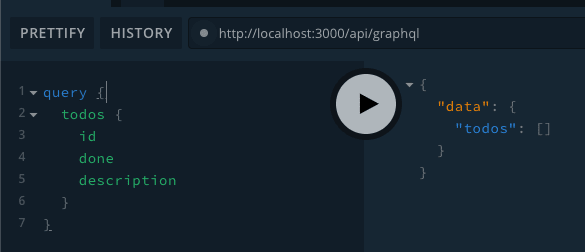
But, wait a minute! How are we going to create data? Well...
Let's go and see how we can add a Mutation which will help us create data inside our database!
Creating data
First, we have to add a new type inside our schema. We first need to specify the name of the mutation, in this case createTodo, and then inside the parenthesis the names and types of values that we will receive. At the end, we need to specify what our mutation will return, in this case, a Todo type:
const schema = gql`
  ...

  type Mutation {
    createTodo(description: String!, done: Boolean): Todo
    completeTodo(id: ID!): Todo
  }
`;
Now, inside our resolvers object, let's add the new Mutation key and the createTodo:
const resolvers = {
...
Mutation: {
createTodo: async (_, { description, done }, _c) => {
return (await db("todos").insert({ description, done }).returning("*"))[0]
},
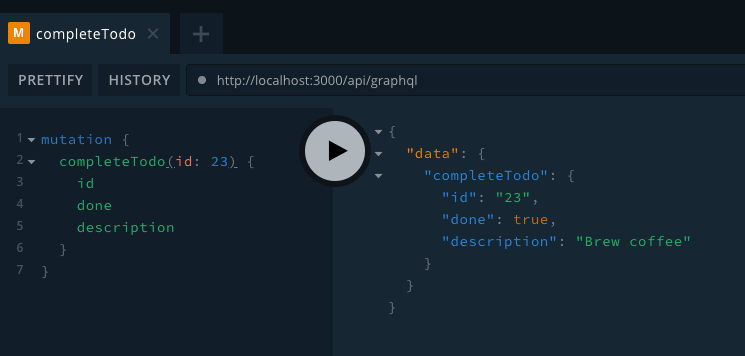
completeTodo: async (_, { id }, _c) => {
return (await db("todos").select("*").where({ id }).update({ done: true }).returning("*"))[0];
}
}
}
And with this, now we can create and complete ToDos in our database

Cool, but what about the Front-end?
The client
Until now, we have been building the server-side of our application by integrating GraphQL in an API route: why don't we integrate the client side of our app?
Dependencies
Let's start by adding two dependencies we need to connect to GraphQL:
yarn add @apollo/react-hooks apollo-boost
Provider
First, let's setup the Apollo Client of our app. For this, let's open pages/_app.js and add the following:
import '../styles/globals.css'
import { ApolloProvider } from '@apollo/react-hooks';
import ApolloClient, { gql } from 'apollo-boost';


function MyApp({ Component, pageProps }) {
  const client = new ApolloClient({
    uri: "http://localhost:3000/api/graphql"
  })

  return (
    <ApolloProvider client={client}>
      <Component {...pageProps} />
    </ApolloProvider>
  )
}

export default MyApp
Query
Now, let's open our pages/index.js and import what we are going to need:
import React, { useState } from 'react';
import { useQuery, useMutation } from "@apollo/react-hooks";
import { gql } from 'apollo-boost';
We first need to declare our GraphQL query exactly as we would do in the GraphQL Playground:
const GET_TODOS = gql`
  query {
    todos {
      id
      description
      done
    }
  }
`
Now, inside our component, we are going to use the query and map through them to render them in the app
export default function Home() {
  const { loading, error, data, refetch } = useQuery(GET_TODOS);

  if(loading) return <p>Loading...</p>
  if(error) return <p>ERROR :(</p>

  return (
    <div>
      <h1>My TODO list</h1>

      {
        data.todos.map((todo) => (
          <div key={todo.id}>
            {todo.description}
            <button
              disabled={todo.done}
            >
              {todo.done ? "Done" : "Complete"}
            </button>
          </div>
        ))
      }

    </div>
  )
}
Now we should see our ToDos on the browser. Let's add a way to create ToDos.
Let's start by adding the createTodo mutation:
const CREATE_TODO = gql`
  mutation CreateTodo($description: String!) {
    createTodo(description: $description) {
      id
      description
      done
    }
  }
`
Now, inside our component, we add some state management, our mutation, and our form to perform the mutation. The file will end up looking like this:
export default function Home() {
  ...
  const [todo, setTodo] = useState("");
  const [createTodo] = useMutation(CREATE_TODO);

  const saveTodo = async (e) => {
    e.preventDefault();
    await createTodo({variables: { description: todo }});
    refetch();
    setTodo("")
  }

  ...

  return (
    <div>
      <h1>My TODO list</h1>

      <form onSubmit={saveTodo}>
        <label>
          New todo
          <input onChange={e => setTodo(e.target.value)} value={todo} />
        </label>
        <button type="submit">Save</button>
      </form>

      ...

    </div>
  )
}
Completing todos
Pretty straightforward! Why don't we add our completeTodo mutation and add functionality to our buttons?
Here we have our mutation declaration:
const COMPLETE_TODO = gql`
  mutation CompleteTodo($id: ID!) {
    completeTodo(id: $id) {
      id
    }
  }
`
And, inside our component, we have:
export default function Home() {
  const [todo, setTodo] = useState("");
  const { loading, error, data, refetch } = useQuery(GET_TODOS);
  const [createTodo] = useMutation(CREATE_TODO);
  const [completeTodo] = useMutation(COMPLETE_TODO)

  const saveTodo = async (e) => {
    e.preventDefault();
    await createTodo({variables: { description: todo }});
    refetch();
    setTodo("")
  }

  const onComplete = async (id) => {
    await completeTodo({variables: { id }});
    refetch();
  }


  if(loading) return <p>Loading...</p>
  if(error) return <p>ERROR :(</p>

  return (
    <div>
      <h1>My TODO list</h1>

      <form onSubmit={saveTodo}>
        <label>
          New todo
          <input onChange={e => setTodo(e.target.value)} value={todo} />
        </label>
        <button type="submit">Save</button>
      </form>

      {
        data.todos.map((todo) => (
          <div key={todo.id}>
            {todo.description}
            <button
              disabled={todo.done}
              onClick={() => onComplete(todo.id)}
            >
              {todo.done ? "Done" : "Complete"}
            </button>
          </div>
        ))
      }

    </div>
  )
}
And, if now we go to our browser, we can see our app working!
Conclusion
GraphQL is a technology that has been growing a lot in the last couple of years and so has NextJS. Now that we can have API routes in our NextJS app, we can integrate them to build a delightful stack able to behave as a monolith and, who knows, maybe even run in a serverless architecture 🤔.
Thanks for reading!

Top comments (0)