Synpse is an end-to-end platform to manage your device fleet that can grow to hundreds of thousands of devices, perform OTA software updates, collect metrics, logs, deploy your containerized applications and facilitate tunnel-based SSH access to any of your device. You can find a Quick Start here.
Intro into AWS IoT Core
We often get questions about how Synpse is compared or competes with the AWS IoT Core service. The short answer is that they operate in slightly different domains. AWS IoT Core focuses on application connectivity of the devices while Synpse targets deployment of the applications that may or may not be using services such as IoT Core.
The best results are achieved when solutions are used together. For example, when you build an application locally that utilizes AWS IoT Core message broker or device state services and then use Synpse to distribute your application to thousands of devices.
Disclaimer: While the AWS landing page says "Easily and securely connect.." we found that it's not true. Setup is quite complicated so buckle up, backaroo!
Example application
In this tutorial, we will deploy a simple open-source application that collects metrics and send them to AWS IoT Core for further processing. All code for this blog post can be found at:
https://github.com/synpse-hq/metrics-nats-example-app - Sample metrics application
https://github.com/synpse-hq/aws-iot-core-example - AWS IoT Core example
Steps:
- Set up AWS IoT Core
- Configure rules to forward data into the S3 bucket
- Create AWS device/Thing for Synpse
- Deploy a demo Synpse application from 3 microservices - Metrics collector, NATS broker, example Python app that forwards data to AWS IoT Core
Technologies used
- Synpse - manage devices and deploy applications to them
- NATS - a lightweight message broker that can run on-prem
- AWS IoT Core - message broker between all devices and AWS
AWS IoT Core
For this application to work we need to setup AWS IoT Core and its pre-requisites. AWS uses certificate authentication by default for all IoT devices.
AWS IoT Core page
Inside AWS IoT Core page navigate to Manage sub-page. Create a "Thing" with AWS generated certificates. Download certificates to your workstation. We will need them later.
AWS IoT S3 page
Inside the AWS IoT S3 page, create an S3 bucket for metrics to be stored. We gonna use it later
Create Act Rule
Go back on the IoT Core page navigate to the ACT subpage. We will create a new Rule for our metrics. Rule creation involved multiple steps, like creating the rule itself, granting access with policy and finalizing the setup.
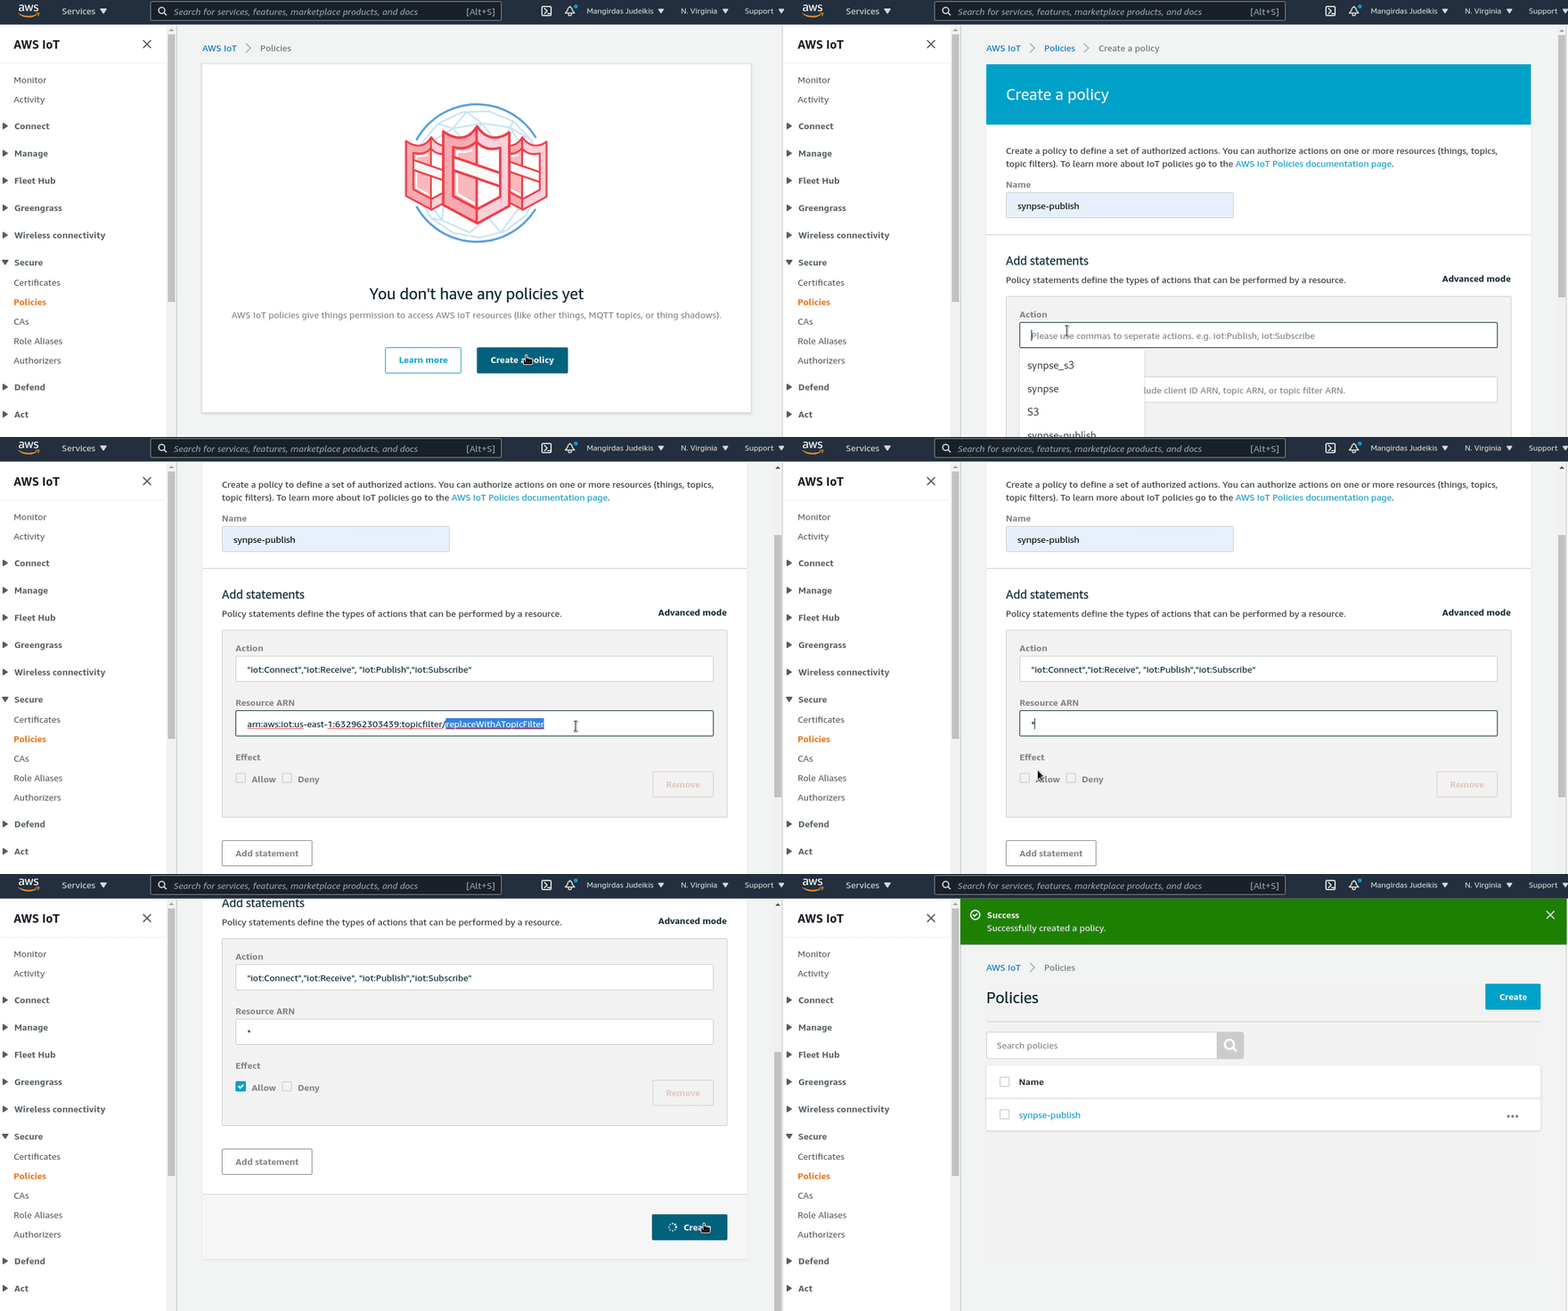
Create policy and attach
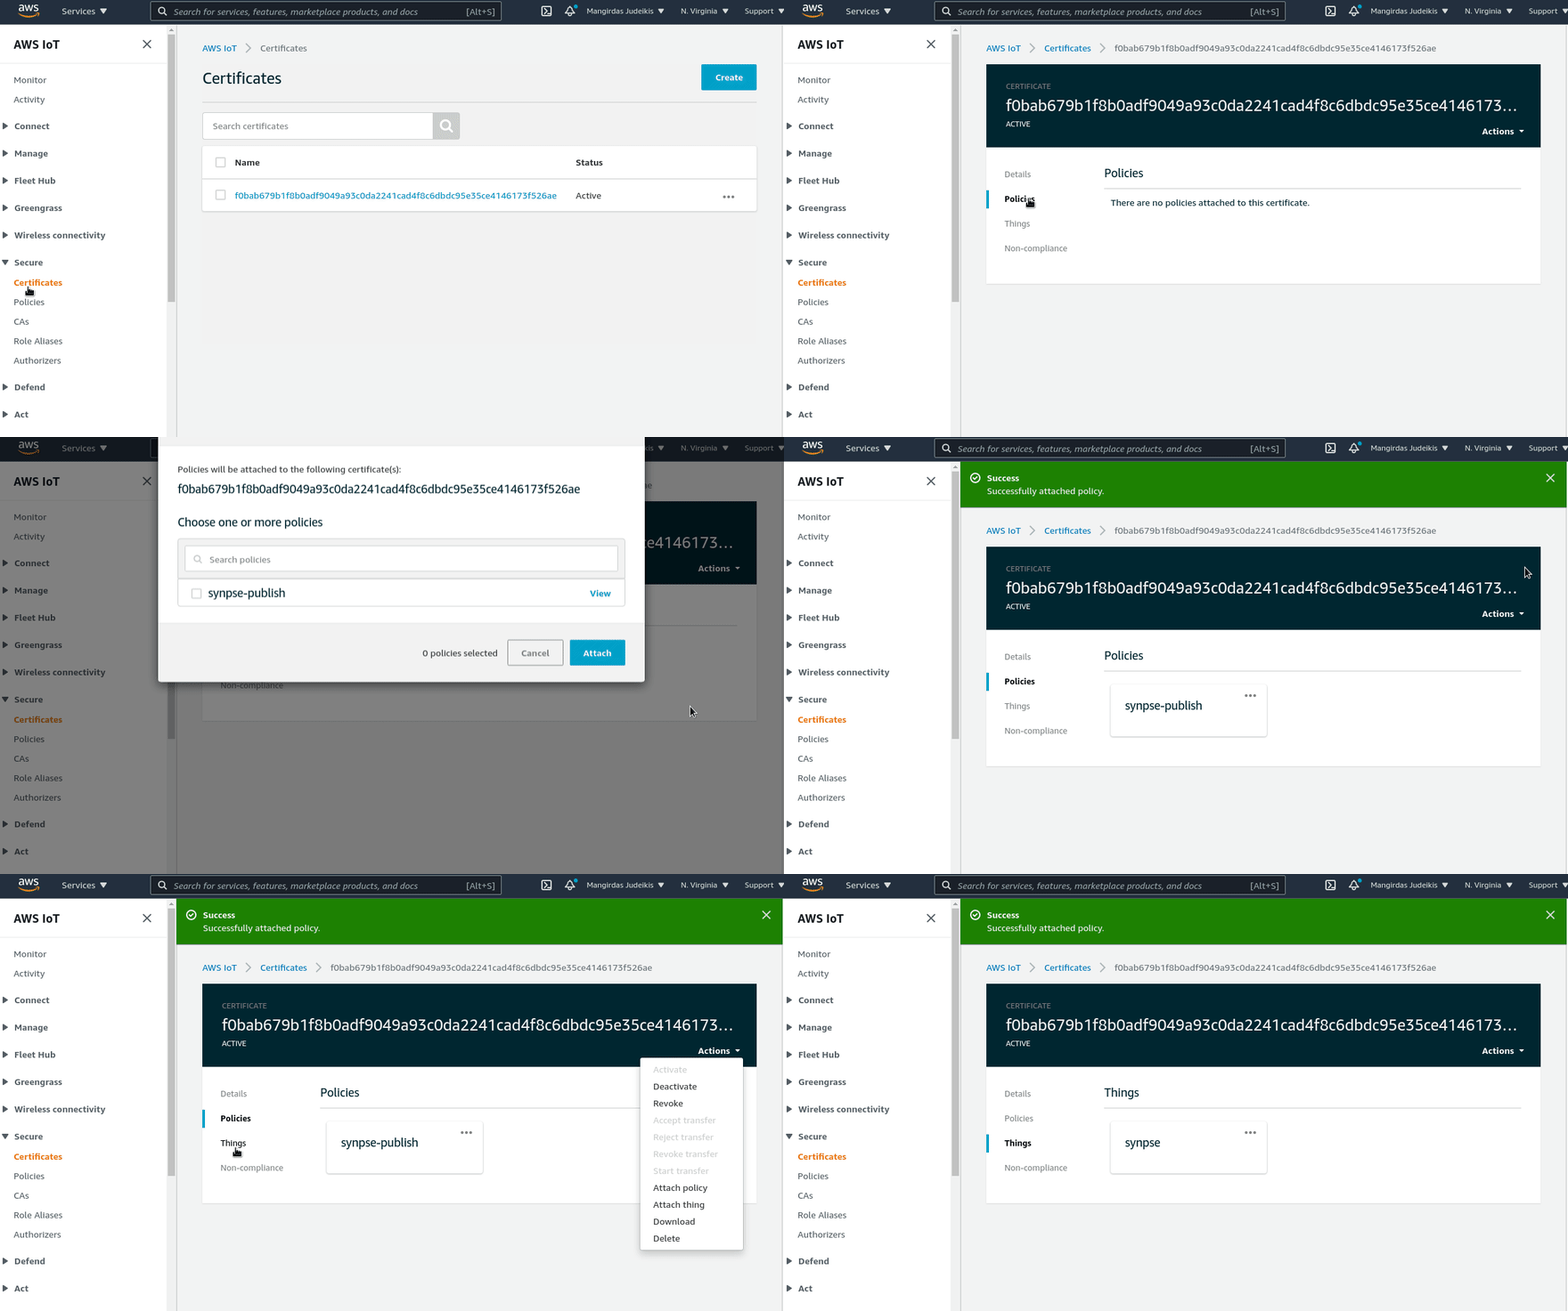
We will need to create a policy to publish events, and attach it to the certificate we generated
The policy document is as below:
{
  "Version": "2012-10-17",
  "Statement": [
    {
      "Effect": "Allow",
      "Action": [
        "iot:Connect",
        "iot:Receive",
        "iot:Publish",
        "iot:Subscribe"
      ],
      "Resource": "*"
    }
  ]
}
Attach the policy to a certificate, used by "Thing"
Get endpoint
You will need an endpoint for your IoT Core. You can get it via CLI:
aws iot describe-endpoint
Or navigate via UI:
Deploy an application
We have downloaded certificates in the first step. Let's create Synpse secret with those certificates
synpse secret create aws-cert --file zzz-certificate.pem.crt
synpse secret create aws-key --file zzz-private.pem.key
synpse secret create aws-root-ca --file AmazonRootCA1.pem
Deploy Synpse application. Modify application yaml with your thing endpoint and messaging topic.
synpse deploy -f synpse-aws-example.yaml
where synpse-aws-example.yaml is:
name: AWS-IoT-Core
description: AWS IoT Core Synpse example
scheduling:
  type: Conditional
  selectors:
    aws: iot
spec:
  containers:
  - name: nats
    image: nats
  - name: app
    image: quay.io/synpse/metrics-nats-example-app
  - name: aws-iot
    image: quay.io/synpse/aws-iot-core-example
    forcePull: true
    args:
      - --endpoint
      - a243pu5i3wf6nw-ats.iot.us-east-1.amazonaws.com
      - --cert
      - /server/gateway/certificate.pem
      - --key
      - /server/gateway/certificate.key
      - --root-ca
      - /server/gateway/AmazonRootCA1.pem
      - --topic
      - test/topic
    command: /server/aws.py
    secrets:
      - name: aws-cert
        filepath: /server/gateway/certificate.pem
      - name: aws-key
        filepath: /server/gateway/certificate.key
      - name: aws-root-ca
        filepath: /server/gateway/AmazonRootCA1.pem
Once running, you should see the application running and data coming into the AWS S3 account
At this point, you might thing "This was not as hard as you told us". We did all the steps using AWS Console UI. Github repository contains more detail steps how to achieve same result via CLI. Good luck :)
Things to look for
AWS CLI was a disaster 5 years ago and it still is. Either API is consistent or CLI should be advanced enough to abstract inconsistencies. In AWS case API documentation is very poor, and if it is there, it just doesn't work. But if you are comfortable "clicking UI" - you are good. In my personal opinion
AWS still does a good job to keep their things proprietary.
Wrapping up
This is a simple way to use AWS IoT Core with Synpse. When it comes to consuming and managing a lot of data, constructing complex applications and integrating seamlessly into your current infrastructure - nothing can beat public cloud. But where the cloud is lacking - IoT device and application management.
Public cloud providers are built on assumption that they will manage infrastructure for you. When it comes to devices itself - hardware is owned by you so there's little incentive for them to manage fleets of machines that they can't be properly billing for.
If you have any questions or suggestions, feel free to start a new discussion in our forum or drop us a line on Discord
Originally published at https://synpse.net/blog


Top comments (0)