Introduction
The previous weekly assignment created unit test for Static Site Generator(ssg). In this week, we extend previous weekly task to implement test automation on Github action with Continuous Integration(CI).
Implementation
The setting of Github Action CI Workflow is very straight forward. I have used suggested Workflows template for .NET from Github. Therefore, I just needed to configure the steps for test automation and lint.
The first step is setting up .NET action. The .NET action finds a specific version of .NET from my SSG. My version of .NET is 5.0.x. Here is the code:
- name: Setup .NET
      uses: actions/setup-dotnet@v1
      with:
        dotnet-version: 5.0.x
The second step is installing dependencies.
- name: Install dependencies
      run: dotnet build ./kimchi-ssg/kimchi-ssg.csproj
dotnet build compiles the SSG, reads through its dependencies specified in the project file, and publishes the resulting on virtual machine.
The third step is setting up Run Formatter & Linter.
- name: Run Formatter & Linter
      run: |
        dotnet tool install --global dotnet-format --version 5.1.250
I have installed dotnet-format for detecting lint from my code.
dotnet-format --check --folder ./kimchi-ssg
This code check the lint all the file from ./kimchi-ssg
The last step is unit testing
- name: Test
  run: dotnet test ./UnitTest/UnitTest.csproj
The UnitTest.csproj includes test code for Kimchi-ssg. The implementation code is same as I did on the cmd and terminal.
The final code is
name: .NET

on:
  push:
    branches: [ main ]
  pull_request:
    branches: [ main ]

jobs:
  build:

    runs-on: ubuntu-latest

    steps:
    - uses: actions/checkout@v2
    - name: Setup .NET
      uses: actions/setup-dotnet@v1
      with:
        dotnet-version: 5.0.x
    - name: Install dependencies
      run: dotnet build ./kimchi-ssg/kimchi-ssg.csproj
    - name: Run Formatter & Linter
      run: |
        dotnet tool install --global dotnet-format --version 5.1.250
        dotnet-format --check --folder ./kimchi-ssg
    - name: Test
      run: dotnet test ./UnitTest/UnitTest.csproj
Testing Lint
Since all the unit test that I created and the additional unit test that my partner created pass the automation test, it is time to test lint! I made lint intentionally like this

and the error message is

I created a pull request for testing Lint. The CI throws error like this
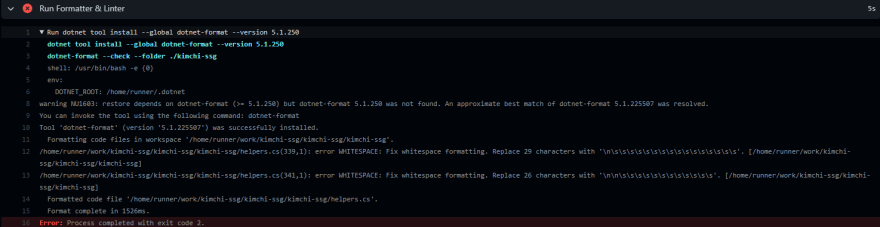
The error message specify that there are two 29 whitespace characters on helpers.cs which is the result that I expected.
Add Tests to Another Project
I have choose to work on JavaScript SSG application that created by Eugene Chung. The testing setup and environment is completely different. He has configured the Node environment whereas I have configured .NET environment on CI. Also the testing environment is different. I have used XUnit for unit testing whereas he has used the Jest for unit testing. However, I have change to work Jest for unit test on WEB422 and previous contribution on Telescope. Also he has excellent CONTRIBUTING.md for providing how to test in his application. Therefore, the testing on my partner's repo is straightforward.
Conclusion
The CI is very excellent automate tool to prevent the code that includes lint and unit test the code. Sometimes I forgot to run Linter command before I commit my code to repo. Since this application is open source project, other people can have unformatted code. Now I do not have to worry because CI automatically block my PR if I have lint on my code!

Top comments (0)