
Introduction
In this post I am going to share how to setup an AWS application load balancer (ALB) for two types of application
- Stateless Application
- Stateful Application
A Stateless application is an app which does not store client specific data (username, session cookie etc) across different sessions i.e. each client request can be served independently without the need to access data from previous request from the same client. An example of such an application could be a search application which just needs to display some information based on user provided data.
A Stateful application is one which needs to store client specific data across different sessions. Any web application which provides some form of authentication can be considered as stateful application since the application will store some user information in order to serve the specific data for the logged in user.
AWS provides three types of Load Balancers
- Classic Load Balancer
- Network Load Balancer
- Application Load Balancer
I am going to use Application Load Balancer, since it is most common for routing HTTP and HTTPS traffic data. You can read more about these load balancers here
Configuration
To start with, we first need to create two EC2 instances installed with the application that we want to be load balanced. I created a sample .NET Core WebAPI project with a WeatherForecast API on both the instances. This can be easily done using dotnet CLI tool. Make sure following are installed on the instances before you use the CLI tool.
- IIS
- .NET Core SDK and runtime
- .NET Core hosting bundle
This application is a stateless application since there is no authentication involved.
Next, configure the application on a specific port (I have used port 80) on IIS and make sure you are able to access the API from outside for that port. You may need to open the port from the instances as well as from the inbound/outbound rule of the instance security groups.
Right, so we are all set to create the load balancer. Go to AWS console and browse to Load Balancers section and create Application Load Balancer. The steps are pretty straight forward to configurethe settings. So I will only mention the important steps. When creating Target Group, choose Target Type as instances since we are load balancing for our EC2 instances. Set Protocol and port accordingly. For Health checks, make sure you select Protocol and path which is accessible for the instances since this is the path where ALB will keep pinging to make sure instances are healthy. A typical way to do this is to configure a path in your application say /hello which just return a 200 OK response. In that case you mention hello to the Path settings in Health check settings. The final part is to register the targets to the target group. Select from the list of available instances from the selected availability zones. And that is it. Your load balancer is up and running.
You can access the load balancer via the DNS name and it will evenly distribute the traffic on your instances.
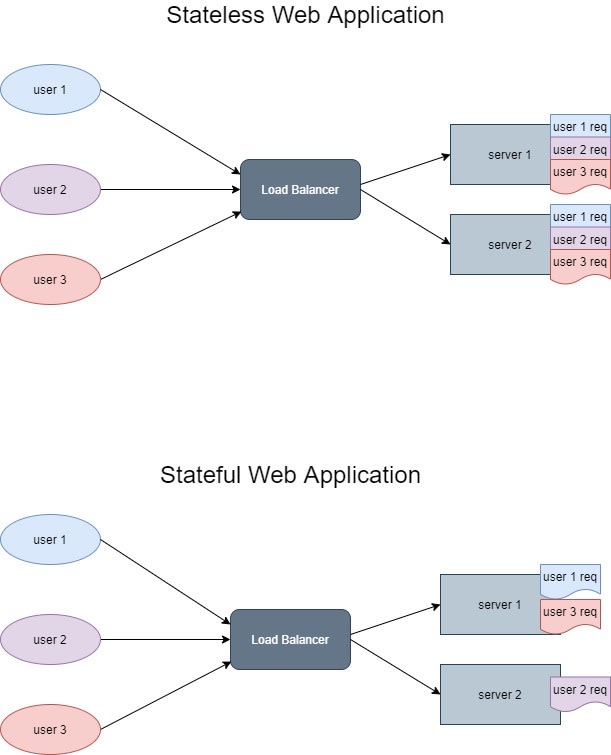
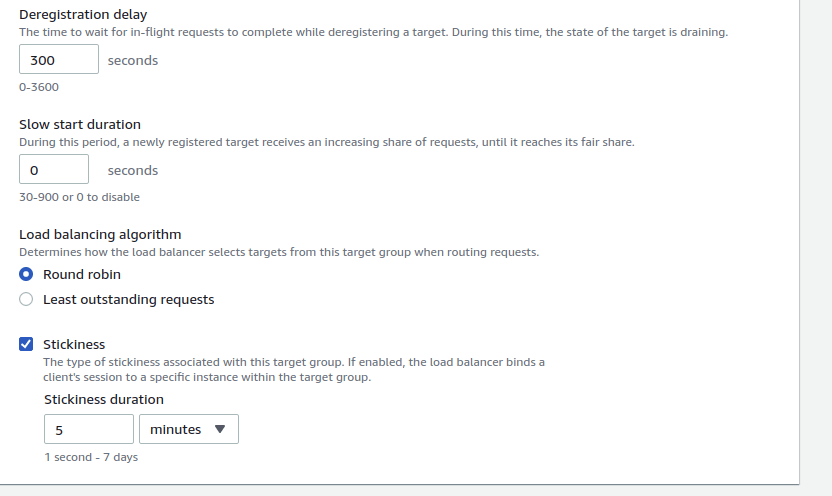
This approach will work well if your application is stateless but if your application is stateful then this approach will not work because of the session state. A user logged in to one of the instances say server1 will have its session state stored on that server only. So if the next request for that user goes to server2, it will not be able to authenticate it, so the application will give undesired result depending on how your application handles the unauthenticated requests. This scenario is commonly known as sticky session i.e. a user session should stick to one single server for its entire duration and all the request should go to that server only. Thankfully ALB provides a very simple setting to handle this. If you go to the settings of your target group, you will find a setting called Stickiness. Just enable this and set the appropriate stickiness duration and you are done. All the request originating from a single client (user) will now be routed to one server only.
Testing
- Stateless: This case is very simple. You just need to push some load on your balancer (jmeter is quite popular tool for load testing) and check the IIS logs on both the instances. The requests should be equally divided between the instances.
- Stateful: This is not so simple. Simply pushing load to load balancer will not work. You will actually need two separate client (impersonating two different users in the application) to send the request. Also the client should support cookies in order for it to work. Most modern browsers like Chrome, Firefox, Internet Explorer etc should work just fine. So you can log in as user1 from Chrome and as user2 from Firefox and access the application via load balancer. Just test your application and make sure user1 and user2 are able to see and modify the application as per their roles.
Conclusion
This was a very simple post on how to create a load balancer in its basic form. There are tons of other settings that you can apply and AWS provides solid documentation for the same. In addition to AWS, there are plenty of other load balancer like HAProxy, NGINX that works quite well. But in case you are already using AWS infrastructure then this is the simplest and quickest to configure.
Hope this is helpful for some.
Cheers,
MM

Top comments (0)