
Hello folks… This post is aimed at setting up the Nim programming environment on Linux + Neovim (Vim).
For those of you unaware of this Python-like easy, C-like fast and me-like awesome programming language (see what I did there 😎), here is the geeky one-liner description of Nim…
Nim is a statically typed compiled systems programming language.
It's alright if you don't get the description, I just wrote it for the sake of completeness 🙃
While I would love to heap praise on Nim and talk about all its features and advantages over traditional counterparts, it makes little sense to reinvent the whole wheel. Hence, for those of you still on crossroads about diving in Nim, I suggest the following article to save yourself from the dilemma.

BTW, I am assuming you guys know the basics of Neovim because boy-o-boy it's not just an editor, its the Jedi way of life in the cyber world (and while you're at it, petition to get baby-yoda emoji) 🤘.

Installing Nim
We will use choosenim for installing (and later on maintaining) our desired version of Nim. For my mates from javascript brethren, choosenim is similar to nvm in its usage. It allows you to easily switch between different versions of Nim (latest, stable, or otherwise).
Execute the command below in your terminal to install both choosenim and Nim.
curl https://nim-lang.org/choosenim/init.sh -sSf | sh
Follow the on-screen instructions to edit the PATH variable in your .bashrc or .profile accordingly. Most probably it will be to add the following line of code:
export PATH=$HOME/.nimble/bin/$PATH
Make sure to source your .bashrc (source ~/.bashrc) if you edit it there or re-login to your Linux machine if you edit in .profile.
This will install the following binaries in ~/.nimble/bin: choosenim, nim, nimble, nimgrep, nimpretty, nimsuggest and testament.
(Relax!! You will have sufficient idea about most of these binaries by the time you reach the end, and you won't immediately need the ones you don't 😛)
To be sure, execute this command to use the stable version of Nim
choosenim stable
Unless you are in a kamikaze mood, always use the stable version.
Setting up Neovim for Nim
Alright!!! Now let's start setting it up on Neovim (more like a super-saiyan version of Vim 😈)
Add filetype plugin
Nim is a relatively new language, and therefore no filetype support comes shipped in by-default with Neovim. Filetype support is essential to use various language-specific features in Neovim (like syntax highlighting, linting, code-formatting, etc.). Hence, we will use an external plugin to add Nim filetype support.
We will use nim-nvim (If you disagree with me, find your own plugin at https://vimawesome.com 😒). This plugin uses the nimsuggest binary to provide syntax highlighting for Nim.
I use vim-plug to manage my vim-plugins, and therefore, will provide instructions on how to add this plugin using the same. If you use some other plugin manager, then please refer to the plugin page of nim-nvim (linked above and here again) to see different options.
Add the following to your list of plugins in init.vim (or .vimrc):
Plug 'alaviss/nim.nvim'
and then call the following two commands from your Neovim console:
:source %
:PlugUpdate
Add linting support
Linting is the C-3PO of the programming world…
In a gist, linting is a process of checking the code for potential programmatic errors.
There are various plugins in Neovim that helps in performing linting of the code. I prefer using ALE (Asynchronous Lint Engine). Going into the details of ALE is beyond the scope of this article (also, I am quite lazy 😪), but the following post is pretty good for those interested in knowing more about linting with ALE.
Let's have a pint of (vim) ale! * Dimitri Merejkowsky
However (since I am a good guy 😇), I will provide the tidbits required to get going with ALE for the purpose of Nim.
Add the following to your list of plugins in init.vim (or .vimrc):
Plug 'dense-analysis/ale'
and then perform the same two calls in Neovim console as in the previous case.
Among other things, most prominently, ALE acts as a Language Server Protocol (LSP) Client.
LSP is like the "one ring to rule them all" from The Lord of the Rings, but for the purpose of linting.
Give a 3 min. read to this article to know slightly more about it.

Now then, we have an LSP client in ALE, but we still require a Nim LSP server. We will quickly install the nimlsp package for that. nimlsp handles the server-side processing (don't ask me how, this post is already too long!! 😓, have some faith and follow the steps and, things will work just fine…).
To install nimlsp, execute the following command in your terminal.
nimble install nimlsp
So nimble is the package manager for Nim similar to npm for Node. And we already got the nimble binary (see above) with the installation of Nim.
The last piece of the puzzle is to instruct ALE on how to use nimlsp. Paste the following ALE configuration code in your init.vim (or .vimrc) for the same.
let g:ale_linters = {
\   'nim': ['nimlsp', 'nimcheck'],
\}
let g:ale_fixers = {
\   '*': ['remove_trailing_lines', 'trim_whitespace'],
\   'nim': ['nimpretty'],
\}
let g:ale_linters_explicit = 1
let g:ale_set_loclist = 0
let g:ale_set_quickfix = 1
let g:ale_lint_on_text_changed = 'never'
let g:ale_lint_on_insert_leave = 0
let g:ale_fix_on_save = 1
let g:ale_sign_error = '✖✖'
let g:ale_sign_warning = '⚠⚠'
highlight ALEErrorSign guifg=Red
highlight ALEWarningSign guifg=Yellow
You can further tweak the configuration as per your requirement. As you can see I have specified nimlsp and nimcheck as linting options and nimpretty as fixing options. ALE uses nimpretty (already provided in Nim installation) for code-formatting.
ALRIGHT!!! You are all set 👍
Testing
I checked the following piece of Nim code in Neovim:
echo "What's your favorite icecream flavor?"
var flavor = readLine(stdin)
echo "Your's ", flavor, ", mine's vanilla!
Can you notice the error in the above code snippet? 🤔 🤔 🤔
Don't worry, Neovim will do it for you 😉
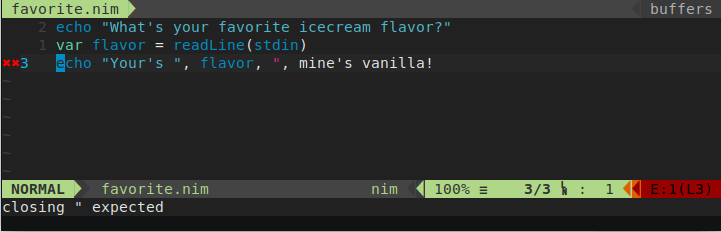
The code was missing closing " which Neovim correctly pointed out. Add it and then execute (compile and run) the code using the following Nim command:
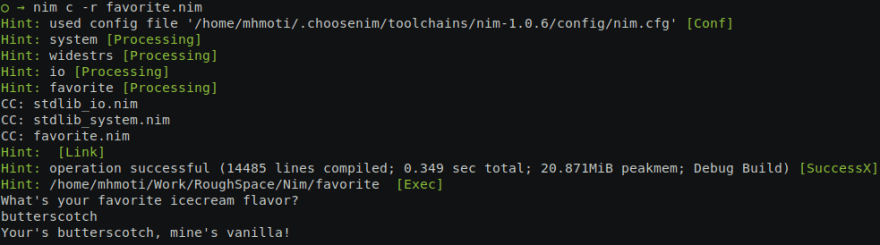
nim c -r favorite.nim
The output will look something like this,
So, congratulations on making it to the end and see you until next time 👋
HAPPY CODING!!!

Oldest comments (0)