
Matomo is an open-source web analytics platform. It is a great alternative to Google Analytics. This platform offers you 100% control of yours and your users’ data.
You don’t need to install Matomo to see what it can do for you. Let’s take a quick tour around the demo site at demo.matomo.org

The open-source self-hosted Matomo can show the following reports:
- Top keywords and search engines, referrals, social media.
- Top pages URLs, page titles, user countries, providers, operating systems, browsers shares, screens resolutions, desktop vs. mobile.
- Engagement (time on site, pages per visit, repeated visits).
- Top campaigns, custom variables, top entry/exit pages, downloaded files, and many more.
- Classified into four main analytics report categories – Visitors, Actions, Referrers, Goals/Ecommerce (30+ reports).
- Statistics email reports.
- Web server analytics logs.
- Tools to comply with GDPR (such as cookie consent)
- Install free or premium plugins to extend and expand the functionality of Matomo.
- And more features.
You can check the Matomo features page, for the full list of features.
I’ve chosen to self-host my own Matomo for these benefits:
- Full control of data. Data is only stored on your server, and you can choose which country the server is located in.
- No data limits. You can hold as much data as your server can fit.
- Fully customisable and extensible.
- Firefox started blocking cross-site tracking cookies, including Google analytics. By hosting the analytics software under your own domain name, you tracking cookies won’t be blocked.
Required services
- The latest PHP 7.x release
- MySQL 5.7+ for your database
- Nginx Webserver
Create MySQL database
Install PHP and MySQL.
sudo apt-get update

sudo apt-get install --no-install-recommends php php-fpm php-curl php-gd php-cli php-mysql mysql-server php-xml php-mbstring
Connect to your MySQL database.
mysql
Create a database for Matomo. Replace matomo_db_name with your database name.
mysql> CREATE DATABASE matomo_db_name;
Create a user called matomo. Replace strong-password with your strong secured password.
mysql> CREATE USER 'matomo'@'localhost' IDENTIFIED BY 'strong-password';
Grant this user matomo the permission to access your matomo_db_name database.
mysql> GRANT SELECT, INSERT, UPDATE, DELETE, CREATE, INDEX, DROP, ALTER, CREATE TEMPORARY TABLES, LOCK TABLES ON matomo_db_name.* TO 'matomo'@'localhost';
Grant this user matomo the FILE global privilege.
mysql> GRANT FILE ON *.* TO 'matomo'@'localhost';
Exit MySQL.
exit
Install Matomo
Install unzip.
sudo apt-get install unzip
Get the latest version of Matomo and unzip it.
sudo wget https://builds.matomo.org/matomo.zip && unzip matomo.zip
Move matomo directory to /srv/.
sudo mv matomo /srv/matomo/
Change the ownership of Matomo directory.
sudo chown -R www-data:www-data /srv/matomo/
NGINX
Get NGINX.
sudo apt-get install nginx
Create NGINX configuration file.
sudo nano /etc/nginx/conf.d/matomo.conf
Insert the following lines in the configuration file. Replace analytics.example.com with the domain you would like to use to access your Matomo installation.
server {
  server_name analytics.example.com;
  root /srv/matomo;
  index index.php index.html;
  access_log /var/log/nginx/matomo_access.log;
  error_log /var/log/nginx/matomo_error.log;

  client_max_body_size 100M;

  location ~ ^/(index|matomo|piwik|js/index|plugins/HeatmapSessionRecording/configs)\.php {
    include /etc/nginx/fastcgi_params;
    fastcgi_pass unix:/var/run/php/php7.2-fpm.sock;
    fastcgi_param SCRIPT_FILENAME $document_root$fastcgi_script_name;
  }

  location ~* ^.+\.php$ {
    deny all;
    return 403;
  }

  location / {
    try_files $uri $uri/ =404;
  }

  location ~ /(config|tmp|core|lang) {
    deny all;
    return 403;
  }

  location ~ /\.ht {
    deny all;
    return 403;
  }

  location ~ js/container_.*_preview\.js$ {
    expires off;
    add_header Cache-Control 'private, no-cache, no-store';
  }

  location ~ \.(gif|ico|jpg|png|svg|js|css|htm|html|mp3|mp4|wav|ogg|avi|ttf|eot|woff|woff2|json)$ {
    allow all;
    expires 1h;
    add_header Pragma public;
    add_header Cache-Control "public";
  }

  location ~ /(libs|vendor|plugins|misc/user) {
    deny all;
    return 403;
  }

  location ~/(.*\.md|LEGALNOTICE|LICENSE) {
    default_type text/plain;
  }
}
Test your NGINX configuration, restart it and add it to boot services.
sudo nginx -t
sudo systemctl restart nginx
sudo systemctl enable nginx
SSL certificate
Install Certbot.
sudo apt-get install certbot python-certbot-nginx
With Certbot, you can generate a SSL certificate (thanks to LetsEncrypt) by running this command:
certbot --nginx -d analytics.example.com
Configure Matomo
Go to your domain, here analytics.example.com. If everything is installed correctly, you should see the Matomo Installation Welcome Screen. Follow the steps.
System Check
Matomo will check your installation to make sure that your server meets the Matomo requirements. If everything is okay, you’ll see a long list like this:

If there is a problem, Matomo will identify it and tell you how to solve it, as in this example:

MySQL Database Setup
For the database setup, use the following credentials:
Database Server : 127.0.0.1
Login: matomo
Password: <YourStrongPassword>
Database Name: matomo
Adapter: PDO/MYSQL

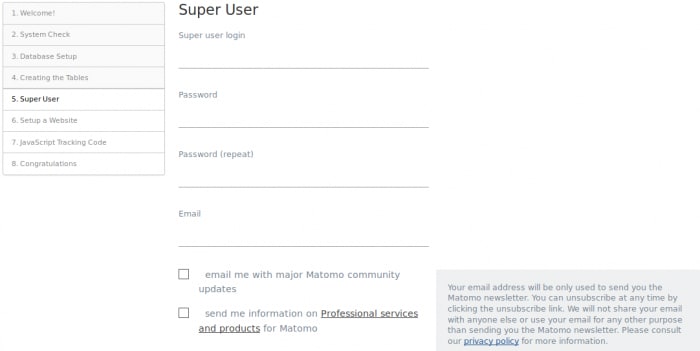
Super User
Now you should create your super user. This user has the highest permissions. Insert your username, password and email. Do not lose those; it is the only way for you to log in to Matomo for the first time
Setup Your First Website
Enter the name and URL of the first website you want to track. You can add more websites once the installation is complete.

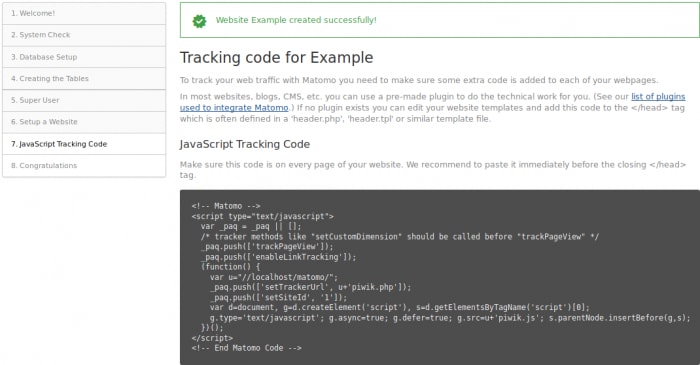
Install the JavaScript Tracking Tag
Matomo will generate a JavaScript tag for you. This code must appear on every page that you want Matomo to analyze. It's recommended that you paste this code immediately before your closing tag.
For Gatsby sites, you could use the gatsby-plugin-matomo
Add this line to your gatsby.config file.
plugins: [
 {
   resolve: 'gatsby-plugin-matomo',
   options: {
     siteId: 'YOUR_SITE_ID',
     matomoUrl: 'https://analytics.example.com',
     siteUrl: 'https://YOUR_LIVE_SITE_URL.COM'
   }
 }
]
Congratulations
You have installed your self hosted Matomo Web Analytics. Now you can perform a wide range of functions, including tracking goals and placing orders online.

Originally published at https://henaff.io.

Top comments (0)