Very often, we’re asked to extract some data from a database. If the request repeats regularly, it’s worth looking into automating it so you don’t have to perform this boring procedure over and over again. For this reason, you’ll probably want to send emails from SQL Server with the predefined content. And it’s not that hard to set up.
Of course, emailing in SQL Server doesn’t need to only be about exporting data. You may simply want to keep yourself (or a colleague of yours) updated when, for example, a backup is finished or a programmed job fails miserably. With built-in functionalities, this can easily be done too.
We cover several different approaches and let you choose which works best for your needs.
Sending emails with a built-in Wizard
The first approach doesn’t require any code as you’re guided through the entire setup by a built-in Wizard.
The first thing you need to take care of is email infrastructure. For that, you’ll have to set up a Database Mail functionality in SQL Server. If you’re using SQL Server Express, you’ll need to enable Database Mail first as it’s disabled by default.
(Optional) Enabling Database Mail in SQL Server Express
Skip this part if you’re not on SQL Server Express but, for example, SQL Server 2017.
We’ll use T-SQL to enable Database Mail. First of all, try the following code:
sp_configure 'Database Mail XPs', 1;
GO
RECONFIGURE
GO
If it works, you’re good to go. Often, you may hit an error informing you that ‘Database Mail XPs don’t exist’. There’s a simple fix to that. Since it’s an advanced feature, we need to change the “show advanced options” from 0 to 1:
sp_configure 'show advanced options', 1;
GO
RECONFIGURE;
GO

sp_configure 'Database Mail XPs', 1;
GO
RECONFIGURE
GO
If it’s executed properly, try the earlier code and proceed when both values are set to ‘1’.
Configuring Database Mail
Find the ‘Management’ folder in SQL server management console and right-click on ‘Configure Database Mail’.
The Wizard will launch and welcome you with some details. Proceed to the next page by clicking on ‘Next’.
On the following screen, you need to choose what to do. Since we are assuming Database Mail hasn’t been created before, go with the first option as in the screenshot below.
To set up Database Mail, you’ll need to enable it first. If you haven’t done so before, a popup will appear asking whether you want to enable Database Mail. Go for it.
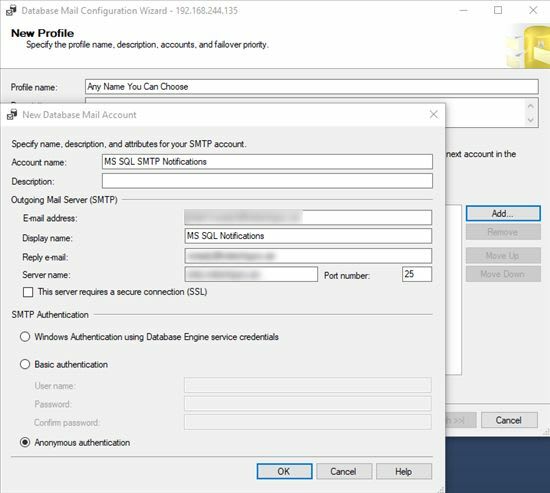
On the new screen, you’ll see that no accounts are setup. Go ahead and add one by hitting the ‘Add’ button.
A window will appear so you can quickly add the necessary details of your mail account. If you want replies to be sent to a different email address, put it under ‘Reply e-mail’. If you leave it blank, responders will reply to the email address specified in the ‘E-mail address’ field. ‘Description’ is optional.
Once you save the new profile, you’ll see it on the list in the previous window. You can add more accounts if you wish and prioritize them. If the first from the list fails to send an email, for whatever reason, the next account from the list will be used.
The following screen will bring you to the list of profiles, split into public and private ones.
- Private Profiles are available to any user or role with access to the database.
- Private Profiles can be restricted to specific users only.
After clicking on “Next”, you’ll see the list of default settings. You can modify them here or keep them intact. Each option is pretty well documented in Microsoft’s documentation.
Finally, you’ll see the summary of everything you just configured. If you’re happy with it, hit ‘Finish’ to wrap up the process.
That’s all, Database Mail is configured!
You can test whether sending emails works straightaway. Right-click on Database Mail and select ‘Send Test E-mail’ from the list.
Here, type in the email address you want to send the test to along with the desired content and send!
Sending emails with SQL Server Agent
The most straightforward way to send emails from SQL Server is by creating a new SQL Agent Job and setting SQL to send emails about the job’s status. For that, you can use the profile you just created.
To set up, you can use another simple Wizard. Right-click on SQL Server Agent and pick ‘Properties’ from the list.
Here, you’ll need to modify some settings. In the ‘Alert System’ tab nested under ‘Select a page’, do the following:
- Tick ‘enable mail profile’.
- In this section, choose ‘Database Mail’ from the dropdown list for ‘Mail system’ and pick the profile you just created from the ‘Mail profile’ dropdown.
- Tick ‘Replace tokens for all job responses to alerts’.
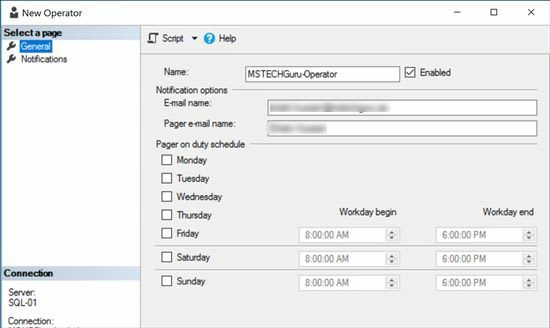
Now, you need to set up an Operator that will be a recipient of your emails. Head back to the list under SQL Server Agent, right-click on ‘Operators’ and pick ‘New Operator’.
In the new menu, you simply need to insert the recipient’s email address, a. Adding a ‘Pager e-mail name’ is optional.
To apply the changes, you’ll need to restart the service of SQL Server Agent and then pick ‘Start’ to resume our project.
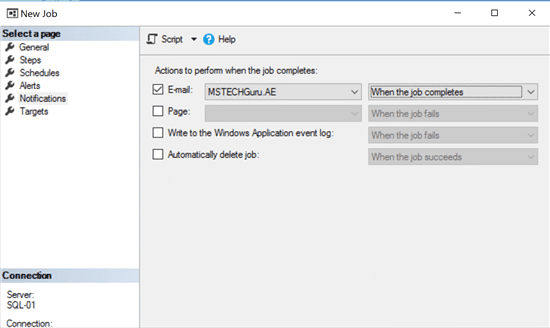
Once you’re back, it’s time to create a new SQL Job. Right-click on ‘Jobs’ and pick ‘New Job…” from the top of the list.
Here, tick the box to the left of ‘E-mail’ field. Choose your newly created profile from the dropdown list and then select the condition. In our example, we’ll want to send an email to ‘Operator’ when the job completes.
Save and move on to the last stage. You should have a profile set up along with an Operator and a Job. Now you only need to create a Maintenance Plan. To no surprise, you can do it with yet another Wizard.
Find the ‘Maintenance Plans’ menu and right-click on ‘New Maintenance Plan…”. The new screen gives you some ideas about the kind of things you’ll be able to set up.
You can name it right away and then move on.
In the next step, you can specify exactly what the task this time will be.
You’ll see your newly created task on the list. If you created some before, you’ll be able to prioritize them at this stage.
At the next stage, you can select which databases you want the task to be performed on. On the same screen, you can also choose where backups should be saved.
In the ‘Destination’ tab, you can choose exactly where on your drive backups should be saved. Use ‘Options’ tab to review the default options and adjust them to your liking.
On the following screen, you can choose to create a report to a text file (and pick a path where it should be saved). But what interests us the most is sending an e-mail report. Here, pick the profile you want to use for sending these reports.
At the last step, you’ll see all the settings you just set up. If everything checks out, click on ‘Finish’ and just wait for the first email to arrive in the specified inbox.
Sending emails with SQL
Another method for sending emails is with a system stored procedure called sp_send_dbmail. This way, you can send emails to specified recipients and include in the email query results, attachments or both.
First things first, if you didn’t follow the first, wizard-based method we covered and you’re using SQL Server Express, you’ll need to enable Database Mail first. Kindly follow the instructions from the earlier paragraph.
Now we’ll need to set up a Mail Account. In this example, we used standard Gmail credentials but of course, you’re free to use any account you have access to. If you need help deciding on which port you should use, check out our article on SMTP Ports.
-- Create a Database Mail account
EXECUTE msdb.dbo.sysmail_add_account_sp
    @account_name = 'Gmail',
    @description = 'Mail account for sending outgoing emails.',
    @email_address = '<xyz@gmail.com>',
    @display_name = 'Piotr @ Mailtrap',
    @mailserver_name = 'smtp.gmail.com',
    @port = 465,
    @enable_ssl = 1,
    @username = '<gmail_username>',
    @password = '<gmail_pass>' ;
GO
Immediately after this is executed, you can view the new records in the sysmail_account and sysmail_server tables.
We now have an account. Now we need to set up a new profile in Database Mail and attach it to our new account.
-- Create a Database Mail profile
EXECUTE msdb.dbo.sysmail_add_profile_sp
    @profile_name = 'Emalis from SQL',
    @description = 'Profile for sending emails from SQL Server, with Gmail account.' ;
GO

-- Add the account to the profile
EXECUTE msdb.dbo.sysmail_add_profileaccount_sp
    @profile_name = 'Emalis from SQL',
    @account_name = Gmail',
    @sequence_number =1 ;
GO
You’ll notice quickly that the sysmail_profile and sysmail_profileaccount tables have been updated.
Now that we have everything set up, we can proceed with a test email:
EXEC msdb.dbo.sp_send_dbmail
    @profile_name = ''Emalis from SQL',
    @recipients = '<bill@mailtrap.io>',
    @copy_recipients = '<jane@mailtrap.io>',
    @blind_copy_recipients = '<frank@mailtrap.io>',
    @body = 'what’s up?!',
    @subject = 'Hey folks',
    @from_address = '<from email>',
    @reply_to = '<from email>'
Once you hit ‘ENTER’, the email will appear in the queue in the sysmail_mailitems tables and move to sysmail_log table shortly after regardless of the result. Of course, if you have set everything up properly, it should also land in the inbox of your recipients.
Customizing emails in SQL
OK, that was easy, but we came here to set up emails that are a bit more sophisticated. Let’s look at some of the available arguments we can use in such emails.
_[ @file_attachments = ] _
You can add any attachments to your email by specifying their absolute paths here. Each file can be a maximum of 1MB in size.
[ @query = ]
This way you can execute any Transact-SQL query and attach it in the email body. Be aware that the query you specify here is executed in a separate session so you can’t use any local variables specified in the script on this occasion.
If you specify a query, you can also use an [ @execute_query_database = ] argument to specify a database on which the stored procedure will run the query
To specify if the results of a query should be sent as an attachment or be inserted into an email body, use an [ @attach_query_result_as_file = ] argument. The value of ‘0’ indicates that the results should go into the body – this is also what will happen if this argument is skipped. The value of ‘1’ indicates an attachment.
There are a number of further customizations you can perform on the query results to, for example, include or exclude headers or decide how to handle errors. Review them all in Microsoft’s Documentation.
Sending emails with a CLR Stored Procedure
The third approach to the problem is with CLR Stored Procedure. There can be a number of reasons why you would want to do this. For example, maybe you’re using SQL Server Express which doesn’t offer support for Transact-SQL and you’re not able to run sp_send_dbmail. Or maybe you need more control of the email sending process or lack sufficient rights on the instance level.
Whatever the reason, setting up a SQLCLR Stored Procedure for sending emails is fairly easy.
If you haven’t written any CLR procedures before, be sure to review Microsoft’s Documentation for tips on getting started and basic examples.
Also, you need to enable CLR first to use the following procedures. CLR integration in SQL Server is off by default. Here’s how to enable it.
You’re free to use either VB.NET or C#.NET to write the procedure. We’ll stick with the first one here.
Imports System.Net
Imports System.Net.Mail

Public Class StoredProcedure
<Microsoft.SqlServer.Server.SqlProcedure()> _
Public Shared Sub spSendMail(ByVal recipients As String, ByVal subject As String, ByVal from As String, ByVal body As String)
Dim mySmtpClient As SmtpClient

Using myMessage As New MailMessage(from, to)

myMessage.Subject = subject
myMessage.Body = body

myMessage.IsBodyHtml = True

mySmtpClient = New SmtpClient("smtp.gmail.com")
mySmtpClient.Credentials = New NetworkCredential("my_email_address", "my_password")
mySmtpClient.Send(myMessage)

End Using
End Sub
End Class
What happened here:
- We created a procedure that’s supposed to send an email with defined ‘Subject’ and ‘Body’, using ‘From’ and ‘To’ variables as a sender and a recipient, respectively
- We also added our example credentials, including the SMTP port, login, and password. Of course, Gmail is just an example here.
Save the code to C:\SendEmail.vb.
Now, let’s compile it on the machine the code will run on. An example command link may look as follows if you used vbc.exe application:
C:\Windows\Microsoft.NET\Framework64\v4.0.30319\vbc /target:library C:\SendEmail.vb
You’ll find the compiled file at C:\SendEmail.dll
In the following step, you’ll need to create the assembly and the stored procedure in SQL Server.
USE msdb // change if you use a different database
GO

CREATE ASSEMBLY SendEmail FROM 'C:\SendEmail.dll'
WITH PERMISSION_SET = UNSAFE
GO

CREATE PROCEDURE [dbo].[spSendMail]
@recipients [nvarchar](4000),
@subject [nvarchar](4000),
@from [nvarchar](4000),
@body [nvarchar](4000)
WITH EXECUTE AS CALLER
AS
EXTERNAL NAME [SendEmail].[StoredProcedure].[spSendMail]
If you’re seeing an error when trying to compile, try to alter the code with the following and try again:
ALTER DATABASE msdb SET trustworthy ON
Finally, test whether everything works as expected. Here’s an example code using the same parameters we indicated above:
EXEC spSendMail @recipients = 'kate@mailtrap.io, pete@mailtrap.io',
@subject = 'Hey, this works too!',
@from = 'piotr@mailtrap.io', @body = 'No one expected the SQL Revolution!'
Of course, you can use a lot more sophisticated arguments in your procedures, such as:
- @fileAttachments – include attachments in your email, specifying their absolute paths. 1MB per file allowed.
- @mailCC and @blindCopyRec – add emails in cc and/or bcc,
- @replyAddress – accept responses at another address than specified in the ‘From’ field. One address allowed.
- @bodyHtml – allow or disallow HTML. Allowed by default.
Here’s an example using some of these arguments:
EXEC spSendMail @recipients = 'kate@mailtrap.io',
@replyAddress = ‘claire@mailtrap.io’
@blindCopyRec = ‘pete@mailtrap.io’
@bodyHtml = ‘0’
@subject = 'Don’t tell Pete but',
@from = 'piotr@mailtrap.io', @body = 'No one expected the SQL Revolution!'
Debugging and testing SQL Server emails
If you encountered any problems when executing an SQL procedure, first things first, check whether the SMTP server is set up properly. Verify your credentials and try sending a test email with another account (preferably from another provider too). If everything’s fine on this end, launch Visual Studio and start debugging your code.
When using either of the first two methods, Database Mail could be the source of the problem. There are a lot of things that could have gone wrong.
Finally, if emails are sent but you’re not entirely sure whether they’re set up as expected, you probably want to route them to a dedicated environment for testing. One such example is Mailtrap, a pre-production email testing platform.
With Mailtrap, you can gather all your emails sent from SQL Server in a single inbox. Here, you can check them for possible HTML issues, and validate the links or attachments. You can also bcc Mailtrap on all your outgoing emails. This way, you’ll get a copy of each email sent so you can quickly inspect these emails and fix them right away.
I hope our guide SQL server: send email from stored procedure with attachment was helpful for you! It was initially published in the Mailtrap blog by Piotr Malek.


Top comments (1)
Woah, good stuff. Reminded me (G)old days were I was student and learning SQL 98/2005. I remember we could also run CMD commands, and manipulating registry entries(WTF).
So cool, MS has implemented these stuff, tho the main factors(such as performance security,...) reminded buggy and not-optimized.