Hello Friends, In a react application if we want to manage the state at component level, then we use useState hook for same but if you are looking for managing state at global level then react content is your answer. You may also be thinking that we can pass data using props from one component to another, but in large applications this become very complex. In this blog post we are going to look how we can store some information at global level so that all component can access that if needed and how we can also update that information.
What is React Context?
React Context is a feature in React that provides a way to share data between components without the need to pass props down manually through every level of the component tree. It allows for the creation of a global data store, which can be accessed by any component in the application. This makes it easier to manage state in large applications with complex component hierarchies. React Context consists of two main components: a context object and a provider component. The context object holds the data, and the provider component is responsible for passing the data down to the child components. The child components can then access the data using the useContext hook.
Using React Context for Global State Management
To understand how React Context can be used for global state management, let’s consider an example of a shopping cart in an e-commerce website. In a typical React application, the state of the shopping cart would be managed in the component that contains it. However, this approach can become challenging as the application grows and the shopping cart needs to be accessed by multiple components in different parts of the application.
To solve this problem, we can create a global state management solution using React Context. Here’s how it works:
Here is a new sample react app structure
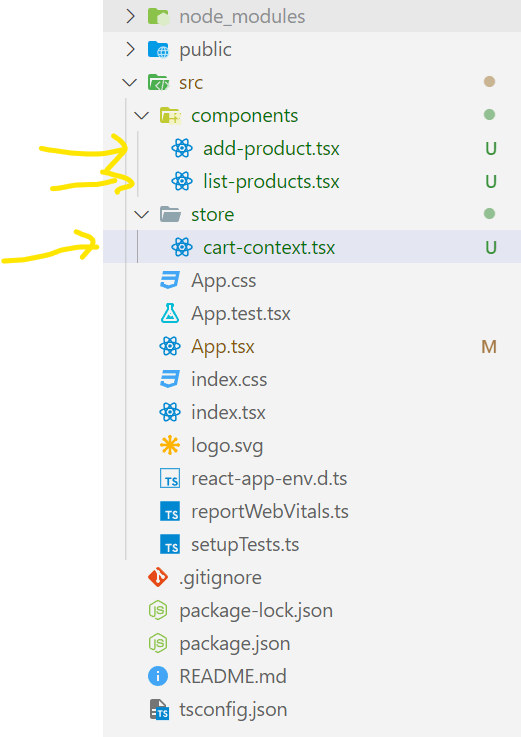
1. Create a new file called “cart-context.tsx” in store directory and add below code.
import React, { useState } from "react";

interface CartContextType {
  cart: product[];
  addItem: (item: product) => void;
  removeItem: (item: product) => void;
}

const CartContext = React.createContext<CartContextType>({
  cart: [],
  addItem: (item: product) => {},
  removeItem: (item: product) => {},
});

interface product {
  id: number;
  name: string;
  quantity: number;
}

export const CartContextProvider = (props: any) => {
  const [cart, setCart] = useState(Array<product>);

  function addItem(item: product) {
    setCart([...cart, item]);
  }

  function removeItem(item: product) {
    setCart(cart.filter((i) => i.id !== item.id));
  }

  return (
    <CartContext.Provider
      value={{
        cart: cart,
        addItem: addItem,
        removeItem: removeItem,
      }}
    >
      {props.children}
    </CartContext.Provider>
  );
};

export default CartContext;
In the above code we are creating a CartContext using the React.createContext method.
The CartContextType interface defines the shape of the context value, which includes an array of product objects, and two functions for adding and removing items from the cart.
The CartContext constant creates the context with an initial value of an empty array of product objects and two empty functions.
The CartContextProvider function is a wrapper component that provides the context value to its child components. It uses the useState hook to create a state variable cart with an initial value of an empty array of product objects.
The addItem function is used to add a new product object to the cart state by spreading the existing cart array and adding the new item to the end of the array.
The removeItem function is used to remove a product object from the cart state by filtering the cart array and returning all items except the one with the matching id.
Finally, the CartContext.Provider component provides the context value to its child components by passing an object with the cart, addItem, and removeItem properties as the value prop. The child components can access this context value by using the useContext hook.
Note that the CartContextProvider function takes a props parameter but does not use it. This is because it is a wrapper component that simply provides the context value to its children and does not render any content itself.
2.Create a new component file name “add-product.tsx” in components folder and add below code.
import { useContext, useState } from "react";
import CartContext from "../store/cart-context";

function AddProduct(props: any) {
  const [productName, setProductName] = useState("");
  const [quantity, setQuantity] = useState(0);
  const cartContext = useContext(CartContext);

  const handleSubmit = (e: any) => {
    e.preventDefault();
    const id = cartContext.cart.length + 1;
    cartContext.addItem({
      id: id,
      name: productName,
      quantity: quantity,
    });
  };

  return (
    <form onSubmit={handleSubmit}>
      <div>
        <label>
          Product Name:
          <input
            type="text"
            value={productName}
            onChange={(e) => setProductName(e.target.value)}
          />
        </label>
      </div>
      <div>
        <label>
          Quantity:
          <input
            type="text"
            value={quantity}
            onChange={(e) => setQuantity(+e.target.value)}
          />
        </label>
      </div>

      <button type="submit">Submit</button>
    </form>
  );
}

export default AddProduct;
The above React functional component called AddProduct is responsible for rendering a form that allows the user to input the name and quantity of a product and add it to the cart.
The component imports the useContext and useState hooks from React, as well as the CartContext created in the previous code snippet.
The component defines two state variables using the useState hook: productName and quantity. These variables are used to store the user input from the form.
The component then uses the useContext hook to access the cartContext value from the CartContext component.
The handleSubmit function is called when the form is submitted. It prevents the default form submission behavior and creates a new product object with an id, name, and quantity property. The id property is generated by adding 1 to the current length of the cart array.
The cartContext.addItem function is then called with the new product object as an argument, which adds the product to the cart.
The render method returns a form with two input fields for the productName and quantity, and a submit button. The onChange event is used to update the productName and quantity state variables as the user types in the input fields.
Finally, the handleSubmit function is called when the form is submitted by the user, adding the new product object to the cart using the cartContext.addItem function.
Overall, this component provides a simple way for the user to add products to the cart by entering the name and quantity in a form. It uses the CartContext to access the cart data and the addItem function to modify it.
3.Create a new file named “list-products.tsx” in components folder and add below code.
import React, { useContext } from "react";
import CartContext from "../store/cart-context";

const ListProducts = () => {
  const { cart, removeItem } = useContext(CartContext);

  return (
    <div>
      <h2>Product List</h2>
      {cart.length === 0 ? (
        <p>Your cart is empty.</p>
      ) : (
        <ul>
          {cart.map((product) => (
            <li key={product.id}>
              {product.name} - {product.quantity}
              <button onClick={() => removeItem(product)}>Remove</button>
            </li>
          ))}
        </ul>
      )}
    </div>
  );
};

export default ListProducts;
The above React functional component called ListProducts is responsible for rendering the list of products in the cart and allowing the user to remove products from it.
The component imports the useContext hook from React, as well as the CartContext created in the previous code snippet.
The component then uses the useContext hook to access the cart array and the removeItem function from the CartContext component.
The render method returns a div with a header and a list of products in the cart. If the cart is empty, a message is displayed indicating that it is empty. Otherwise, an unordered list is rendered with each item in the cart. For each item, the name and quantity are displayed, along with a remove button. The onClick event for the remove button calls the removeItem function with the corresponding product as an argument, removing it from the cart.
Overall, this component provides a simple way for the user to view and remove products from the cart. It uses the CartContext to access the cart data and the removeItem function to modify it.
4.Update the “App.tsx” as below.
import "./App.css";
import { CartContextProvider } from "./store/cart-context";
import AddProduct from "./components/add-product";
import ListProducts from "./components/list-products";

function App() {
  return (
    <CartContextProvider>
      <div className="App">
        <AddProduct />
        <hr />
        <ListProducts />
      </div>
    </CartContextProvider>
  );
}

export default App;
The above code is for React functional component called App that acts as the main component for the application. It renders the AddProduct and ListProducts components and wraps them in the CartContextProvider component.
The CartContextProvider component wraps the App component with the context provider, making the context and its data available to all child components.
The App component then returns a div with a class of App that contains the AddProduct and ListProducts components. The hr element is added to separate the two components visually.
Overall, this component provides the structure for the application and ensures that the context provider is available to all child components. It allows the user to add and remove products from the cart using the AddProduct and ListProducts components respectively.
Here is the working output .
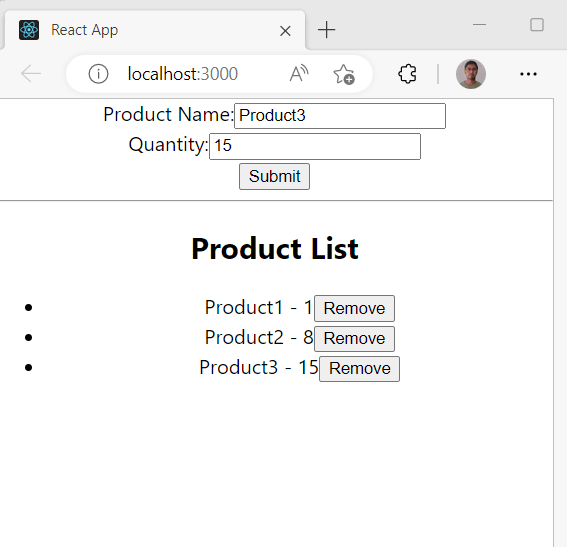
Just ignore the css part for now 
I have added three products and you can see that added in cart object in global context and then I am trying to remove product 2 which is also working as below. Note that we are not passing functions or data using props from one component to another component but we are using React Context to manage that cart state globally.

Conclusion
This is a introduction to React Context and how it can be used for global state management. The code snippets provided are helpful in understanding how to create and use a context object, and how to provide and access data using the useContext hook. The example of a shopping cart in an e-commerce website is a practical use case that demonstrates the benefits of using React Context for global state management.
Overall, this blog post provides a resource for anyone looking to learn about React Context and global state management in React applications.
Thanks and Happy Learning :). Please give your valuable feedback and share this post if you liked and learned something from this post.
The post Global State Management using React Context appeared first on CodeLila.

Top comments (0)