Imagine this: You’re building a multi-page dashboard. Each page needs access to user information, but traditional prop drilling makes your code spaghetti-like. Enter context! We’ll leverage React’s built-in context API to effortlessly inject props into Outlet and seamlessly share them across your child components, all while maintaining clean and maintainable code.
Introducing Outlet Context: The Superhero of Data Sharing
Enter the mighty outlet context API , built-in to React Router V6. Think of it as a magic portal that seamlessly transports data between components, regardless of their nesting level. With context, you can share global state, user information, and any other data you need, all without prop drilling.
The Magic of Outlet Context and Outlet Props
React Router v6 comes with a powerful component called Outlet. It acts as a placeholder for child routes, rendering the content they define. But here’s the exciting part: you can leverage context to inject props into Outlet, making them accessible to all its child components!
Benefits of Passing Props to Outlet with Context:
- Clean and maintainable code: Ditch the prop drilling spaghetti and structure your code like a well-organized garden.
- Improved data sharing: Share data effortlessly across any level of nested components, keeping your state management centralized and efficient.
- Enhanced flexibility: Dynamically change props based on routes or user interactions, adding a whole new level of control to your app.
- Reduced boilerplate code: No more prop drilling rituals! Context takes care of data flow, leaving you with more time to focus on building amazing features.
Let’s Dive in: A Step-by-Step Guide
Create an react app named “outlet-context-example” with typescript as template using below command.
npx create-react-app outlet-context-example --template typescript
now open the project in vs code and install the react-router dom package as below

Create a components folder in src and then create “ChildComponent1.tsx”, “ChildComponent2.tsx”, “ChildComponent3.tsx” and HomeDashboard.tsx file in component folder as below.

Next Update the App.tsx file with below code.
import { RouterProvider, createBrowserRouter } from "react-router-dom";
import HomeDashboard from "./components/HomeDashboard";
import ChildComponent1 from "./components/ChildComponent1";
import ChildComponent2 from "./components/ChildComponent2";
import ChildComponent3 from "./components/ChildComponent3";

const routes = createBrowserRouter([
  {
    path: "/",
    element: <HomeDashboard />,
    children: [
      {
        path: "component1",
        element: <ChildComponent1 />,
      },
      {
        path: "component2",
        element: <ChildComponent2 />,
      },
      {
        path: "component3",
        element: <ChildComponent3 />,
      },
    ],
  },
]);

function App() {
  return <RouterProvider router={routes} />;
}

export default App;
The above code uses the react-router-dom library for handling navigation. It defines a set of routes, including a main route (“/”) that renders a HomeDashboard component and three child routes (“component1,” “component2,” and “component3”) that render corresponding child components (ChildComponent1, ChildComponent2, and ChildComponent3). The App component serves as the main entry point and utilizes the RouterProvider from react-router-dom to provide routing information to the rest of the application.
Update Homedashboard.tsx with below code.
import { Outlet, useNavigate, useOutletContext } from "react-router-dom";

const sampleServerData = {
  employeeInfo: {
    id: 1,
    name: "John",
  },
};

type EmployeeInfoContextType = {
  empInfo: {
    id: number;
    name: string;
  };
};

function HomeDashboard() {
  const navigate = useNavigate();
  function loadComponent1(e: any) {
    e.preventDefault();
    navigate("/component1");
  }

  function loadComponent2(e: any) {
    e.preventDefault();
    navigate("/component2");
  }
  function loadComponent3(e: any) {
    e.preventDefault();
    navigate("/component3");
  }

  return (
    <>
      <h1>Header area</h1>
      <button onClick={loadComponent1}>Load Component1</button>
      <button onClick={loadComponent2}>Load Component2</button>
      <button onClick={loadComponent3}>Load Component3</button>
      <Outlet
        context={{
          empInfo: sampleServerData.employeeInfo,
        }}
      />
      <footer>footer area</footer>
    </>
  );
}

export function useEmployeeInfoData(): EmployeeInfoContextType {
  return useOutletContext<EmployeeInfoContextType>();
}

export default HomeDashboard;
The above code defines a React component named HomeDashboard, representing a dashboard with navigation buttons and an outlet for rendering child components. Here’s a succinct breakdown:
-
Navigation and Outlet:
- The component uses buttons (
Load Component1,Load Component2,Load Component3) to trigger navigation to different routes using thereact-router-domlibrary. - It employs the
Outletcomponent to specify where child components will be rendered.
- The component uses buttons (
-
Context and Data:
- A sample data structure (
sampleServerData) simulates employee information. - A context type (
EmployeeInfoContextType) is defined to represent the structure of employee information.
- A sample data structure (
-
Functions and Footer:
- The
useNavigatehook is used to navigate to different components when buttons are clicked. - The
useEmployeeInfoDatafunction is exported for child components to access the employee information context. - The component includes a header, buttons for navigation, an outlet for child components, and a footer.
- The
This setup provides a structured and navigable interface for a React application, and the use of context allows for the efficient sharing of data between components. This blog post can delve deeper into the importance of routing, context, and component composition in building maintainable and scalable React applications.The useEmployeeInfoData hook uses useOutletContext from react-router-dom to access the shared context, ensuring consistent data retrieval across child components.
Update ChildComponent1.tsx with below code.
import { useEmployeeInfoData } from "./HomeDashboard";

function ChildComponent1() {
  const empInfoData = useEmployeeInfoData();
  return (
    <>
      <h1>Child Component 1 loaded</h1>
      <p>Employee Info:</p>
      <p> id:{empInfoData.empInfo.id}</p>
      <p>name: {empInfoData.empInfo.name}</p>
    </>
  );
}

export default ChildComponent1;
ChildComponent1 is a React component that leverages the useEmployeeInfoData function from the HomeDashboard module. This component displays a simple user interface with a heading indicating its loaded status and paragraph elements showcasing employee information such as ID and name. The use of context allows ChildComponent1 to seamlessly access and present data shared by its parent component (HomeDashboard). This coding structure demonstrates the efficiency of React context for managing and passing data across different parts of a React application.
Update ChildComponent2.tsx with below code.
import { useEmployeeInfoData } from "./HomeDashboard";

function ChildComponent2() {
  const empInfoData = useEmployeeInfoData();
  return (
    <>
      <h1>Child Component 2 loaded</h1>
      <p>Employee Info:</p>
      <p> id:{empInfoData.empInfo.id}</p>
      <p>name: {empInfoData.empInfo.name}</p>
    </>
  );
}

export default ChildComponent2;
ChildComponent2 is another React component that relies on the useEmployeeInfoData function imported from the HomeDashboard module. Like its counterpart, ChildComponent1, it renders a user interface indicating its loaded status and displays employee information retrieved from the shared context. This consistent approach highlights the modularity and ease of data sharing facilitated by React’s context management.
Update ChildComponent3.tsx with below code
import { useEmployeeInfoData } from "./HomeDashboard";

function ChildComponent3() {
  const empInfoData = useEmployeeInfoData();
  return (
    <>
      <h1>Child Component 3 loaded</h1>
      <p>Employee Info:</p>
      <p> id:{empInfoData.empInfo.id}</p>
      <p>name: {empInfoData.empInfo.name}</p>
    </>
  );
}

export default ChildComponent3;
ChildComponent3 is a React component that leverages the useEmployeeInfoData function from the HomeDashboard module, emphasizing the shared employee information context. Following a similar structure to its counterparts, this component displays a loaded status, along with employee information (ID and name) retrieved from the context. The uniformity in approach across these child components highlights the efficiency and simplicity of React’s context management for data sharing in a modular and maintainable manner.
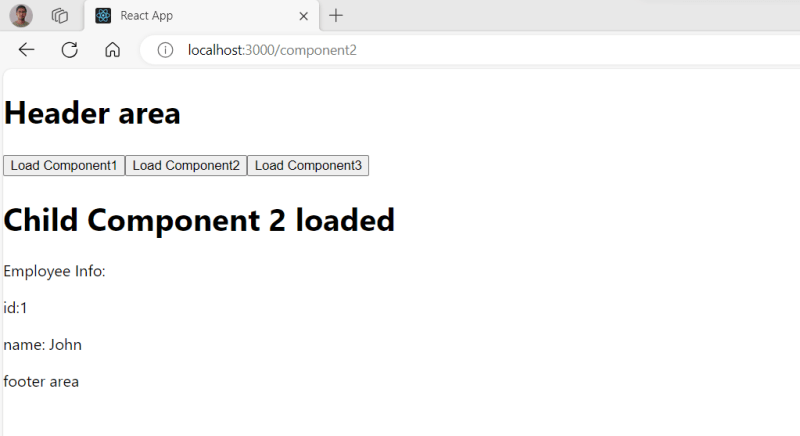
This is the running application output on browser.
Conclusion
In the ever-evolving landscape of React development, React Router v6 stands out as a powerful ally for efficient navigation and state management. The journey we’ve embarked upon in this blog has unraveled the complexities of traditional prop drilling and illuminated a path paved with the simplicity of React’s context API.
As we conclude, let’s reflect on the key takeaways:
-
Cleaner and Maintainable Code:
- By bidding farewell to the tangled web of prop drilling, we’ve embraced a coding style that resembles a well-organized garden—structured, readable, and easy to maintain.
-
Effortless Data Sharing:
- The introduction of the Outlet context API serves as our superhero, effortlessly transporting data between components. This seamless sharing mechanism ensures that data flows harmoniously across various nested levels.
-
Flexibility in Prop Passing:
- React Router v6, with its Outlet and context combination, provides a dynamic approach to prop passing. React to route changes or user interactions by adjusting props, adding a newfound level of control and flexibility to your application.
-
Boilerplate Code Reduction:
- The era of prop drilling rituals has come to an end. With context gracefully handling data flow, developers can now allocate more time to crafting remarkable features rather than wrestling with boilerplate code.
As you integrate these practices into your React projects, consider the profound impact on the scalability, readability, and overall developer experience. React Router v6, armed with the Outlet context API, empowers you to build applications that are not just functional but also elegantly structured.
So, go ahead, dive into the world of React Router v6, wield the Outlet context API, and let your code flourish with the simplicity and efficiency it deserves. Happy coding!
The post Unlocking Seamless Data Sharing: A Deep Dive into React Router v6 and Context for Multi-Page Dashboards appeared first on CodeLila.

Top comments (0)