
I originally started this to get to play around with some lighting shaders and here we finally are. Lighting is a pretty big topic though.
Overview
There's a lot of stuff involved with lights so we'll start with a high level:
- Types of Lights
- Directional (directional)
- Point (positional)
- Spotlight (positional and directional)
- Area (field of rectangular area)
- Types of lighting effects
- Ambient (background)
- Diffuse (scattered light)
- Specular (reflected light)
- PBR/BRDF (more realistic lighting with real physical properties)
- Lighting granularity
- Per poly (flat)
- Per vertex
- Per pixel
I'm not really an expert but that's roughly how I want to approach it. PBR or Physically Based Rendering is probably a bit beyond me but is the most common used in games today. What really gets my interest is some of the older and simpler models (including things like per-poly and per-vertex models that are actually harder to do with modern APIs) so that will be the focus.
Cleanup - Animating the Scene
At the end of the last part I bailed on doing real animation and just called render on every pointer update. This was bad for performance because I'm rendering way more than is necessary while the scene is being manipulated. Instead it make more sense to use requestAnimationFrame to sync the frame up to the refresh rate of the browser.
This is actually not too hard. First we start by removing all calls to this.render() with the sole exception of the one in connectedCallback which will bootstrap the draw loop. We'll make a new method called renderLoop that will call render in a requestAnimationFrame loop.
async connectedCallback() {
    this.createShadowDom();
    this.cacheDom();
    this.attachEvents();
    await this.bootGpu();
    this.createCameras();
    this.createMeshes();
    this.createLights();
    await this.loadTextures();
    this.renderLoop();
}
renderLoop(){
    requestAnimationFrame(() => {
        this.render();
        this.renderLoop();
    });
}
Why split the method? Why not just insert the animation frame into render? The main reason is flexibility. render is still only responsible for 1 frame. We're also likely to add new timing dependent information like the current time for animation and it makes sense to have this as an input to render.
Normals
Normals are vectors that point away from the the surface.

Since we are just using color gradients between vertices we didn't really need to think about these but they are extremely useful for figuring out things like lighting. But while lighting might need the normal at every pixel for a mesh we just get the normal at the vertices and interpolate between them. So for the figure above we only store the normal vectors at the red vertices and when calculating across the surface the pixel shader will give us values in between them, no different than how we interpolate between colors currently.
The values are just a 3-value unit vector pointing in the direction you want it to go.
We'll add this information just like colors and UVs. Let's start with a quad:
//data.js
export const quad = {
    positions: [
        -0.5, -0.5, 0,
        0.5, -0.5, 0,
        0.5, 0.5, 0,
        -0.5, 0.5, 0
    ],
    colors: [
        1, 0, 0,
        1, 0, 0,
        1, 0, 0,
        1, 0, 0
    ],
    uvs: [
        0, 1,
        1, 1,
        1, 0,
        0, 0
    ],
    normals: [
        0, 0, -1,
        0, 0, -1,
        0, 0, -1,
        0, 0, -1
    ],
    triangles: [
        0, 1, 2,
        0, 2, 3
    ],
    textureName: "grass"
}
And we'll hook it up so the data goes to the shader:
bindNormals(normals) {
    const normalsBuffer = this.context.createBuffer();
    this.context.bindBuffer(this.context.ARRAY_BUFFER, normalsBuffer);
    this.context.bufferData(this.context.ARRAY_BUFFER, normals, this.context.STATIC_DRAW);
    const vertexNormalLocation = this.context.getAttribLocation(this.program, "aVertexNormal");
    this.context.enableVertexAttribArray(vertexNormalLocation);
    this.context.vertexAttribPointer(vertexNormalLocation, 3, this.context.FLOAT, false, 0, 0);
}
Add a light
We'll start small and then build up as there are different types of lights. We want to start with a "directional light". This is a type of light that can be thought of as an infinitely far away source of light going a single direction, like the Sun. We aren't going to think about it spreading out or anything fancy like that, it's just a pure field of parallel light vectors and therefore we don't even need a position for the light, it's just a direction. We'll also be starting with "diffuse" lighting which is light that is scattered into the environment evenly. Keep in the back of your head that how light it scattered is a property of the object not the light.
Since we're starting to get a little messy in the lib folder, I'm going to start using a new folder called "Actor" which represents things that make up a scene like a Mesh, Camera and now a Light.
A light won't be much right now:
export class Light {
    #type;
    #position;
    #direction;
    #color;

    constructor(light){
        this.#type = light.type ?? "directional";
        this.#position = light.position ?? [0,0,0];
        this.#direction = light.direction;
        this.#color = light.color ?? [1,1,1,1];
    }

    getInfoMatrix(){
        return new Float32Array([
            ...this.#position, 1,
            ...invertVector(this.#direction), 1,
            ...this.#color,
            0, 0, 0, this.#type === "directional" ? 0 : 1
        ])
    }
}
I've decided to use a mat4 to send it to the shader since it allows me to cram everything into it. The first row will be the position, the second the direction, the third the color and the final row is some meta data. We won't have many lights in a scene, at least with the algorithms I'm going with as it'll be quite expensive so we can just use global uniforms as fixed-name variables.
One thing worth pointing out is that the #direction is inverted. This is because we'll be using dot-products between the normal and the light direction but for that to work correctly they need to be in the same direction, so what we're really looking at is the light bouncing off the surface into the camera.
The inverse is simple, just flip the sign of each component:
//vector.js
export function invertVector(vec){
    return vec.map(x => -x);
}
We'll send this to the shader as part of our global uniforms.
setupGlobalUniforms(){
    const projectionMatrix = this.cameras.default.getProjectionMatrix();
    const projectionLocation = this.context.getUniformLocation(this.program, "uProjectionMatrix");
    this.context.uniformMatrix4fv(projectionLocation, false, projectionMatrix);
    const viewMatrix = this.cameras.default.getViewMatrix();
    const viewLocation = this.context.getUniformLocation(this.program, "uViewMatrix");
    this.context.uniformMatrix4fv(viewLocation, false, viewMatrix);
    const light1Matrix = this.lights[0].getInfoMatrix();
    const light1Location = this.context.getUniformLocation(this.program, "uLight1");
    this.context.uniformMatrix4fv(light1Location, false, light1Matrix);
}
We can now access the normal data in our vertex shader:
uniform mat4 uProjectionMatrix;
uniform mat4 uModelMatrix;
uniform mat4 uViewMatrix;

attribute vec3 aVertexPosition;
attribute vec3 aVertexColor;
attribute vec2 aVertexUV;
attribute vec3 aVertexNormal;
varying mediump vec4 vColor;
varying mediump vec2 vUV;
varying mediump vec3 vNormal;
void main(){
    gl_Position = uProjectionMatrix * uViewMatrix * uModelMatrix * vec4(aVertexPosition, 1.
0);
    vColor = vec4(aVertexColor, 1.0);
    vUV = aVertexUV;
    vNormal = vec3(uModelMatrix * vec4(aVertexNormal, 1.0));
}
and pass it down to our pixel shader. Keep in mind we need to rotate it by the model matrix to account for things like rotation which were added to the model. Then we pass down to the fragment shader which also contains the light info:
varying lowp vec4 vColor;
varying lowp vec2 vUV;
varying lowp vec3 vNormal;
uniform lowp mat4 uLight1;
uniform sampler2D uSampler;
void main() {
    //gl_FragColor = texture2D(uSampler, vUV);
    gl_FragColor = vColor;
}
Now we can place a light:
createLights(){
    this.lights = [
        new Light({
            type: "directional",
            direction: [0,0,1],
            color: [1,1,1,1]
        })
    ]
}
And just call that in connectedCallback.
Directional Lights
Directional lights don't vary much based on the lighting type, this is mainly because they are a constant field so things tend to be lit pretty evenly.
First let's do some debugging and make sure that we're getting proper values:
//fragment shader
//definitions....
void main() {
    gl_FragColor = uLight1[1];
}
We should get a blue mesh. This is because we placed it with a positive Z direction so when read as a color the blue channel will be 1 and the rest (aside from alpha which is 1) will be 0.

Cool.
Now we can do the actual light calculation:
void main() {
    mediump float light = dot(vNormal, uLight1[1].xyz);
    gl_FragColor = vec4(light, light, light, 1);
}
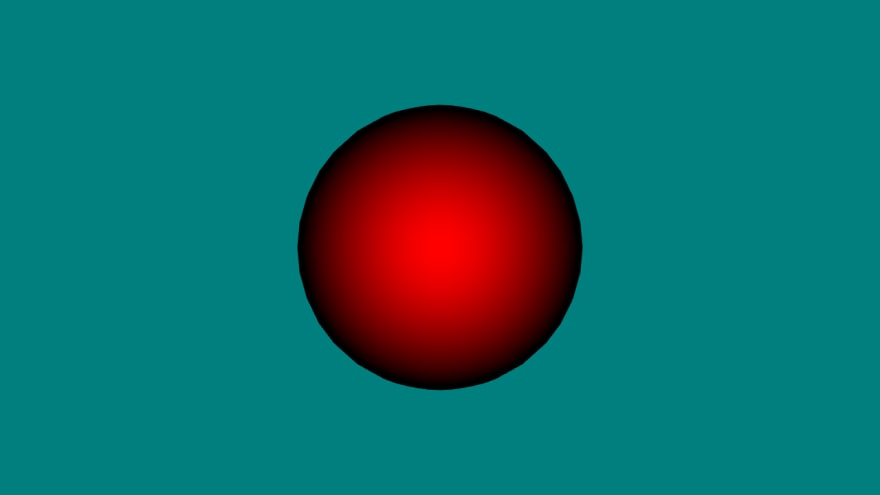
We take the dot product of the normal and the light which will produce a scalar between 0 and 1 that represents the diffuse light intensity. Since the first face is facing in the negative Z it will get fullblast (and since we're only using intensity it'll be monochrome):

Since that looks good we'll tweak it to take into account the color:
//fragment shader
void main() {
    mediump float light = dot(vNormal, uLight1[1].xyz);
    gl_FragColor = vColor * vec4(light, light, light, 1);
}

A normal sphere will get a nice radial gradient with the center the direction of the light source:

Point Lights
Point lights are only one more operation thankfully. Instead of a direction, we represent them with a position and the rays move out in a spherical pattern.
So all we do is change our light from spot to point and give it a position. But we do need to add some stuff to the vertex shader:
uniform mat4 uProjectionMatrix;
uniform mat4 uModelMatrix;
uniform mat4 uViewMatrix;

attribute vec3 aVertexPosition;
attribute vec3 aVertexColor;
attribute vec2 aVertexUV;
attribute vec3 aVertexNormal;
varying mediump vec4 vColor;
varying mediump vec2 vUV;
varying mediump vec3 vNormal;
varying mediump vec3 vPosition;
void main(){
    gl_Position = uProjectionMatrix * uViewMatrix * uModelMatrix * vec4(aVertexPosition, 1.0);
    vUV = aVertexUV;
    vColor = vec4(aVertexColor, 1.0);
    vNormal = vec3(uModelMatrix * vec4(aVertexNormal, 1.0));
    vPosition = vec3(uModelMatrix * vec4(aVertexPosition, 1.0));
}
We're now creating a varying position vPosition. This happens after the model has been moved around but before the camera transforms happen and it represents the world space coordinates of the pixel. We can use this in the fragment shader:
varying mediump vec4 vColor;
varying mediump vec2 vUV;
varying mediump vec3 vNormal;
varying mediump vec3 vPosition;
uniform lowp mat4 uLight1;
uniform sampler2D uSampler;
void main() {
    bool isPoint = uLight1[3][3] == 1.0;
    if(isPoint){
        //point light + color
        mediump vec3 toLight = normalize(uLight1[0].xyz - vPosition);
        mediump float light = dot(normalize(vNormal), toLight);
        gl_FragColor = vColor * vec4(light, light, light, 1);
    } else {
        //directional light + color
        mediump float light = dot(normalize(vNormal), uLight1[1].xyz);
        gl_FragColor = vColor * vec4(light, light, light, 1);
}
We check the type and if it's a point light we get the vector going to the light using our new vPosition vector and then we do the same calculation. It's important here that we normalize things here too. I forgot to do that last time but the interpolated values are not normalized because WebGL has no clue how they are used so we need to remember to do that. Failure to do so will cause things to be brighter or dimmer than you expect.
Point light at z = -1.5:
Point light at z = -1.5 if we forgot to normalize:

Point light at z = -2.0:

We can see that the light spot is smaller as it goes closer which is what we expect.
Colored light
This is also pretty easy to add. It's simply multiplying the color of the light by the color of the object. Say we have a white object [1,1,1] and we cast green light [0,1,0], we want it to be green. But if we have a red object [1,0,0] and cast green light then it should be black because the object doesn't reflect back green. Using a white light should retain all colors of the object.
void main() {
    bool isPoint = uLight1[3][3] == 1.0;
    if(isPoint){
        //point light + color
        mediump vec3 toLight = normalize(uLight1[0].xyz - vPosition);
        mediump float light = dot(normalize(vNormal), toLight);
        gl_FragColor = vColor * uLight1[2] * vec4(light, light, light, 1);
    } else {
        //directional light + color
        mediump float light = dot(normalize(vNormal), uLight1[1].xyz);
        gl_FragColor = vColor * uLight1[2] * vec4(light, light, light, 1);
    }
}
`
We store color of the light in the 3rd (index 2) component of the light and just multiply it.
Say we have lavender sphere [1,0.5,1]:
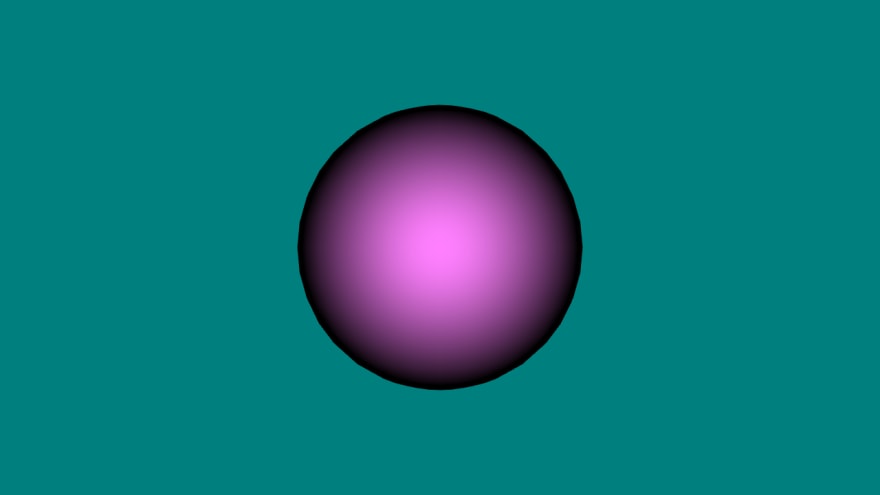
And we cast yellow [1,1,0] light on it:

A lot covered here and I had to edit out a lot too! Next time I want to continue with looking at different lighting models. You can find the code for this check point here: https://github.com/ndesmic/geogl/tree/v4

Oldest comments (0)