
Imagine collecting requests on a Google sheet and wanting a way to process those requests by moving them to another sheet. At the same time, you’d like to email the users letting them know their requests were approved. Let’s learn how to set up an approval process with email notifications using Google Sheets!
Spreadsheet Setup
Submitted Sheet
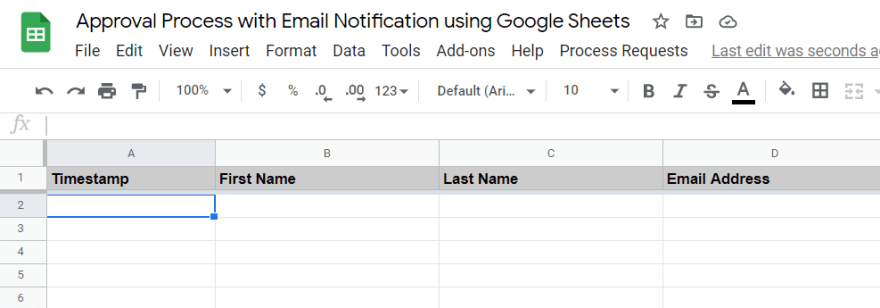
- Create a sheet called Submitted.
- Create four columns:
- Timestamp
- First Name
- Last Name
- Email Address
Approved Sheet

- Select the Submitted sheet’s menu and choose Duplicate.
- Rename the sheet to Approved.
Email Settings Sheet

- Create a sheet called Email Settings.
- In cell A1, let’s create a label called Subject.
- In cell B1, enter the text for the subject of the email sent to the user when the request is approved.
- In cell A2, let’s create a label called Body.
- In cell B2, enter the text for the body of the email sent to the user when the request is approved.
Script Editor

Let’s start writing some code! Google Sheets has a handy script editor available.
- Navigate to Tools > Script Editor.
- The script editor will include a starting function. You can remove all the code.
- Navigate to File > Save. Give the script project a name and select Ok.
Approval Process
Create a function called approve. This function will be used to move rows from the Submitted sheet to the Approved sheet as well as sending the emails.
function approve() {

}
Let’s continue to add code to the function. We’re going to set up some variables we’ll need for the process.
Variables
Create a variable called spreadsheet. This gets the active spreadsheet and returns a Spreadsheet object, which will provide additional functions we’ll need.
var spreadsheet = SpreadsheetApp.getActiveSpreadsheet();
Create a variable called activeSheet. This gets the active sheet and returns a Sheet object, which will provide additional functions we’ll need.
var activeSheet = spreadsheet.getActiveSheet();
Create a variable called activeSheetName. This gets the active sheet’s name. We’ll use this to make sure you’re on the Submitted sheet when running the approve process.
var activeSheetName = activeSheet.getName();
Create a variable called approvedSheet. This gets the Approved sheet so we can move data to it.
var approvedSheet = spreadsheet.getSheetByName('Approved');
Create a variable called approvedSheetLastRow. This gets the last row number that contains data in the Approved sheet. When we move in data, we don’t want to overwrite anything that’s already there. This helps us know where to start.
var approvedSheetLastRow = approvedSheet.getLastRow();
Create a variable called emailSettingsSheet. This gets the Email Settings sheet so we can get some information from it.
var emailSettingsSheet = spreadsheet.getSheetByName('Email Settings');
Create a variable called emailSubject. This gets the text used for the subject of the email sent to the user when the request is approved.
var emailSubject = emailSettingsSheet.getRange('B1').getValue();
Create a variable called emailBody. This gets the text used for the body of the email sent to the user when the request is approved.
var emailBody = emailSettingsSheet.getRange('B2').getValue();
Create a variable called dataRange. This gets the range of data present in the active sheet.
var dataRange = activeSheet.getDataRange();
Create a variable called data. This gets the actual data from the range in the active sheet.
var data = dataRange.getValues();
Create a variable called selectedRange. We’ll use this to check if the user selected the whole row(s), which will be required prior to approving the request(s).
var selectedRange = activeSheet.getActiveRange();
Create a variable called selectedData. This will be the data we’re approving and moving from the Submitted sheet to the Approved sheet.
var selectedData = selectedRange.getValues();
Create a variable called startRow. This will tell us where to start removing data from the Submitted sheet after it was moved to the Approved sheet.
var startRow = selectedRange.getRowIndex();
Create a variable called numRows. This will tell us how many rows to move to the Approved sheet and remove from the Submitted sheet.
var numRows = selectedRange.getNumRows();
Create a variable called numCols. We’ll use this to check if the user selected the whole row(s).
var numCols = selectedRange.getNumColumns();
Logic
The user can only approve requests on the Submitted sheet. So let’s check to make sure they are on that sheet. If they aren’t, we’ll display a helpful message letting them know.
if (activeSheetName !== 'Submitted') {

  // If you're not on the Submitted sheet when trying to approve requests, show message.
  spreadsheet.toast('You can only approve requests on the Submitted sheet.', 'Process Requests');

}
Let’s force the user to select the whole row(s) in order to approve them. If the number of columns selected is less than the last column number having data, we know they didn’t select the whole row. We’ll display a helpful message letting them know.
if (numCols < dataRange.getLastColumn()) {

  // If the user didn't select the whole row(s), show message.
  spreadsheet.toast('Please select the whole row(s).', 'Process Requests');

}
You can’t approve something that doesn’t exist right?! If the user tries to approve requests when there’s no rows of data, let’s display a helpful message letting them know.
if (data.length === 0) {

  // If there is no data in the sheet, show message.
  spreadsheet.toast('There are no requests to process.', 'Process Requests');

}
Ok we’re ready to copy the selected row(s) to the Approved sheet. We need to specify where to write the rows. So we get the range by starting on the row after the last row of data currently there. We start at column 1. We take up however many rows of data we’re moving. We also take up however many columns of data we’re moving. We set the values of the range to the selected rows of data.
// Copy rows to Approved sheet.
approvedSheet.getRange(approvedSheetLastRow + 1, 1, numRows, dataRange.getLastColumn()).setValues(selectedData);
Now that the selected row(s) have moved to the Approved sheet, let’s remove them from the Submitted sheet. We know where the first selected row is. We also know how many rows. Pass that into the function to delete the rows from the Submitted sheet.
// Remove rows from Submitted sheet.
activeSheet.deleteRows(startRow, numRows);
Send Email
Time to send out those email notifications. Keep in mind there is a limit on how many emails can be sent per day.
Loop through each of the selected rows and if there’s an email address and you still have quota for the day, send the email with the subject and body coming from the Email Settings sheet.
for (var i = 0; i < selectedData.length; i++) {
var row = selectedData[i];
var emailAddress = row[3];
// If there's an email defined and you haven't surpassed your daily quota, send the email.
if (emailAddress && MailApp.getRemainingDailyQuota() > 0) {
MailApp.sendEmail(emailAddress, emailSubject, emailBody);
}
}
All that’s left to do is let the user know the process is complete!
// When approval process is complete, show message.
spreadsheet.toast('The request(s) have been approved.', 'Process Requests');
Custom Menu
Instead of running the approve function from the script editor, let’s create a custom menu so we can run it from the spreadsheet’s menu toolbar instead!
The best time to create a custom menu is when the spreadsheet first opens. Use the onOpen trigger, which is executed when the spreadsheet is first opened.
Add a custom menu to the spreadsheet called Process Requests. Selecting the Process Requests menu will display a menu option called Approve. Selecting Approve will run the function called approve!
// Create custom menu when spreadsheet opens.
function onOpen() {
  var options = [
    {
      name: 'Approve',
      functionName: 'approve'
    }
  ];

  SpreadsheetApp.getActiveSpreadsheet().addMenu('Process Requests', options);
}
Final Code
// Create custom menu when spreadsheet opens.
function onOpen() {
var options = [
{
name: 'Approve',
functionName: 'approve'
}
];
SpreadsheetApp.getActiveSpreadsheet().addMenu('Process Requests', options);
}
// Move rows from Submitted to Approved and send email.
function approve() {
var spreadsheet = SpreadsheetApp.getActiveSpreadsheet();
var activeSheet = spreadsheet.getActiveSheet();
var activeSheetName = activeSheet.getName();
var approvedSheet = spreadsheet.getSheetByName('Approved');
var approvedSheetLastRow = approvedSheet.getLastRow();
var emailSettingsSheet = spreadsheet.getSheetByName('Email Settings');
var emailSubject = emailSettingsSheet.getRange('B1').getValue();
var emailBody = emailSettingsSheet.getRange('B2').getValue();
var dataRange = activeSheet.getDataRange();
var data = dataRange.getValues();
var selectedRange = activeSheet.getActiveRange();
var selectedData = selectedRange.getValues();
var startRow = selectedRange.getRowIndex();
var numRows = selectedRange.getNumRows();
var numCols = selectedRange.getNumColumns();
if (activeSheetName !== 'Submitted') {
// If you're not on the Submitted sheet when trying to approve requests, show message.
spreadsheet.toast('You can only approve requests on the Submitted sheet.', 'Process Requests');
} else {
if (numCols < dataRange.getLastColumn()) {
// If the user didn't select the whole row(s), show message.
spreadsheet.toast('Please select the whole row(s).', 'Process Requests');
} else {
if (data.length === 0) {
// If there is no data in the sheet, show message.
spreadsheet.toast('There are no requests to process.', 'Process Requests');
} else {
// Copy rows to Approved sheet.
approvedSheet.getRange(approvedSheetLastRow + 1, 1, numRows, dataRange.getLastColumn()).setValues(selectedData);
// Remove rows from Submitted sheet.
activeSheet.deleteRows(startRow, numRows);
for (var i = 0; i < selectedData.length; i++) {
var row = selectedData[i];
var emailAddress = row[3];
// If there's an email defined and you haven't surpassed your daily quota, send the email.
if (emailAddress && MailApp.getRemainingDailyQuota() > 0) {
MailApp.sendEmail(emailAddress, emailSubject, emailBody);
}
}
// When approval process is complete, show message.
spreadsheet.toast('The request(s) have been approved.', 'Process Requests');
}
}
}
}

Top comments (0)