Table of Contents:
- TL;DR
- Introduction to Outbox Pattern
- Implementation of the Outbox Pattern
-
Adding
Aspire - Demo
- Conclusion
- References
TL;DR
This post provides an example of the Outbox pattern implementation using Aspire , DotNetCore.CAP , Azure Service Bus , Azure SQL , Bicep , and azd.
Source code: https://github.com/NikiforovAll/cap-aspire
Introduction to Outbox Pattern
The Outbox pattern is a crucial component in the world of distributed systems. As we move towards a more distributed and decoupled architecture in modern software development, ensuring reliable message delivery becomes increasingly important.
In a distributed system, different components need to communicate with each other, often through asynchronous messaging. The Outbox pattern provides a reliable way to handle these messages. It ensures that even if a system fails after performing a local transaction but before sending out the message, the message is not lost. Instead, it is temporarily stored in an “outbox” and can be retrieved and sent when the system recovers.
By using the Outbox pattern , we can ensure that all components of the system receive the necessary messages in a reliable manner, thereby maintaining the integrity and consistency of the entire system.
In a distributed system without the Outbox pattern , there are several things that could go wrong, leading to data inconsistency or message loss. Here are a few examples:
- Transaction Commit and Message Send are not Atomic : In a typical scenario, a service might first commit a transaction to its database and then send a message to a message broker. If the service crashes after the transaction commit but before the message is sent, the message will be lost. Other services will not be aware of the changes that were committed to the database.
- Message Send Failure : Even if the service doesn’t crash, sending the message could fail due to a network issue or a problem with the message broker. If the message send operation is not retried, the message will be lost.
- Duplicate Messages : If the service retries the message send operation after a failure, it could end up sending the same message multiple times if the first send actually succeeded but the acknowledgement was lost. This could lead to duplicate processing if the message consumers are not idempotent.
- Ordering Issues: If multiple messages are sent as a result of a single transaction, and the sends are not atomic, then the messages could be received out of order. This could lead to incorrect processing if the order of the messages is important.
The Outbox pattern addresses these issues by ensuring that the transaction commit and the message send operations are atomic, and by providing a mechanism for reliably sending messages even in the face of failures.
Idempotent consumers play a significant role in the Outbox pattern. In the context of distributed systems, idempotency refers to the ability of a system to produce the same outcome, regardless of how many times a particular operation is performed. This is crucial in ensuring data consistency and reliability in a distributed environment.
However, this could potentially lead to the same message being delivered more than once, especially in scenarios where the system fails after sending the message but before it could mark the message as sent in the outbox. This is where idempotent consumers come into play.
Idempotent consumers are designed to handle duplicate messages gracefully. They ensure that the side effects of receiving the same message more than once are eliminated. This is typically achieved by keeping track of the IDs of all processed messages. When a message is received, the consumer checks if it has already processed a message with the same ID. If it has, it simply ignores the message.
Implementation of the Outbox Pattern
Now that you understand the importance and benefits of the Outbox pattern, let’s delve into what it takes to implement:
The implementation of the Outbox pattern involves the following steps:
- Create an Outbox Table : The first step is to create an Outbox table in your database. This table will store all the messages that need to be sent. Each message should have a unique ID and a status field that indicates whether the message has been sent or not.
- Modify the Application Code : The next step is to modify your application code. Whenever your application needs to send a message as part of a transaction, it should add the message to the Outbox table as part of the same transaction.
- Implement an Outbox Publisher : The Outbox publisher is a separate component that polls the Outbox table for unsent messages. When it finds an unsent message, it sends the message and updates the status of the message in the Outbox table to ‘sent’.
Introduction to DotNetCore.CAP
Luckily, there is a .NET library called DotNetCore.CAP that simplifies the implementation of the Outbox pattern for us.
DotNetCore.CAP is an open-source library that provides a set of APIs that allow developers to easily send messages as part of a database transaction, store them in an outbox, and ensure they are reliably delivered to all interested consumers, even in the face of failures.
The library also supports idempotent consumers, which are crucial for ensuring data consistency and reliability in a distributed environment. This means that even if the same message is delivered more than once, the side effects of receiving the same message are eliminated.
By using DotNetCore.CAP, developers can focus on the business logic of their applications, while the library takes care of the complexities of ensuring reliable message delivery in a distributed system.
Example
This code demonstrates how to use the CAP library in an ASP.NET Core application for event publishing and handling.
In the producer:
- A route handler for the “/send” endpoint is defined.
- It starts a transaction, executes a SQL command to get the current server time, and publishes a message with this time to the “test.show.time” topic.
- The message is published with a delay of 500 milliseconds.
- If all operations are successful, the transaction is committed and a response is returned.
// Producer/Program.cs
app.MapGet("/send", async (
    SqlConnection connection,
    ICapPublisher capPublisher,
    TimeProvider timeProvider) =>
{
    var startTime = timeProvider.GetTimestamp();
    using var transaction = connection
        .BeginTransaction(capPublisher, autoCommit: false);

    var command = connection.CreateCommand();
    command.Transaction = (SqlTransaction)transaction;
    command.CommandText = "SELECT GETDATE()";
    var serverTime = await command.ExecuteScalarAsync();

    await capPublisher.PublishDelayAsync(
        TimeSpan.FromMilliseconds(500),
        "test.show.time",
        new MyMessage(serverTime?.ToString()!));

    transaction.Commit();

    return TypedResults.Ok(new
    {
        Status = "Published",
        Duration = timeProvider.GetElapsedTime(startTime)
    });
});
💡Note, BeginTransaction is an extensions method defined in DotNetCore.CAP.SqlServer. It responsible for Outbox table management.
public static IDbTransaction BeginTransaction(
    this IDbConnection dbConnection,
    ICapPublisher publisher,
    bool autoCommit = false)
In the consumer:
- A class
SampleSubscriberis defined that implementsICapSubscribe. - It has a method
HandleAsyncthat is decorated with theCapSubscribeattribute, specifying it as a handler for the “test.show.time” topic. - When a message is received on this topic, it logs the message content after a delay of 300 milliseconds.
// Consumer/Program.cs
public class SampleSubscriber(
    TimeProvider timeProvider,
    ILogger<SampleSubscriber> logger) : ICapSubscribe
{
    public record MyMessage(string CreatedAt);

    [CapSubscribe("test.show.time")]
    public async Task HandleAsync(MyMessage message)
    {
        await Task.Delay(TimeSpan.FromMilliseconds(300), timeProvider);

        logger.LogInformation("Message received: {CreatedAt}", message.CreatedAt);
    }
}
Adding Aspire
To fully demonstrate the demo, we need to setup some real infrastructure components - Message Broker and Database.
.NET Aspire provides a curated suite of NuGet packages (Components) specifically selected to facilitate the integration of cloud-native applications. Each component furnishes essential cloud-native functionalities through either automatic provisioning or standardized configuration patterns.
Add Message Broker:
The .NET Aspire Service Bus component handles the following concerns to connect your app to Azure Service Bus. It adds ServiceBusClient to the DI container for connecting to Azure Service Bus.
dotnet add package Aspire.Azure.Messaging.ServiceBus --prerelease
Add Database:
.NET Aspire provides two built-in configuration options to streamline SQL Server deployment on Azure:
- Provision a containerized SQL Server database using Azure Container Apps
- Provision an Azure SQL Database instance (We will go with this one)
dotnet add package Aspire.Microsoft.Data.SqlClient --prerelease
Here is how we can setup Aspire Host based on installed components:
// CapExample.AppHost/Program.cs
var builder = DistributedApplication.CreateBuilder(args);

var sqlServer = builder.ExecutionContext.IsPublishMode
    ? builder.AddSqlServer("sqlserver").PublishAsAzureSqlDatabase().AddDatabase("sqldb")
    : builder.AddConnectionString("sqldb");

var serviceBus = builder.ExecutionContext.IsPublishMode
    ? builder.AddAzureServiceBus("serviceBus")
    : builder.AddConnectionString("serviceBus");

builder.AddProject<Projects.Consumer>("consumer")
    .WithReference(sqlServer)
    .WithReference(serviceBus);

builder.AddProject<Projects.Producer>("producer")
    .WithReference(sqlServer)
    .WithReference(serviceBus);

builder.Build().Run();
The idea is to use connection strings during development time and provision Azure resources on publish time.
Aspire allows us to develop locally and deploy to the cloud without source code changes by providing a flexible configuration system. We can use connection strings managed by Aspire Components, which can be easily switched between local development and cloud deployment environments. This allows us to seamlessly transition between different deployment scenarios without modifying our source code.
Down below you can find how to configure DotNetCore.CAP based on Aspire Components:
// Consumer/Program.cs
// Producer/Program.cs
var builder = WebApplication.CreateBuilder(args);

builder.AddServiceDefaults();
builder.AddAzureServiceBus("serviceBus");
builder.AddSqlServerClient("sqldb");

builder.Services.AddCap(x =>
{
    var dbConnectionString = builder.Configuration.GetConnectionString("sqldb")!;
    var serviceBusConnection = builder.Configuration.GetConnectionString("serviceBus")!;

    x.UseAzureServiceBus(serviceBusConnection);
    x.UseSqlServer(x => x.ConnectionString = dbConnectionString);
});
Provision Infrastructure
The Azure Developer CLI (azd) has been enhanced to support the deployment of .NET Aspire applications. The azd init workflow offers tailored support for .NET Aspire projects. I utilized this approach while developing this application and it proved to be quite nice. It improved by productivity.
When azd targets a .NET Aspire application it starts the AppHost with a special command (dotnet run --project AppHost.csproj -- --publisher manifest), which produces the Aspire manifest file.
The manifest file is interrogated by the azd provision sub-command logic to generate Bicep files in-memory only (by default).

See https://learn.microsoft.com/en-us/dotnet/aspire/deployment/azure/aca-deployment-azd-in-depth?tabs=linux#how-azure-developer-cli-integration-works for more instructions.
Personally, I find it more convenient to generate Bicep files explicitly. This can be accomplished by executing the following command:
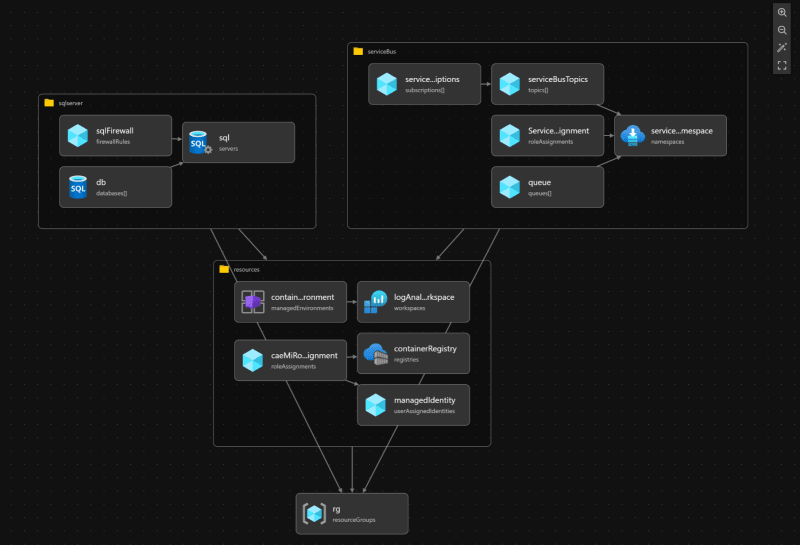
❯ azd infra synth
Here is visualization of what would be provisioned:
To provision resources we need to run next command:
❯ azd provision
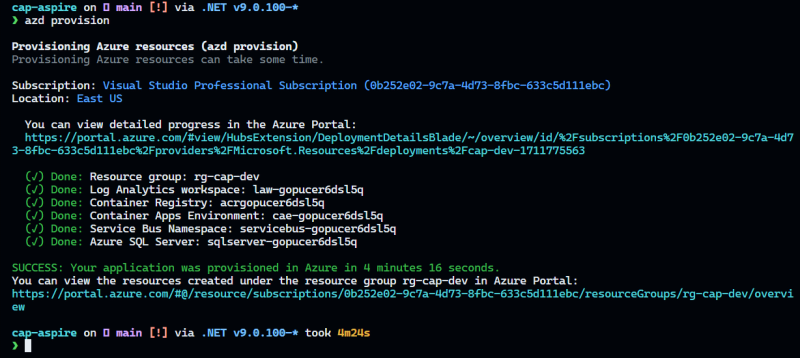
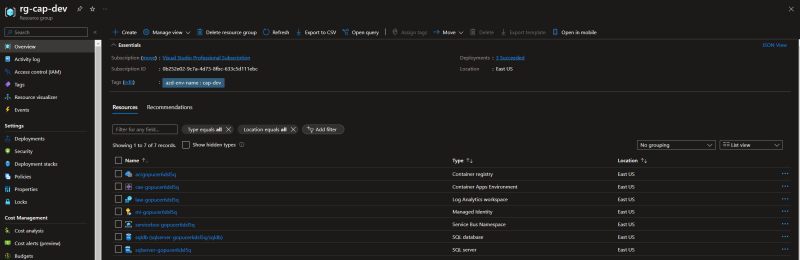
Here is created resource group - rg-cap-dev:
Configure for Local Development
To retrieve connection string for Azure Service Bus:
#!/bin/bash
resourceGroup="rg-cap-dev"
namespace=$(
    az servicebus namespace list \
        --resource-group $resourceGroup \
        --output tsv \
        --query '[0].name'
)
azbConnectionString=$(
    az servicebus namespace authorization-rule keys list \
        --namespace-name "$namespace" \
        --name RootManageSharedAccessKey \
        --resource-group $resourceGroup \
        --output tsv \
        --query 'primaryConnectionString'
)

dotnet user-secrets --project ./src/CapExample.AppHost \
    set ConnectionStrings:serviceBus $azbConnectionString
To retrieve connection string for Azure SQL Database:
#!/bin/bash

# read server address
if [-f .azure/cap-dev/.env]
then
    export $(cat .azure/cap-dev/.env | sed 's/#.*//g' | xargs)
fi

# read server password
db_password=$(jq -r '.inputs.sql.password' .azure/cap-dev/config.json)

dotnet user-secrets --project ./src/CapExample.AppHost set ConnectionStrings:sqldb \
    "Server=$SQLSERVER_SQLSERVERFQDN;Initial Catalog=sqldb;Persist Security Info=False;User ID=CloudSA;Password=$db_password;MultipleActiveResultSets=False;Encrypt=True;TrustServerCertificate=False;Connection Timeout=30;"
To check the secrets were stored successfully:
❯ dotnet user-secrets --project ./src/CapExample.AppHost list
# ConnectionStrings:sqldb = Server=sqlserver-gopucer6dsl5q.database.windows.net;Initial Catalog=sqldb;Persist Security Info=False;User ID=CloudSA;Password=<your-password>;MultipleActiveResultSets=False;Encrypt=True;TrustServerCertificate=False;Connection Timeout=30;
# ConnectionStrings:serviceBus = Endpoint=sb://servicebus-gopucer6dsl5q.servicebus.windows.net/;SharedAccessKeyName=RootManageSharedAccessKey;SharedAccessKey=<your-key>
Demo
As you might know, Aspire adds OpenTelemetry support out-of-the-box and you can configure it in ServiceDefaults/Extensions.cs.
DotNetCore.CAP has a package that adds additional OpenTelemetry capabilities.
Distributed spans in OpenTelemetry help you track operations over a message broker by providing a way to trace the flow of messages across different components of your system.
When using a message broker like DotNetCore.CAP, messages are typically sent from a producer to a consumer through an intermediary broker. Each step in this process can be considered a span, which represents a unit of work or an operation.
By instrumenting your code with OpenTelemetry, you can create spans that capture information about each step of the message flow. These spans can include details such as the time taken, any errors encountered, and additional contextual information.
With distributed spans, you can visualize the entire journey of a message as it moves through your system, from the producer to the broker and finally to the consumer. This allows you to gain insights into the performance and behavior of your message processing pipeline.
By analyzing the distributed spans, you can identify bottlenecks, latency issues, and potential errors in your message processing flow. This information is invaluable for troubleshooting and optimizing the performance of your distributed systems.
Here is what you need to do to install and configure OpenTelemetry for DotNetCore.CAP:
Install NuGet package:
❯ dotnet add ./src/CapExample.ServiceDefaults/ package DotNetCore.Cap.OpenTelemetry
Adjust ServiceDefaults:
builder.Services.AddOpenTelemetry()
    .WithMetrics(metrics =>
    {
        metrics
            .AddAspNetCoreInstrumentation()
            .AddHttpClientInstrumentation()
            .AddProcessInstrumentation()
            .AddRuntimeInstrumentation();
    })
    .WithTracing(tracing =>
    {
        if (builder.Environment.IsDevelopment())
        {
            tracing.SetSampler(new AlwaysOnSampler());
        }

        tracing
            .AddAspNetCoreInstrumentation()
            .AddGrpcClientInstrumentation()
            .AddHttpClientInstrumentation()
            .AddCapInstrumentation(); // <-- add this code
    });
Locally
Now, let’s run the demo:
❯ dotnet run --project ./src/CapExample.AppHost
# Building...
# Restore complete (0.6s)
# CapExample.ServiceDefaults succeeded (0.2s) → src\CapExample.ServiceDefaults\bin\Debug\net9.0\CapExample.ServiceDefaults.dll
# Consumer succeeded (0.3s) → src\Consumer\bin\Debug\net9.0\Consumer.dll
# Producer succeeded (0.5s) → src\Producer\bin\Debug\net9.0\Producer.dll
# CapExample.AppHost succeeded (0.2s) → src\CapExample.AppHost\bin\Debug\net9.0\CapExample.AppHost.dll

# Build succeeded in 2.6s
# info: Aspire.Hosting.DistributedApplication[0]
# Aspire version: 9.0.0-preview.2.24162.2+eaca163f7737934020f1102a9d11fdf790cccdc0
# info: Aspire.Hosting.DistributedApplication[0]
# Distributed application starting.
# info: Aspire.Hosting.DistributedApplication[0]
# Application host directory is: C:\Users\Oleksii_Nikiforov\dev\cap-aspire\src\CapExample.AppHost
# info: Aspire.Hosting.DistributedApplication[0]
# Now listening on: http://localhost:15118
# info: Aspire.Hosting.DistributedApplication[0]
# Distributed application started. Press Ctrl+C to shut down.
Let’s generate some load:
❯ curl -s http://localhost:5288/send | jq
# {
# "status": "Published",
# "duration": "00:00:00.5255861"
# }
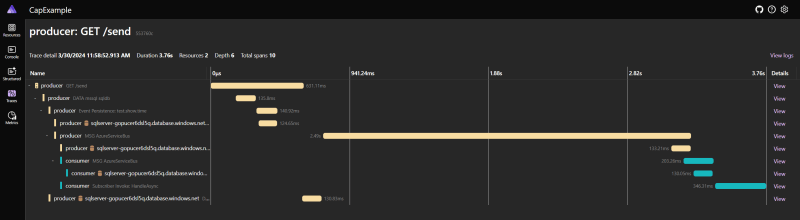
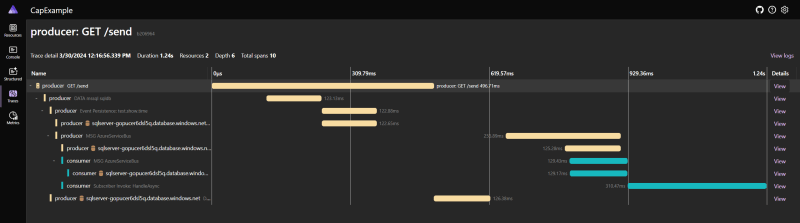
Navigate to Aspire Dashboard to see some traces:
Here is the first request, as you can see, we need some time to establish initial connection with Azure Service Bus:
Subsequent requests take less time:
💡I recommend you to delve into the source code and trace examples to enhance your understanding of how the Outbox Pattern works.
Azure
Let’s deploy to Azure Container Apps by running azd deploy
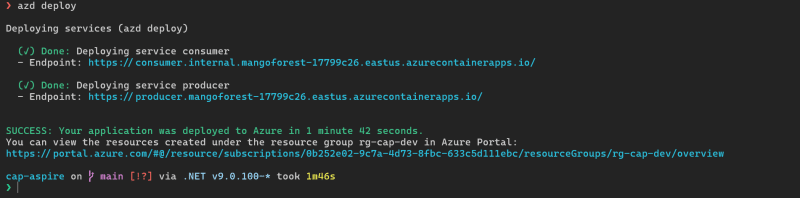
During the initial configuration (azd init) I specified that I want a public address for the Producer. We can utilize it for dev testing:
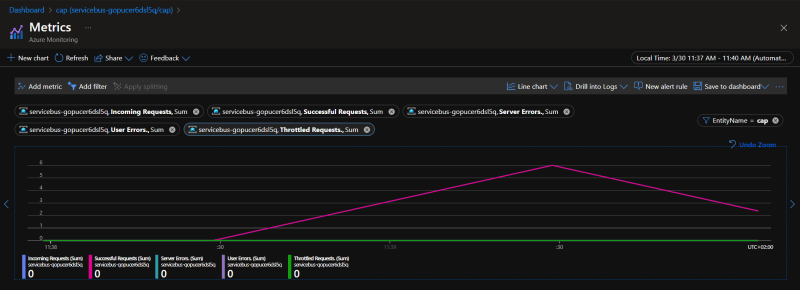
Let’s generate some load and see the metrics for Azure Service Bus.
❯ curl -s https://producer.mangoforest-17799c26.eastus.azurecontainerapps.io/send | jq
# {
# "status": "Published",
# "duration": "00:00:00.0128251"
# }
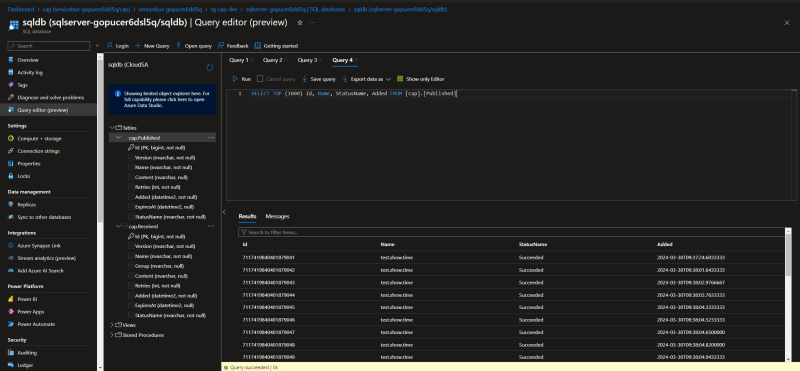
Outbox Tables
Under the hood DotNetCore.CAP create two tables to manage an outbox.
In the Outbox Pattern , the Published and Received tables are used to manage the messages that need to be published or have been received by a messaging system. Let’s take a closer look at the purpose of each table:
Published Table : The Published table is responsible for storing the messages that need to be published to an external messaging system. When an application generates a message that needs to be sent out, it is stored in the Published table. This table acts as a buffer or a queue, ensuring that the messages are not lost if the messaging system is temporarily unavailable or if there are any failures during the publishing process. By using the Published table, the application can continue to generate messages without being blocked by the availability or performance of the messaging system. The messages in the Published table can be processed asynchronously by a separate component or background process, which takes care of publishing them to the external messaging system. Once a message is successfully published, it can be removed from the Published table.
Received Table : The Received table is used to track the messages that have been received by the application from the external messaging system. When the application receives a message, it stores the necessary information about the message in the Received table. This information can include the message content, metadata, and any other relevant details. The Received table allows the application to keep a record of the messages it has processed, enabling it to handle duplicate messages.
Cleanup
Once you are done with the development you can delete the resource group rg-cap-dev:
❯ azd down
# Deleting all resources and deployed code on Azure (azd down)
# Local application code is not deleted when running 'azd down'.
# Resource group(s) to be deleted:
# • rg-cap-dev: https://portal.azure.com/#@/resource/subscriptions/0b252e02-9c7a-4d73-8fbc-633c5d111ebc/resourceGroups/rg-cap-dev/overview
# ? Total resources to delete: 10, are you sure you want to continue? Yes
# Deleting your resources can take some time.
# (✓) Done: Deleting resource group: rg-cap-dev

# SUCCESS: Your application was removed from Azure in 10 minutes 53 seconds.
Conclusion
In this post, we’ve explored the Outbox Pattern , a crucial component in the world of distributed systems. We’ve seen how it ensures reliable message delivery in a distributed system, maintaining the integrity and consistency of the entire system.
We’ve also looked at how the .NET library DotNetCore.CAP simplifies the implementation of the Outbox Pattern , allowing developers to focus on the business logic of their applications while the library takes care of the complexities of ensuring reliable message delivery.
Finally, we’ve seen how .NET Aspire provides a curated suite of NuGet packages that facilitate the integration of cloud-native applications, providing essential cloud-native functionalities through either automatic provisioning or standardized configuration patterns.
In summary, the combination of the Outbox Pattern , DotNetCore.CAP, and .NET Aspire provides a powerful toolset for building reliable, cloud-native applications in .NET. By understanding and leveraging these tools, developers can build applications that are robust, scalable, and ready for the challenges of the modern, distributed world.

Top comments (0)