Digitally transforming the business. We hear that almost every day. For years now. It's mostly the big guys who want to increase their productivity or generate more market value, by switching manual tasks to automative processes that run in the cloud etc... But how about the little guy, the single person? How can an individual benefit from the Industry 4.0 era we are living in? Ever wanted to create a webshop to make some side money off your artisan part or hobby, but didn't know where to start?
Well, let's try from here.
Table Of Contents
Intro
The goal of this article is to help you to understand all the various aspects of building a fully functional webshop that:
- Runs on the cloud using AWS Lightsail service
- Has a dedicated static IP with a DNS Zone set, that redirects to a domain like example.com
- Has integrated PayPal and Credit Card checkout
- Has a contact section that sends customer questions to your email, and shows a map of your area
- With all the data being protected with an SSL certificate, since we are dealing with sensitive customer information, like credit card data or PayPal authentication.
Sounds fun? Let's dive in.
Now, since I'm not targeting only developers with this article, I will be using different tools and plug-ins that will make our lives easier.
For example, on the frontend part, we could build our own dom, enrich Javascript logic with a popular framework, integrate a layout framework like bootstrap and play additionally with the CSS, but why? Let's just use a predefined WordPress theme that looks awesome and is already built for a shop layout. Plus it's compatible with great plugins.
We could use only the PayPal API, and connect it to our business logic for the payment process, but why when we can install the WooCommerce plugin on our WordPress app, already proven, and secure. With a dedicated part for the contact form and our location on our theme, we'll just need to activate Google APIs for SMTP and maps.
I'll try to keep the dev skills to the minimum, but there are some parts where they are inevitable, like SSL certificate configuration on AWS Lightsail.
-
Before you start you need to have:
- AWS account, for app hosting
- GCP account, for email and map APIs
- Business PayPal account, for money transfer
- Business email, for interacting with your customers
- A bought domain name, for your website (like example.com), most .com domains today come at around $10 per year, but this can vary a lot depending on the domain name and provider
We can divide our job into 3 categories: AWS Configuration, WordPress Configuration, Security Configuration (SSL)
AWS Configuration
-
Lightsail instance (Linux + Wordpress)
- Log in to your AWS account
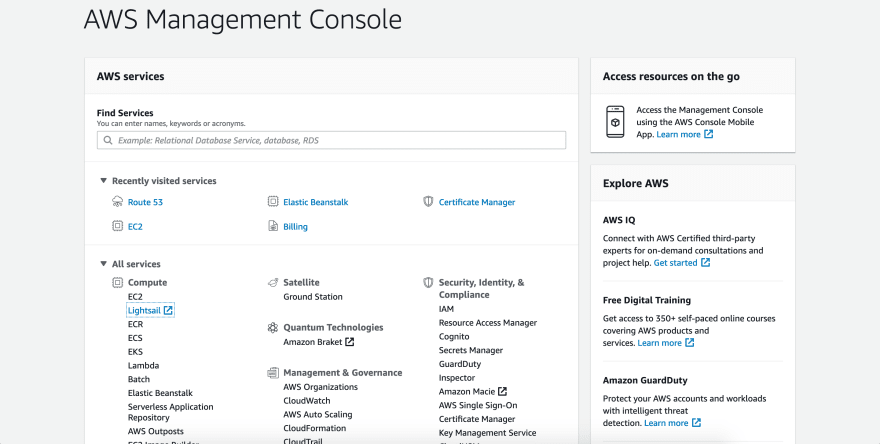
- Select All services -> Compute -> Lightsail

- Under Instances tab select Create Instance
- Here select the operating system like Linux and enrich it with Wordpress, all preconfigured, you don't need to break a sweat, select the machine configuration(keep in mind this is a paid service), give the instance a name, and click "Create Instance"

- Now, wait. Some minutes may pass, in order for AWS to configure your instance
-
Static IP
- Every time you start your instance, AWS will give it a public and a private IP. The public one will be different every time, so you need to make sure you create a static public IP
- Go back to Lightsail Home, and under Networking tab click -> Create a static IP address
- Under "Attach to an instance" select your instance name
- Give your static IP a name and click Create

-
DNS Zone
- Now it is time to connect your static IP to a domain name, like example.com. In order to achieve that, we need a DNS Zone
- Under the same Networking tab click -> Create a DNS Zone
- Type your registered domain name and click Create

- Now you will have a DNS Zone under your Networking tab, click on it
- At the bottom of the page, you will have 4 name server addresses that you need to copy, and paste to your domain provider DNS Zone setting, so all the traffic from your example.com, will go to your static IP
- At the start of the page, you will have an "Add record" button, you will use that 3 times:
- To link your static IP to example.com -> Select A record, put "@" in the input field before example.com and select resolves to -> your static IP name
- To link your static IP to www.example.com -> Select CNAME record, put www in the input field before example.com and select maps to example.com
- To set your SSL certificate ( we will cover this a little bit later)
WordPress Configuration
Of course unless you're building a Busines Intelligence Suite that features Predictive Analysis and Machine Learning, WordPress is useful... Plus it's super easy.
This is the first time I worked with WordPress, and i got everything right in the first try, as it helps you with embedded templates. You don't want to bother yourself with the looks of the website? Here, have one of the many themes. You're doing a shop? Here's a shop template. Need to integrate payments? Here's a payment plugin. To handle shipping? To handle taxes? To add configurable products that can go out of stock? Want to interact with your clients? Here's a contact form plugin. Want to write a blog? They have it. Everything I just described is contained in our app, and is straightforward and easy to setup.
Plugins are basically add-ons that enrich our WordPress app, providing complex behavior that is easy to install.
-
In order to accomplish our business goals we will need:
-
ShopIsle theme (because it is a shop template and built to work with some of the plugins later)
- You can customize this theme, add your own photos, create pages, set banners, but that is pretty easy, so I will not cover it in this article. But there is a great article here. But please leave a comment if you have extra questions on this and I will be happy to address them
-
WooCommerce (for PayPal and Credit Card checkout)
- Inside the plugin, you can add your products, set shipping or taxes, and configure the paying methods, create discount coupons and more.

- To set up PayPal checkout go on -> Set up payment -> PayPal checkout -> Set Up, there PayPal will ask you to login with your business account, and you just follow the procedure until the end, the shop is already set with WooCommerce, this will just be the final stage of purchasing a product. To clarify, while WC is free, PayPal takes 2.9%+ 30 cents for every transaction.
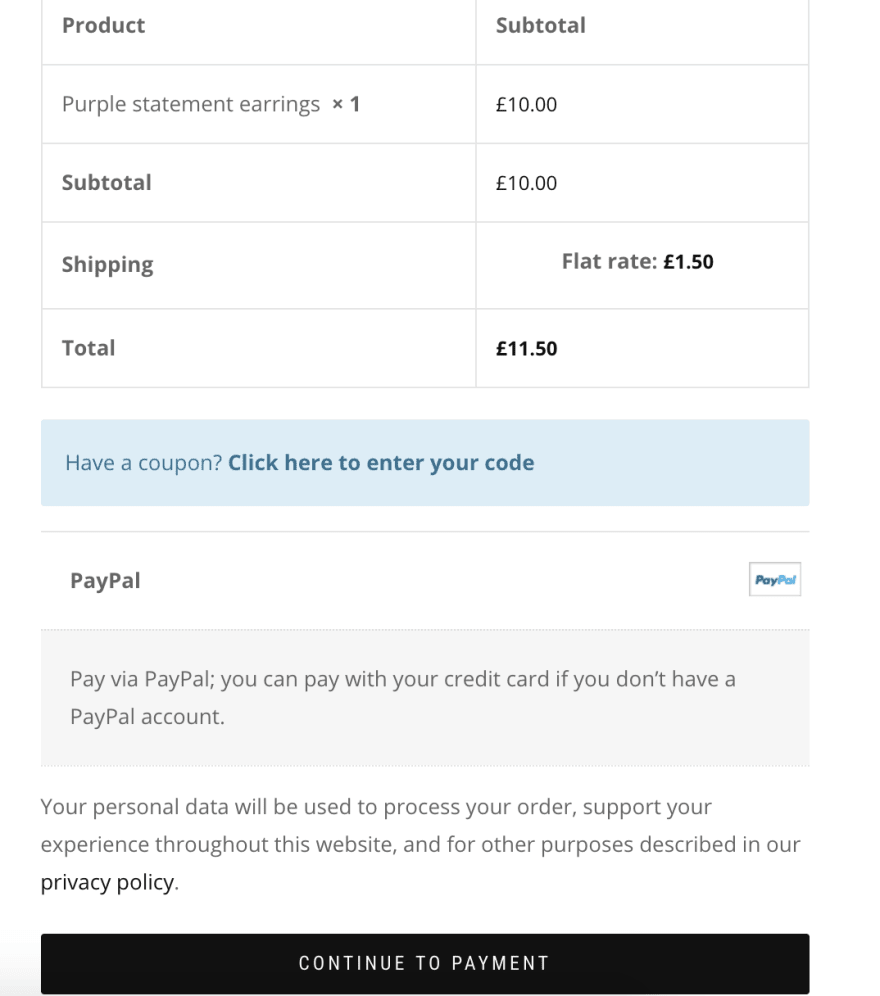
- Now you're covered. Even if the buyer doesn't have a PayPal account, there is a valid second option to pay with your credit card. Your checkout procedure in the cart section will look something like this:

- You can find WooCommerce documentation on how to set a shop here.
- Inside the plugin, you can add your products, set shipping or taxes, and configure the paying methods, create discount coupons and more.
-
ShopIsle theme (because it is a shop template and built to work with some of the plugins later)
-
Intergeo (for integrating Google Maps API into your website)
- In order to use google maps on your website, you have to go to your GCP account and create a Project, let's call it "example-project", go to "APIs and Services" and select JavaScript Maps API, click enable, and from there go to create credentials, select API Key and copy that value
- Go to your Intergeo plugin and create a new Map using the API key, you can set your exact location here

- The final result will be a map, with a string value on the bottom of the map tile, something like "[intergeo id="0ITM"][/intergeo]"
- Copy that, go to customize the theme, under the contact page section -> in the input field "Map shortcode" paste the value from above
- Really Simple SSL (To activate the SSL certificate you get later from a certificate authority)
- Just install it, but don't activate it until you finish the SSL configuration, or skip this step until you finish the SSL part
-
WPForms and WP mail SMTP (For Contact section, so you can receive and send mail)
- Go to WPForm Lite plugin, click -> Add New, and later configure the form that as you wish, the final result will have a similar string like the maps
- Copy that string, go to customize contact page, and paste the value into the "Contact form shortcode"

- In order to make the form work and send emails, you need to install WPForms SMTP plugin
- Depending on the email provider you use you will configure your plugin accordingly
- In our case, we used Gmail, and here is an awesome tutorial that you should follow
- In order to make this integration work, you will need to go to your GCP account and activate the Email API and generate credentials similar as in the MAPs API, except here you will use CliendID and Client Secret, but all of that you will find in the tutorial above
SSL Configuration
Http is a protocol for client-server communication on the internet that sends data in plain text over the network. You already noticed something disturbing in this sentence? Correct, somebody who monitors your traffic can steal your credit card info, because it is in plain text. Since our app handles sensitive data like that, we need to appeal as a secure website to our customers. To achieve that our website has to have the https protocol enabled. You know, the lock in the address bar is an indicator of whether our website is secure. And if our website is just using HTTP, most modern browsers will show the user a red lock or something similar, indicating that the data transferred from that browser to a remote server is not encrypted and can be monitored and stolen. How do we achieve HTTPS? With something called Secure Socket Layer or SSL. A secure protocol that revolves around certificates issued for our website. We need to register our domain with a company that issues SSL certificates. There are several types of certificates, free or commercial, depending on the layers of security you want. We will stick to Domain Validated Certificates, which are free, prove our ownership of the domain, and enable encrypted data transfer.
For a more detailed and in-depth article on how to issue an SSL certificate to an AWS Lightsail instance, I will leave this useful 9 step tutorial for you to follow.
To summarize you need to:
- SSH into your Lightsail instance
- Install Certbot, a helper tool that retrieves the certificate from a free Certificate Authority that is called Let's Encrypt
- Run a few commands to issue the certificate for your example.com domain
- Edit your DNS Zone, add records with the strings send to you from Let's * Encrypt, so they can verify that you own the domain
- Under etc/letsencrypt/ directory you should have your certificates
- Link those certification files to our apache server
- Activate SSL plugin (Download Simple SSL Wordpress plugin and activate it)
There you go, all secured! And you only need to do this every 3 months, because certificates expire after 90 days.
That's all folks! I hope you found this article helpful.
Cheers,
Nikola


Oldest comments (0)