We will walk through the basic steps needed to create a gem and publish it.
Introduction
RubyGems has been included with Ruby itself since Ruby 1.9, and is central to Ruby code distribution. It allows Ruby developers to package their code up into a single compressed file, called a "gem". Gems have filenames that end in the .gem extension, and they contain both the Ruby code that makes up the library in question and metadata about the library, including author and version information.
Hal Fulton.
We will create a gem that will MonkeyPatch the String class in the Ruby language. It will introduce two new methods.
These methods will allow us to modify a string by randomly removing half the characters of it. We will call our gem thanoscase.
The name of the gem must be unique within the RubyGems ecosystem. So if you want to follow along with the steps for creating the gem, remember to change its name.
The only requirement for you is to have Ruby 1.9 or greater is in your system. A little bit of GitHub won't hurt either.
Crafting the gem
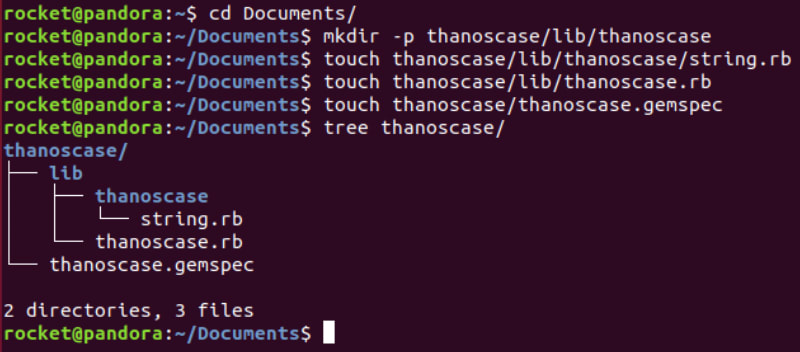
The first thing will be to create the structure we need to have a gem published in RubyGems. As you can see in the gist below:
Basic file structure
We will type a couple of commands in our console:
mkdir -p thanoscase/lib/thanoscase
touch thanoscase/lib/thanoscase/string.rb
touch thanoscase/lib/thanoscase.rb
touch thanoscase/thanoscase.gemspec
string.rb
It will hold the logic for the methods that are going to be added to the String class. As can be seen here:
thanoscase.gemspec
The gemspec defines what’s in the gem, who made it, and the version of the gem. It’s also your interface to RubyGems.org. All of the information you see on a gem page (like jekyll’s) comes from the gemspec.
thanoscase.rb
At this point, we will use thanoscase.rb as a placeholder for importing other libraries. In this case, we are importing the class String.
Pushing changes to RubyGems
Once all the files are created, we need to build the gem. We will build it from the thanospec.gemspec specifications.
Inside your root folder run the following command:
gem build thanoscase.gemspec

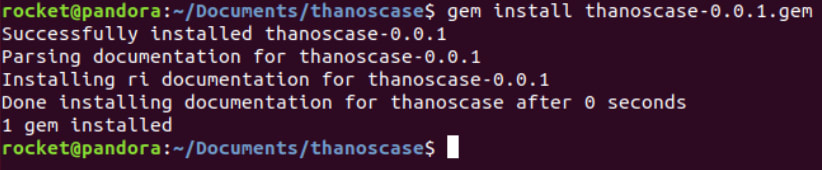
Installing and using our newly created gem
Run this for installing the gem locally:
gem install thanoscase-0.0.1.gem
Now we will trigger the irb console and we will play along a little bit with our gem.

irb stands for interactive ruby is a tool to interactively execute Ruby expressions read from the standard input.
require 'thanoscase' is used for importing our library so we can play with it.
Pushing our gem to RubyGems
First, you will need to login into RubyGems:
gem signin

And now what we have been waiting for!! Time to push your gem!!!
gem push thanoscase-0.0.1.gem
We are done!! Now your newly created gem can be installed from anywhere!!!
gem install thanoscase
Gem creation ends here. If you want to keep reading, we will add tests to our gem and continuous integration for tests to run automatically on every build.
RSpec for testing
It is a good practice to have tests in place for covering the functionality we have created.
Being said that, we will install RSpec, a tool for testing.
Add this line to your gemspec file:
s.add\_development\_dependency "rspec", "~\> 3.8"
It should look like this:
We will need to create a Gemfile, inside our root folder:
touch Gemfile
Add the following lines to it:
echo "source 'https://rubygems.org'" \>\> Gemfile
echo "gemspec" \>\> Gemfile
We are all set. Run the bundle command in order to install the RSpec dependency:
bundle

If you don't have bundler installed, you will need to run:
gem install bundler
If you want to install a specific bundler version:
gem install bundler -v 1.17.3
A new file will be created. Gemfile.lock will keep track of the library versions we are using.
When your co-developers (or you on another machine) check out your code, it will come with the exact versions of all the third-party code your application used on the machine that you last developed on (in the Gemfile.lock). When **they** run bundle install, bundler will find the Gemfile.lock and skip the dependency resolution step. Instead, it will install all of the same gems that you used on the original machine.
Once RSpec is installed. Run rspec --init to set up your project to use RSpec.
rspec --init
A folder spec will be created with a file inside called spec\_helper.rb. This file holds the basic and default configuration for RSpec to work. All tests will be expected to be placed under the spec folder.
Following this convention, we proceed to emulate our lib folder structure. We will create a file called string\_spec.rb as follows:
mkdir -p spec/lib/thanoscase
touch spec/lib/thanoscase/string.rb
And our file structure should look something like this:

Inside our string\_spec.rb file, we will write a couple of tests:
Now we can run our test with:
bundle exec rspec --format documentation

CircleCI 2.1 for Continuous Integration
Once you have created a GitHub repository and pushed all your changes to the cloud, your code will be able to receive contributions from all around the globe.
In order to ease the way to handle contributions (from other people or your own), we can automate the tests for running every time a new branch is created, or a new commit is pushed to such a branch.
Create a folder called .circleci with a configuration file inside config.yml :
mkdir .circleci
touch .circleci/config.yml
And inside this configuration file copy the following lines:
Once you have pushed these changes to your GitHub repository. And added the project to CircleCI, your tests will be running every time a contribution is made. You can take a look here for seeing how the specs were run.
Links of interest
- RubyGems Guides;
- Source code forthanoscase gem;
- CircleCI Caching Dependencies;
- RSpec main site;
- Using Workflows to Schedule Jobs;
- CircleCI 2.1 Config Overview;
- The Ruby Way. Third Edition;

Top comments (0)