In this article, we are going to learn how to upload images on the server using Node.js/Express and Cloudinary.
What is Cloudinary?
Cloudinary is a cloud-based image and video management Software-as-a-Service (SaaS). Cloudinary provides an API for uploading, storing, managing, transforming, and delivering images and videos using a Content Delivery Network (CDN). Cloudinary offers a variety of SDKs for different languages and platforms. For more information on their developer solutions, visit https://cloudinary.com/developers.
What are we building?
We are going to build a simple Node.js/Express application that will allow us to upload images to the server using Cloudinary. We will also be able to view the uploaded images in the Cloudinary dashboard.
Assumptions
- While we will cover everything from scratch and in detail, we will assume that you have a basic understanding of Node.js and Express. If you need a hand with that, you may refer to my previous article where I have elaborated more on these tools.
Prerequisites
To follow along with this article, you need to have the following installed on your machine:
- Node.js
- A text editor of your choice. I recommend VS Code
Postman: is a very simple and intuitive API testing tool or application. We will use it to test our API endpoints/routes. You can also use Insomnia or any other API testing tool of your choice.
A Cloudinary account. You can create one here. We will also cover how to create one in the next section.
Table of contents
- Setup Cloudinary account
- Setup our Node.js/Express application
- Upload images to Cloudinary
- Test our application using Postman
- Conclusion
Let's code
Setup Cloudinary account
Go to https://cloudinary.com/users/registe_free and create a free account. You can also sign in if you already have an account.
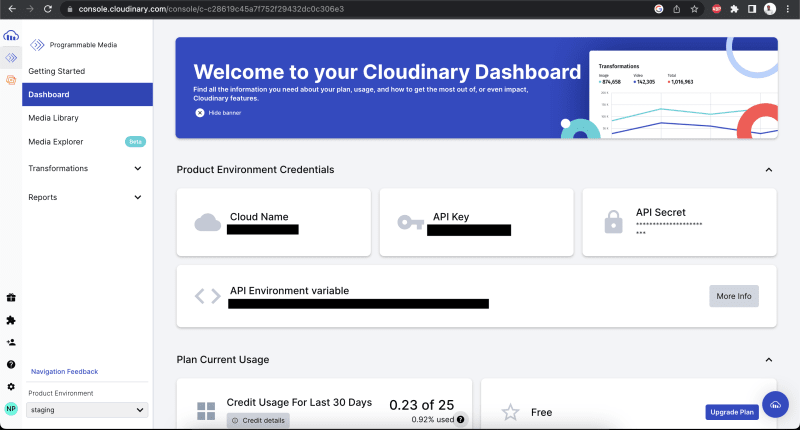
After signing into your account, you will be redirected to the console. Click on the Programmable Media tab in the left sidebar.
- You will be redirected your Cloudinary Dashboard. Copy the
Cloud Name,API Key, andAPI Secretand save them somewhere. We will use them to access the Cloudinary API in our application.
Setting up our Node.js/Express application
- Create a new directory and name it
cloudinary-upload. Open it in your favorite text editor. I will be using VS Code.
mkdir cloudinary-upload
cd cloudinary-upload
code .
- Initialize a new Node.js application using the command below. This will create a
package.jsonfile in our project directory.
npm init -y
- Install the following dependencies, I will explain how each of them helps below.
npm install express body-parser cors dotenv cloudinary
npm install --save-dev nodemon
Understaning the dependencies
Cloudinary: The Cloudinary Node SDK allows you to quickly and easily integrate your application with Cloudinary.
body-parser: Body parser is an npm library used to process data sent through an HTTP request body. The body-parser middleware converts text sent through an HTTP request to a target format using 4 different parsers: text, JSON, URL encoded, and raw. To learn more about body-parser, visit https://www.npmjs.com/package/body-parser.
I had explained the rest of the dependencies in my previous article.
- Create a
.envfile in the root of our project directory (wherepackage.jsonis located) and add the following environment variables. Replace the values with your own keys.
PORT = 3000 // Or any other port of your choice
CLOUDINARY_API_KEY = // Your Cloudinary API key
CLOUDINARY_API_SECRET = // Your Cloudinary API secret
CLOUDINARY_CLOUD_NAME = // Your Cloudinary cloud name
- Create an
index.jsfile in the root of our project directory and create a basic express server.
import express from 'express';
import bodyParser from 'body-parser';
import dotenv from 'dotenv';
import cors from 'cors';
import { v2 as cloudinary } from 'cloudinary';

// CONFIGURE DOTENV
dotenv.config();

// LOAD ENVIROMENT VARIABLES
const {
  PORT,
  CLOUDINARY_API_KEY,
  CLOUDINARY_API_SECRET,
  CLOUDINARY_CLOUD_NAME,
} = process.env;

// CONFIGURE CLOUDINARY
cloudinary.config({
  cloud_name: CLOUDINARY_CLOUD_NAME,
  api_key: CLOUDINARY_API_KEY,
  api_secret: CLOUDINARY_API_SECRET,
});

// INITIALIZE EXPRESS
const app = express();

// CONFIGURE MIDDLEWARE
app.use(bodyParser.json());
app.use(cors());

/**
 * @description - This is where we upload our image to cloudinary. We will come back to this later.
 */

// CREATE SERVER
app.listen(PORT, () => {
    console.log(`Server is running on port ${PORT}`);
});
- Update your
package.jsonfile to add the start script and indicate to use ES6 modules.
{
  "name": "cloudinary-upload",
  "version": "1.0.0",
  "description": "",
  "main": "index.js",
  "type": "module", // Add this line
  "scripts": {
    "test": "echo \"Error: no test specified\" && exit 1",
    "dev": "nodemon index.js" // Add this line
  },
  "keywords": [],
  "author": "",
  "license": "ISC",
  "dependencies": {
    "body-parser": "^1.20.2",
    "cloudinary": "^1.37.0",
    "cors": "^2.8.5",
    "dotenv": "^16.0.3",
    "express": "^4.18.2"
  }
}
- Run the following command to start our server.
npm run dev
If you see the message Server is running on port 3000 in your terminal, then you have successfully created a basic express server.
Upload images to Cloudinary
To upload an image to Cloudinary, we will use the upload method from the Cloudinary SDK. The upload method takes in an image file, uploads it to Cloudinary, and returns a promise containing details of the uploaded image.
The upload method in Node.js has the following signature:
cloudinary.uploader.upload(file, options).then(callback);
The method takes in various parameters to customize the upload process. The parameters are categorized into two: required and optional. We will focus on the required parameters.
Required parameters
file: This is the image file to upload. It can be a path to a local file (supported in SDKs only), the remote HTTP or HTTPS URL address of an existing file, a private storage bucket (S3 or Google Storage), the actual data (byte array buffer), the Data URI (Base64 encoded), or an FTP address of an existing file.-
options: Here we add information that determines how our file is saved in the cloud. We pass in the following attributes:-
public_id (String): The identifier of how a file will be named in the cloud. -
folder (String): The name of the folder in which the file will be saved. -
unique_filename (Boolean): If set to true, Cloudinary will add random characters on the file name to ensure that the file name is unique. -
use_filename (Boolean): If set to true, Cloudinary will use the original file name of the uploaded file.
-
To read more about all options available, visit the documenation here.
Uploading an image
We return into our code and add the following code to our index.js file.
/**
 * @description - This is where we upload our image to cloudinary. We will come back to this later.
 */

// ADD THESE LINES OF CODE

app.post('/api/upload', async (req, res) => {
  // DESTRUCTURE IMAGE FROM REQ.BODY
  const { image } = req.body;

  try {
    // DEFINE UPLOAD OPTIONS
    const options = {
      public_id: 'sample_image',
      folder: 'sample',
      unique_filename: true,
      use_filename: true,
    };
    // UPLOAD IMAGE TO CLOUDINARY
    const response = await cloudinary.uploader.upload(image, options);
    // RETURN UPLOADED IMAGE DATA
    const uploadedImage = response.url; // You can then store the image url in your database
    // RETURN COMPLETE RESPONSE
    return res.status(200).json({ uploadedImage, response });
    // CATCH ERROR
  } catch (error) {
    return res.status(500).json({ message: error.message });
  }
});
Understanding the code
We created a route
/api/uploadthat accepts aPOSTrequest. The route takes in an image from the request body and uploads it to Cloudinary.We created a
try/catchblock to handle errors that may occur during the upload process. Another way to handle errors is to use thecatchmethod on the promise returned by theuploadmethod.
await cloudinary.uploader.upload(image, options)
.then(callback)
.catch(error => console.log(error));
We created an
optionsobject to customize the upload process.We catch the response from the
uploadmethod and return the image url and the complete response to the client.
Let's test our code.
Test the application using Postman
Open Postman and create a
POSTrequest tohttp://localhost:3000/api/upload.Add the
imagekey to the request body and set the value to the image you want to upload. We will use a link to an image on the internet.
{
    "image": "https://images.unsplash.com/photo-1639020715359-f03b05835829?ixlib=rb-4.0.3&ixid=M3wxMjA3fDB8MHxwaG90by1wYWdlfHx8fGVufDB8fHx8fA%3D%3D&auto=format&fit=crop&w=1740&q=80"
}
Click on the
Sendbutton to send the request.You should see the following response:
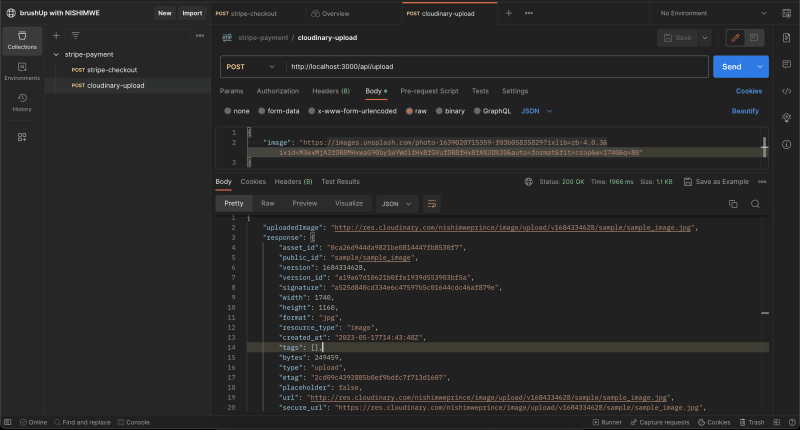
You will notice that the response contains the image url and other details about the uploaded image.
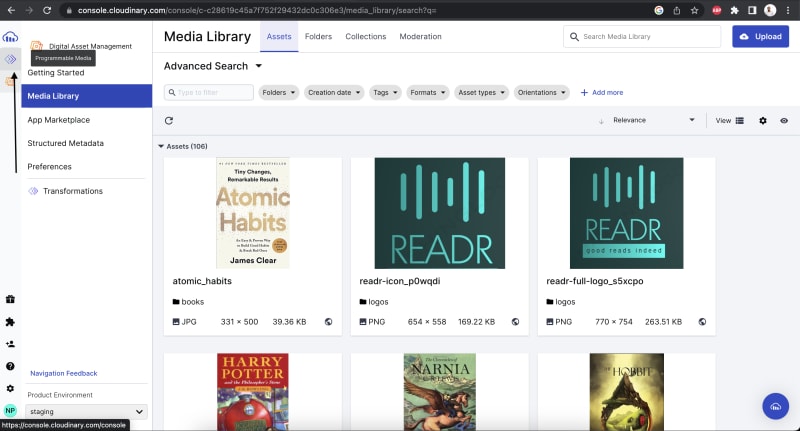
- An image is uploaded to Cloudinary. You can check your Cloudinary dashboard to see the uploaded image in its specified folder.

Conclusion
In this tutorial, we learnt how to upload images on the server using the Cloudinary SDK with Node.js/Express. We created a Node.js server using Express and uploaded an image to Cloudinary using the upload method from the Cloudinary SDK. We also learnt how to customize the upload process by passing in options to the upload method.
Thank you for reading! I hope you found this tutorial helpful. If you have any questions or comments, please feel free to reach out to me on LinkedIn. I would love to connect with you. See you next week!!

Top comments (0)