
I recently realized most of the Engineers at our workplace have stuck in this constant loop of Building Apks and passing it over to the QA team on Slack. All that we do every time is, manually build the Apk from the feature branch which we are working on and upload it to Slack for the QA team to get it tested. If any changes come in between or later the loop goes on again. You got the point right! So, Why do it manually when you can make it automated. 🤷♂️
So let's use the power of GitLab CI and combine it with Slack API to build a bot that will give you the list of all the available branches on our repo, and on select, the corresponding repo will be built and Apk will be uploaded to Slack.
Goals
- Interactive Slack-bot that displays all available branches on the repo. (We will be using Message Menus from Slack API)
- Setup a GitLab CI with a job that will run only when triggered by our Slack-bot.
- Automatically build app variants on CI for selected repo on slack and upload it back to slack.
- Additionally, let's add few more features like options to check the status of the CI Job. Help command that provides instructions on how to use the bot. (We will be using slash commands from Slack API).
- Finally, let's ensure that the Specific user who requested for Apk is pinged when the Apk build is successfully finished.
TL;DR
If you are right way interested to dig into code. Here is the spoiler. Also, you can show right to the bottom to check out the final functionality.
 NitishGadangi
/
apk-dispatcher-slack-bot
NitishGadangi
/
apk-dispatcher-slack-bot
🤖 Slack Bot that uses the power of GitlabCI to build and give you the APKs from Gitlab for specified branches
Required Ingredients
- We need a CI/CD instance for this. Fortunately, GitLab has a simple and free CI/CD system that is available in private repositories.
- You must have permission to create a new Slack App and launch it in your Workspace.
- As we are going to use Slash commands for Slack-bot, we need an HTTP instance that responds to calls from Slack. (We will be using a simple Node.js app deployed on Heroku)
- Obviously some basic understanding of how CI/CD works and some knowledge on Node.
Let's start cooking…

GitLab Setup
You need to add CI/CD configuration file to you GitLab repo. This can be done by adding **.gitlab-ci.yml** file to the Android project root. For further detailed walkthrough you can always go through the documentation here.

The CI configuration yml file essential consists all the instructions required to run the CI pipeline. For environment setup, we can run the standard Android SDK instance. However, we can use the Docker image by Jangrewe which is pre-configured for Android. Later we need to add remaining instructions that help to build Apk and upload on to slack. Here is how it looks finally.
Before moving further let's look into the above configuration file and understand keyword and their use:
-
**image:**This tag is used to specify a Docker image to be used for execution. Gitlab runners will use this Docker image to run the pipeline. -
**cache:**Caching the Gradle folder significantly reduces the build time when generating multiple builds. The cache will be downloaded and extracted at the beginning and uploaded at the end of every job.${CI_PROJECT_ID}is the unique project ID in Gitlab.
Now, we define a job to build a debug APK and its contents are explained below.
-
**stages:**This signifies which stage the job belongs to. -
**before_script:**This is used to set up stuff before the actual work is started. In our case, we setGRADLE_USER_HOMEto avoid using the complete path to gradle, and make the gradlew executable. -
**rules:**Here, we can define various conditions such that the job runs only when based on these specified rules. As we need our job to be running only when triggered manually, we are adding an if condition specifying the$CI_PIPELINE_SOURCEmust be a trigger. -
**script:**The shell script executed by the Gitlab Runner. It is the only mandatory keyword for a job to run.
- Firstly, we run the command to assemble the debug build
- After the build is generated, we use curl, a command line tool to transfer data.
- Also,
${SLACK_CHANNEL_ID}and${SLACK_REFERRER_ID}are used to refer to the channel from where user triggered the pipeline and the corresponding user id for mentioning him to give a notification. These two variables will be sent by our Node.js App which inturn is triggered by Slack-bot. - Similarly we also used
${CI_COMMIT_REF_NAME}and${CI_PIPELINE_ID}to add more info to the message along with the Apk. - Finally for file upload, Slack defines a pretty easy-to-use API. Put the file name of generated APK (for example, app-debug.apk). If your gradle generates distinct build names as per the build version/type then use the find command with the initial characters of the file, as shown above.
Node.js App setup
As we gonna use slash commands for our slack bot, we need to have a server application that can respond to incoming requests from slack-api. I would like to keep things as short as possible. Here we go.
- Clone this repo (apk-dispatcher-slack-bot)
- Here we can observe we will be having the base route as
/androidunder which there 4 more post routers available.
-
/android/actionsis used as Request URL for Interactivity actions in slack. Any interactions interactive components (such as buttons, select menus, and datepickers) will be sent to this end point. -
/android/get_apk,/android/help,/android/get_statusare triggered from slash commands and each of it will do corresponding actions and post the response back to slack-api.
We also need to provide the environment variables by placing them in .env file or placing in Config vars(in case you use heroku) when deployed. We get back to this part later for now you can deploy the project directly.
That being said you can always look at the complete code base to get more clarity on what actually happening in the back. Anyway lets move forward.
Slack App setup
Lastly, we need to create own slack app for our workspace and link it to our node.js app.
- Login to your slack workspace, or create one at Slack Workspace.
- Go to the Apps section, and create a new app. All you need to enter is App Name, and select the workspace from drop down. In the first page of App Settings add in basic details of your app under display info section.
- Under Features go to OAuth & Permissions, first install the app to your works space and copy and secure the
Bot User OAuth Token.And below under Scopes section add the following OAuth Scopes, commands and files:write .

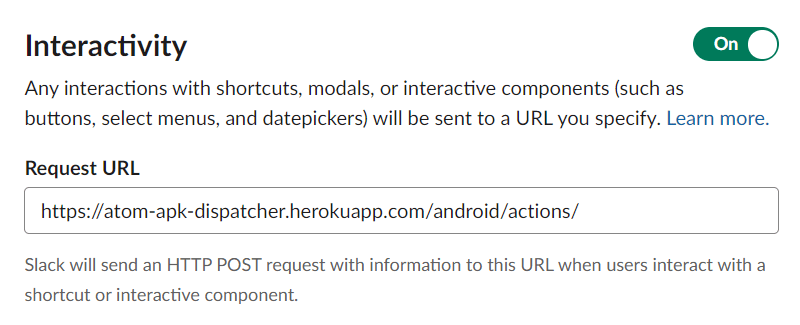
4. Next go to Interactivity & Shortcuts section under Features . Turn on the Interactivity and paste the /actions end point of your Node.js App after its deployment.
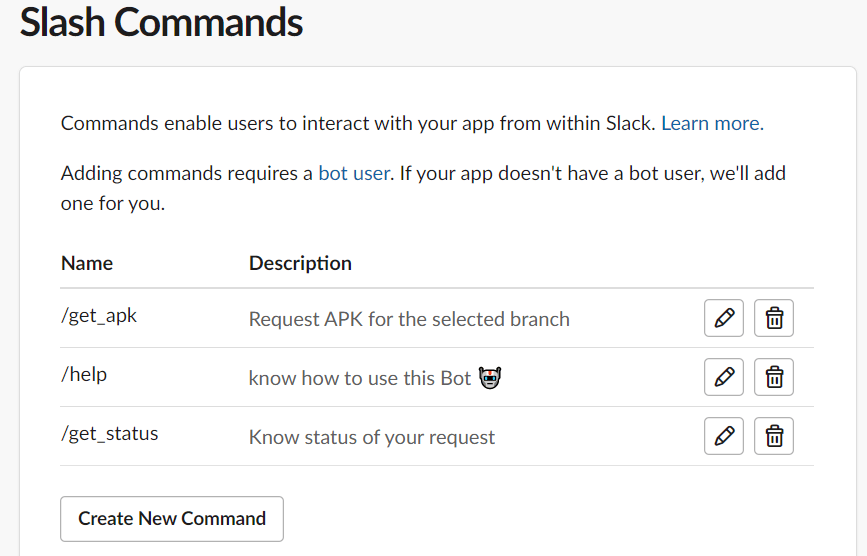
5. Finally, go to Slash Commands section under features and Create new command. Here we are planning to have 3 slash commands and therefore we have 3 corresponding endpoints in our backend. Add the slash commands, its request URL and the description as required.
The Slack App is ready and we are good to go. However, we have to bind together all the pieces in order to make them work together.
Lets bind all of them…
As we have discussed before, we need to specify the environment variables In our Node App in order to make it functional. Let look in how we can fetch each of those environment variables and later we can place them into Config Vars in out Heroku settings.
**SLACK_CHANNEL_ACCESS_TOKEN:** This can be fetched from OAuth & Permissions section from your Slack App setup. It has been discussed above in step-3 of Slack App setup.
**AUTH_TOKEN:** This is basically your GitLab Personal Access Token. You can fetch it from your GitLab profile preferences → Access token and create one for you. (scope read_repository is enough for our use case).
**TRIGGER_TOKEN:** Go to your GitLab repo Settings → CI/CD and under Pipeline triggers , add trigger. Copy the Token and that will be your TRIGGER_TOKEN . You can read more about triggers from here.
**PROJECT_ID:** Under the same Pipeline triggers section from cUrl copy the project id. You can refer the below image.

Now that we got all the variables required lets place it in the Config Vars section in Heroku, and the final state looks like this.

Finally, lets test the functionality…
Jump on to your slack workspace and invite our all new Slack bot to any channel where you want to use it. Start typing any slack commands by typing **/** followed by the command. Slack will automatically start suggesting all the available slash commands.
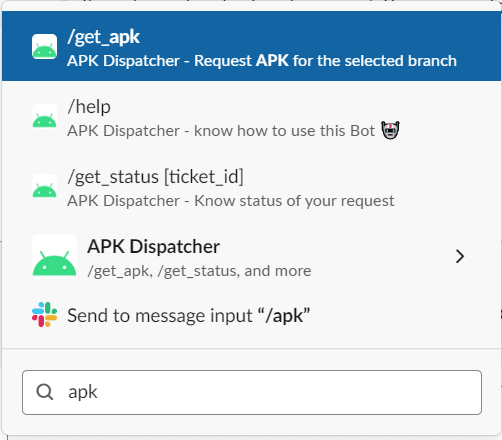
All three slash commands which we have added before are listed.
Here we are having 3 slash commands lets test all of them.
Doing **/help** will give us the following instructions on how to use the bot.

Doing **/get_apk** will prompt you with a drop-down menu asking you to select a branch from which you want to get build and get the apk.

Once you select any branch it will give you details about the branch selected and estimated time for the build. Also a ticked_id is provided which can be later used to know the status of the pipeline if required.

The given ticked_id can be use in combination with **/get_status** to know the status of the build process.

Finally, once the build has finished the bot will ping you with the final Apk.

Yeah! That's the whole App that we have built. You can always extend it further by adding more slash commands or adding more instructions to the CI config. Anyway, I would say this is more than enough.
That being said I hope you have understood the whole build and hope you like this implementation. In case of any doubts comment down below.
Finally, I would like to attach two other Medium articles which broadly helped me during the whole process. Credits to them too. 🎉

Top comments (0)