

Introduction
As the demand for scalable and efficient cloud computing solutions continues to grow, Google Cloud Platform (GCP) remains a popular choice among developers. In this blog post, we will explore how to run a Python script on Google Cloud in 2023. Whether you are a beginner or an experienced developer, this step-by-step guide will help you leverage the power of GCP for your Python applications.
Prerequisites:
Before we dive into the process, make sure you have the following prerequisites in place:
- A Google Cloud Platform account: Sign up for GCP if you don't already have an account.
- Python installed on your local machine: Ensure you have Python installed, preferably version 3.x.
- A basic understanding of the command line interface (CLI).
- A basic understanding of Git.
Make sure you have a repository set up that contains the Python scripts you want to run on Google Cloud. This could be a repository hosted on a version control platform like GitHub. Having a repository allows you to easily clone the code onto your VM Instance and execute the Python scripts seamlessly. If you haven't set up a repository yet, take some time to create one and ensure it contains the necessary Python scripts you want to deploy.
Let's get started with the process:
Step 1: Set up a Google Cloud project
- Log in to the Google Cloud Console using your GCP account credentials.
- Create a new project or select an existing one from the project dropdown menu.
- Take note of your project ID, as it will be required in later steps.

Step 2: Enable the necessary APIs
- In the Google Cloud Console, navigate to the APIs & Services section.
- Click on "Library" in the left navigation menu.
- Search for "Compute Engine API" and enable it.
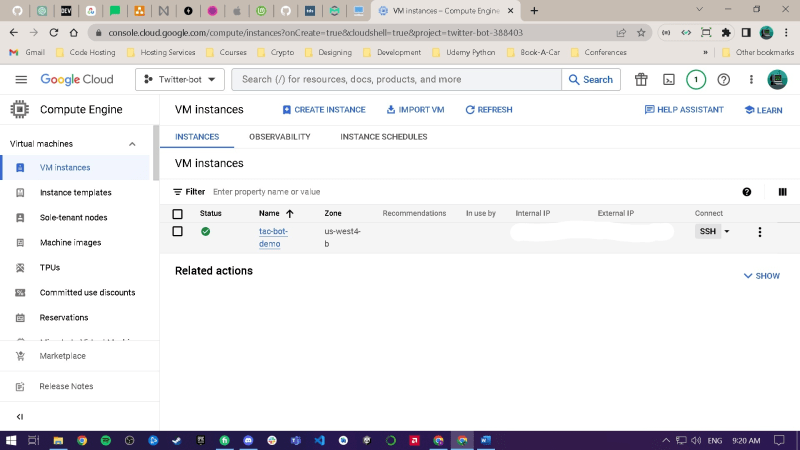
Step 3: Create a VM Instance
- Click on the hamburger menu in the top-left corner of the console, and select "Compute Engine."

- In the Compute Engine section, click on the "CREATE INSTANCE" button to start creating a new VM instance.

- Fill in the necessary details to configure your VM instance. Provide a unique name for your VM instance and leave every other setting on default.

- Scroll down and click “CREATE”.

Once the VM instance is created, you can monitor its status, connect to it via SSH, manage its network settings, and perform various other actions from the Compute Engine section in the Google Cloud Console.

Step 4: Connect to the VM instance using SSH
- Click on the "SSH" button next to the VM instance you want to access. This will open a browser-based SSH terminal.

Step 5: Installing Software and Dependencies
- We need to install necessary software and dependencies .i.e. Python, Git, Tmux and pip.
- First, you need to update the package manager before installing any software. It's a good practice to update the package manager on your VM instance. Run the following command:
sudo apt update.

- By default, many Linux distributions come with Python preinstalled. However, if Python is not already installed or you want to install a specific version, you can use the package manager to install it. Run the following command to install Python 3:
sudo apt install python3. - Pip is the package installer for Python. To install pip, use the following command:
sudo apt install python3-pip.

- To install Git, use the following command:
sudo apt install git

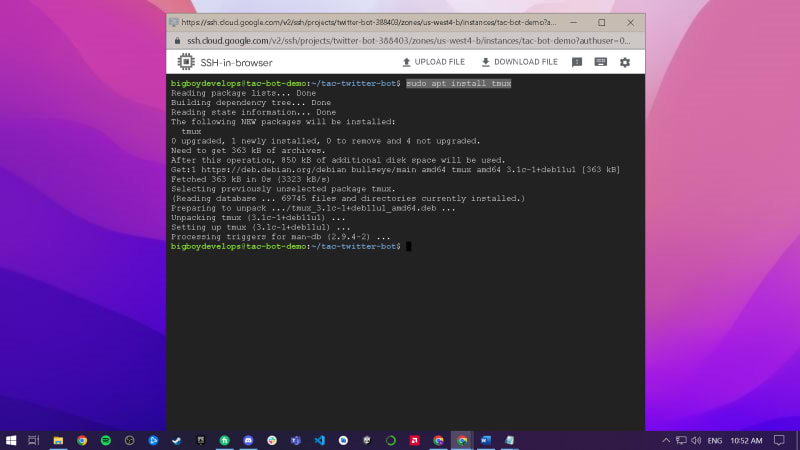
- Install tmux. Tmux is a terminal multiplexer that allows you to run multiple terminal sessions within a single window. Install tmux using the following command:
sudo apt install tmux.
Step 6: Cloning the repository
- Clone the repository of the project you want to run using
git clone <repository_url>providing the repository URL. Replace with the actual URL of the repository you want to clone. This will create a local copy of the repository on your VM instance. - Once the cloning process is complete, navigate to the cloned repository directory using the cd command. For example:
cd my-repository.

Replace 'my-repository' with the name of the cloned repository directory.
Step 7: Run the Python script
- After navigating to the directory containing the Python file you want to run, use the python3 command to execute the file by running this command:
python3 my_script.py.
Replace my_script.py with the name of your Python script.
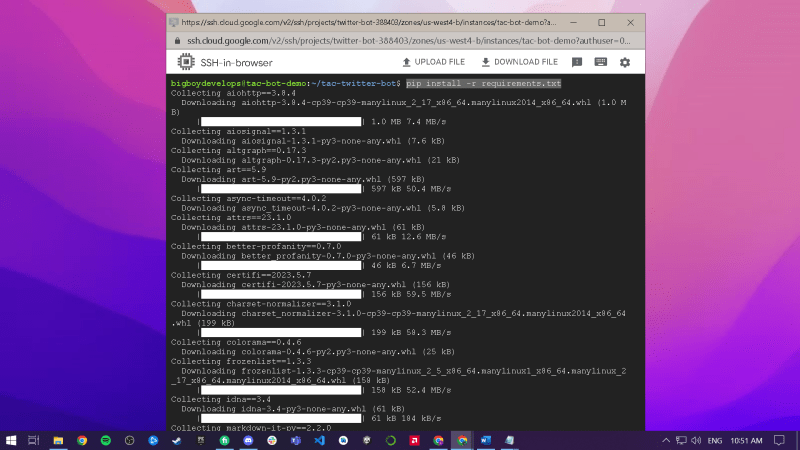
Note: Before running the Python script, make sure you have any necessary dependencies or requirements installed on your VM instance. You can use pip to install the required packages if needed. If you have a number of dependencies, you can run pip install -r requirements.txt to install them.
Step 8: Monitor the script's output
Once you execute the Python script, monitor the terminal output to ensure it runs successfully. The script may produce some output or perform certain actions based on its functionality.
Step 9: *Optional *- Detach the process using tmux (recommended for long-running scripts)
If your Python script takes a long time to complete or you want to keep it running 24/7 in the background, it's recommended to use a terminal multiplexer like tmux. This allows you to detach the process and keep it running even if you disconnect from the SSH session.
To use tmux, run the following command to start a new tmux session: tmux new -s mysession.

Replace 'mysession' with a suitable session name of your choice.
Inside the tmux session, navigate to the directory containing the Python script and execute it as mentioned in Step 7. Once the script starts running, you can detach the tmux session by pressing 'Ctrl-b' followed by 'd'. This will detach the session and return you to the normal SSH terminal.
To reattach to the tmux session in the future, use the following command: tmux a -t mysession.
Replace 'mysession' with the name of your tmux session.
Running a Python script on Google Cloud in 2023 opens up a world of possibilities for developers and businesses alike. With the power and flexibility of Google Cloud's infrastructure, you can easily deploy and scale your Python applications to meet the demands of your users. In this step-by-step guide, we covered the process of creating a VM instance, connecting to it, installing Python, pip, Git, and tmux, and running a Python file from a cloned repository.
As the world of technology continues to evolve, Google Cloud remains at the forefront of innovation, providing developers with powerful tools and services to bring their Python applications to life. So, go ahead and unleash the full potential of your Python scripts on Google Cloud.


Top comments (0)