

Requirements
- GitHub Source Code
- GitHub Personal Access Token
Set up GitHub Source Code
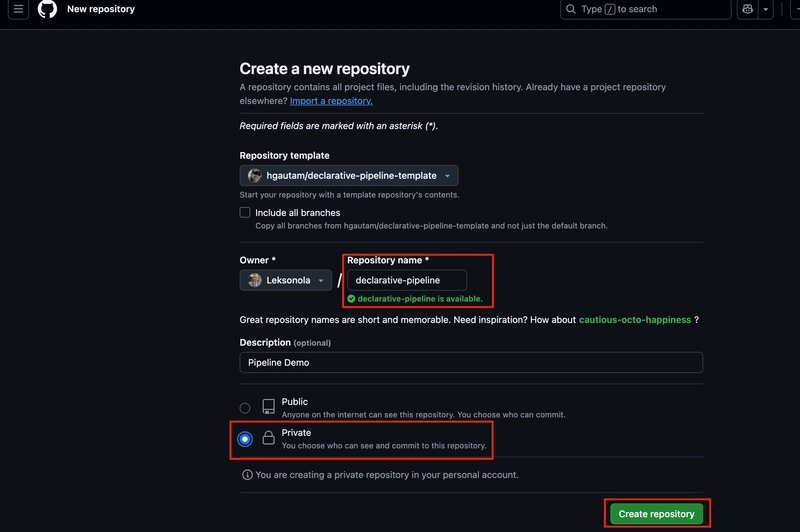
- Click Here to use a pre-defined template to create a repository.
- Enter a name for your repository.
- Enter your description.
- Set visibility to Private.
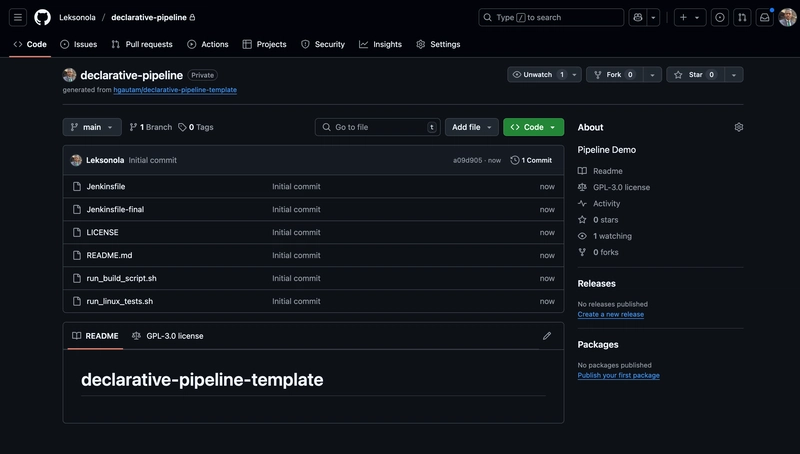
- Select Create repository.
Set up GitHub Personal Access Token
To enable Jenkins to access your private GitHub repository, you'll need to configure GitHub credentials in the Jenkins UI. This requires a personal access token - please refer to GitHub's official documentation for creating one.
Create Pipeline Job
- Login to your Jenkins and click New item. Click Here to install Jenkins
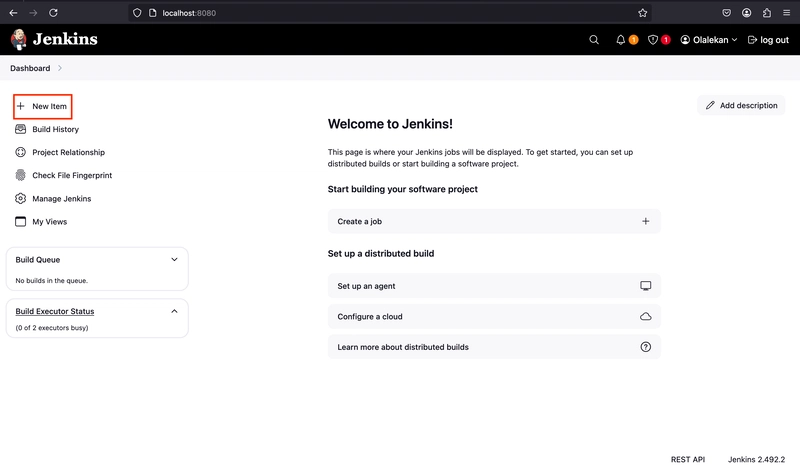
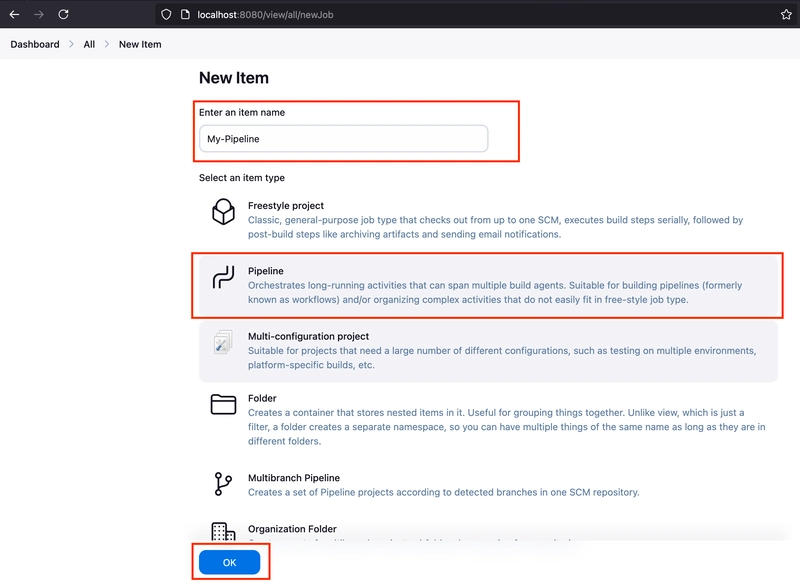
- Enter a name for your job, select Pipeline and click OK.
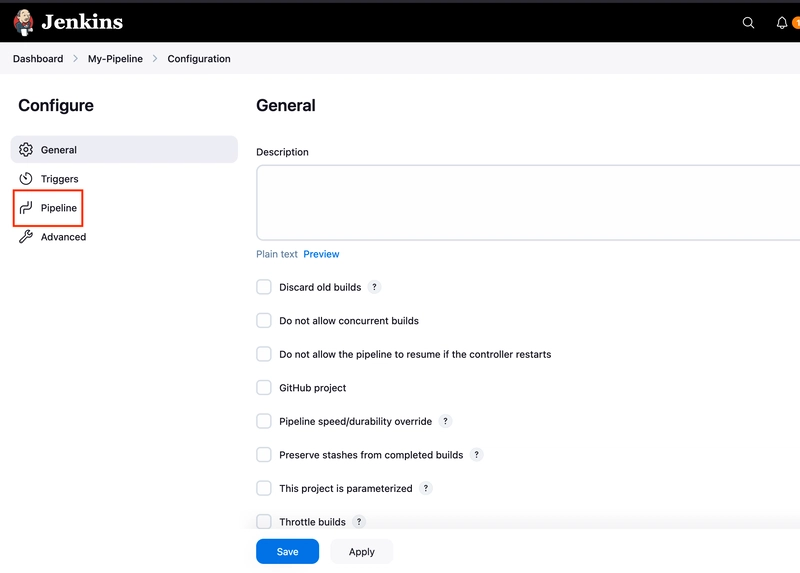
- This will take you to job configuration page. Click on Pipeline to go to Pipeline configuration section.
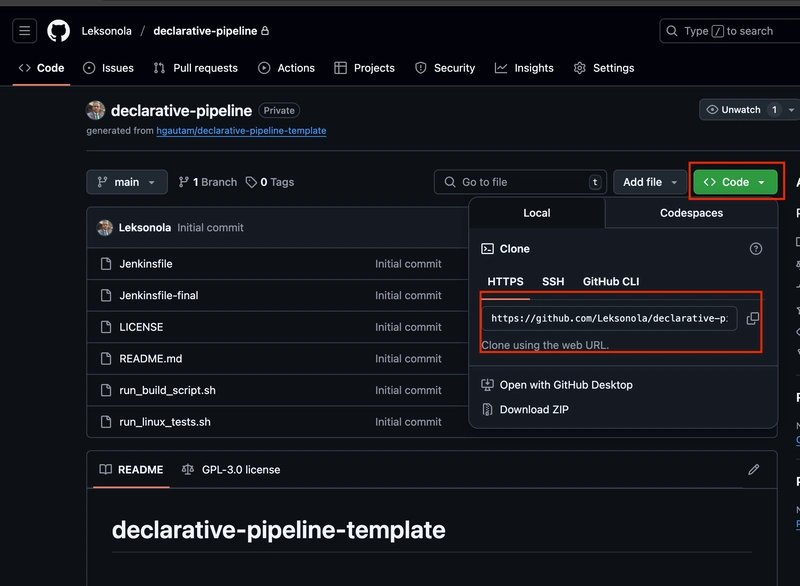
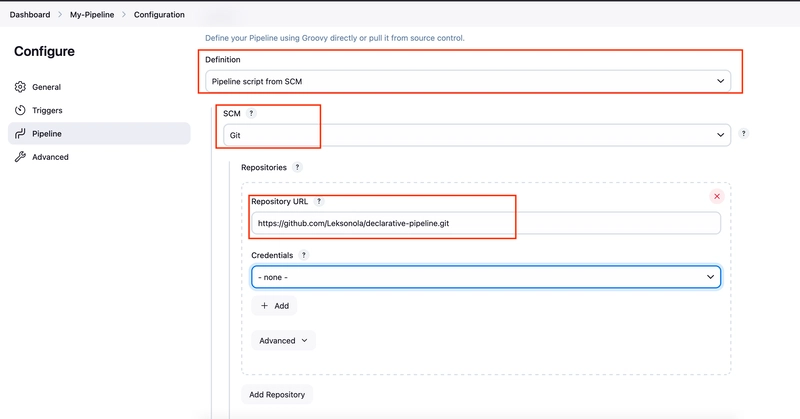
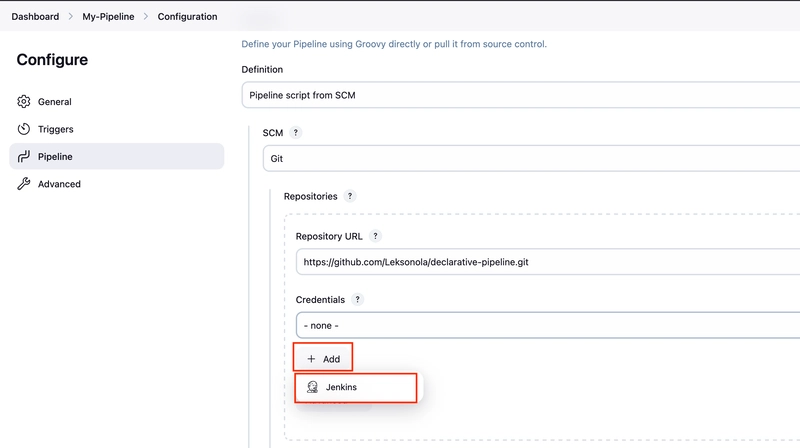
- Choose Pipeline script from SCM under Definition, choose Git for SCM. Copy the newly created repo URL and paste it in Repository URL.
- You may see an error saying Failed to connect to repository, that's because you need to authenticate to your GitHub account. Click Add under Credentials and select Jenkins
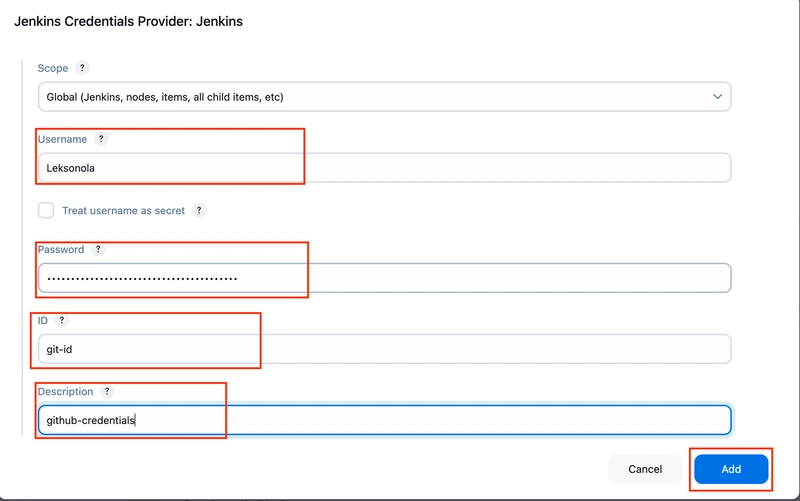
- Leave Domain, Kind and Scope as default value.
- Enter your GitHub username for Username and enter your GitHub Personal Access Token created earlier for Password.
- Enter a unique ID and a description. Click Add After.
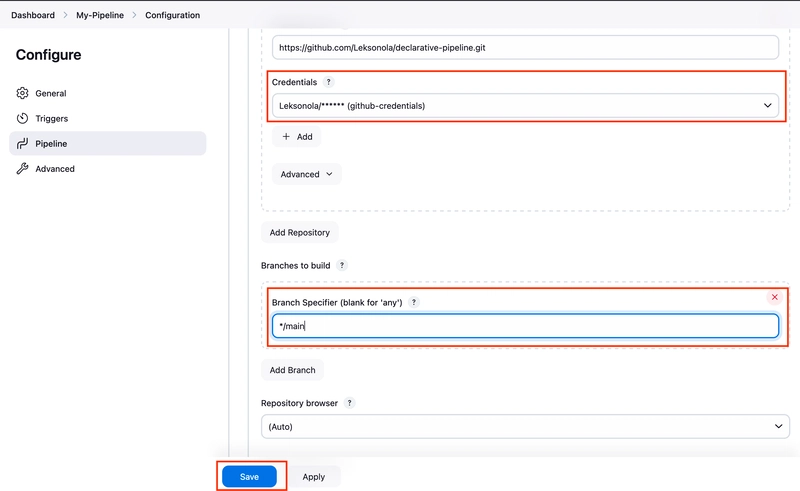
Choose the newly created credentials and scroll down to Branch Specifiers to change to main; this is the branch you will be using. Leave other other settings as default and click save.
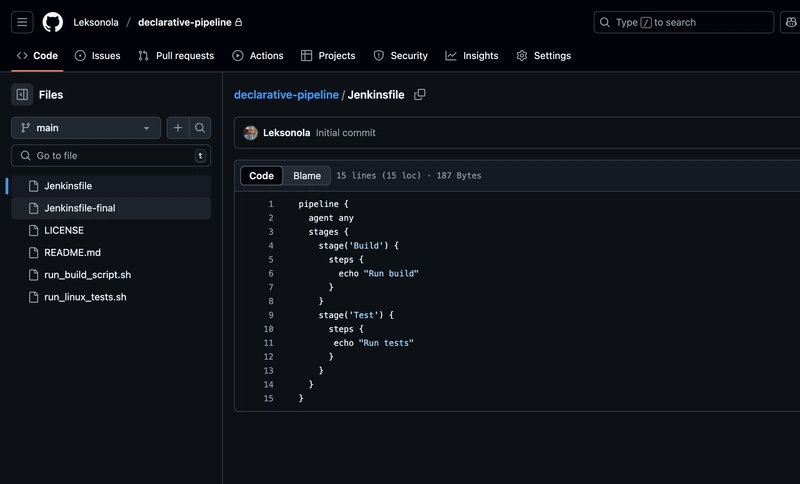
In the GitHub repository, there is a predefined Jenkinsfile with two stages i.e. build and test. There is a single step in each of this single stages ( an echo statement ). This base Jenkinsfile will be used to build our pipeline job.
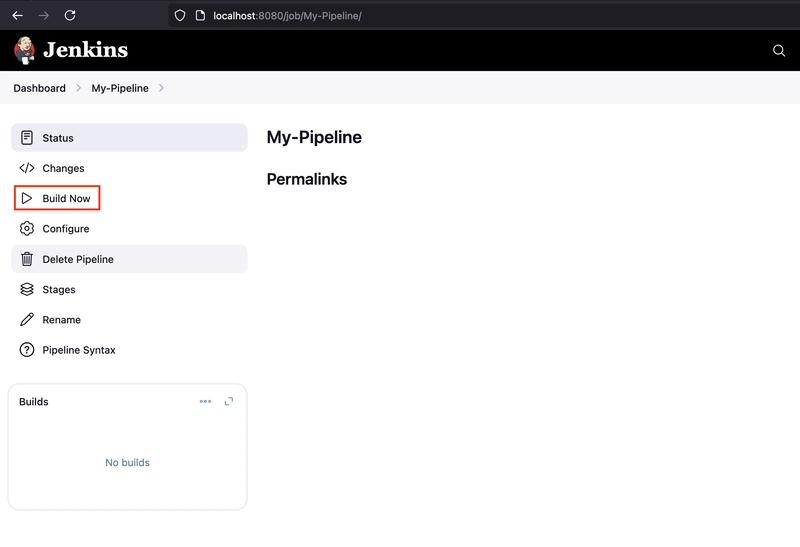
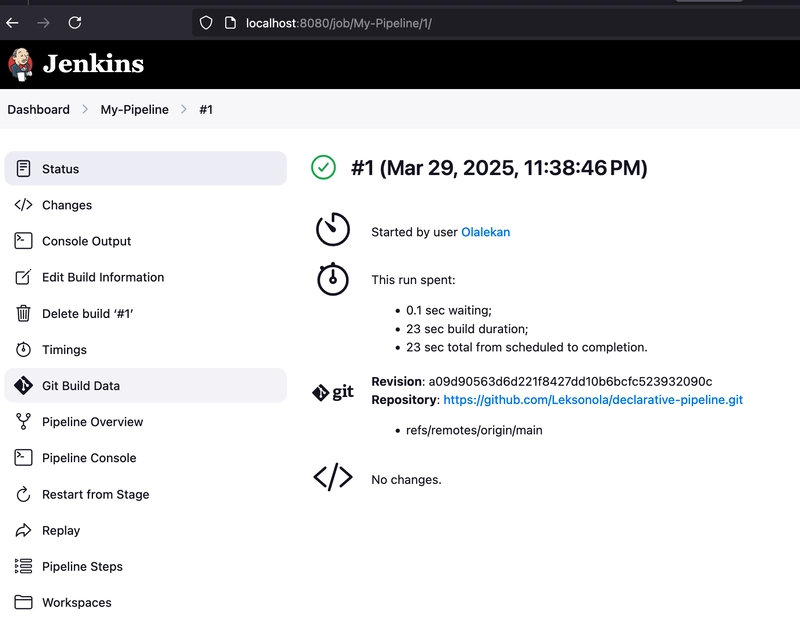
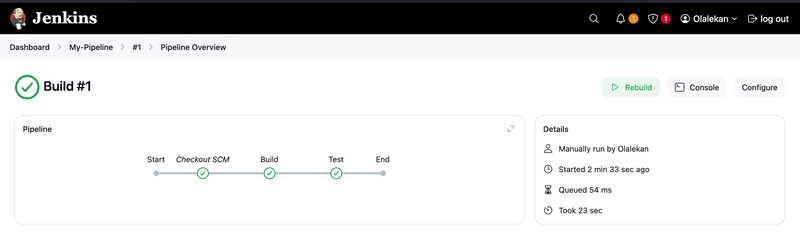
In the Jenkins UI, click Build now.
Modify Build stage
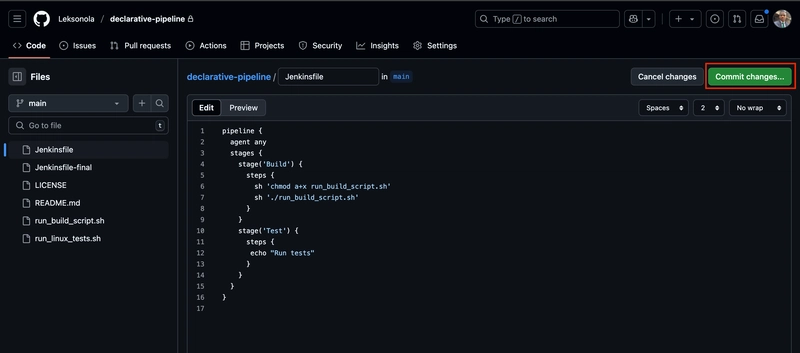
- Changes will be made to your build stage by clicking on Jenkinsfile in our repo and click on pencil icon to edit.
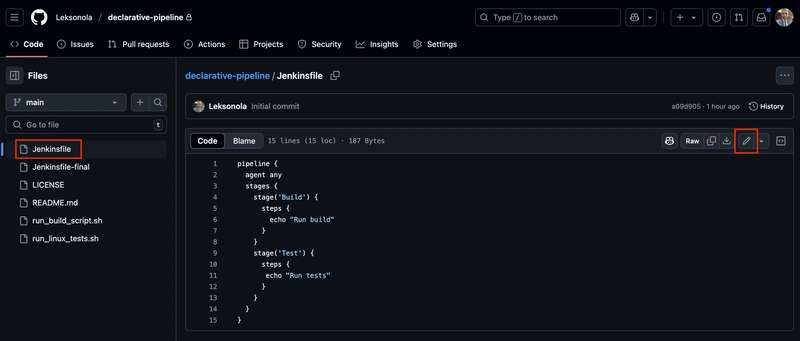
- Under buid stage, you will remove the existing step and add two new steps
sh 'chmod a+x run_build_script.sh'
sh './run_build_script.sh'
Your edited Jenkinsfile should look like this
pipeline {
  agent any
  stages {
    stage('Build') {
      steps {
        sh 'chmod a+x run_build_script.sh'
        sh './run_build_script.sh'
      }
    }
    stage('Test') {
      steps {
       echo "Run tests"
      }
    }
  }
}
- Click commit changes.
- Back to the Jenkins UI, Click Build now to start a new build

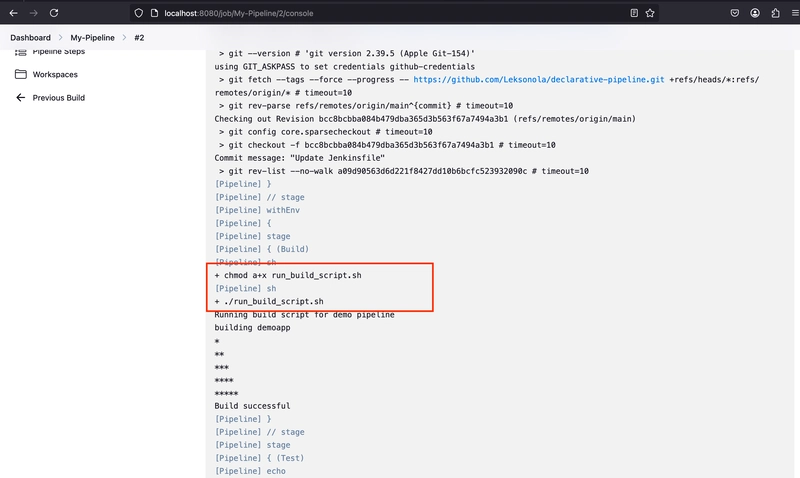
- Once build #2 is successful, click Console output.

- Scroll down to confirm the two steps configured as part of the build stage.
Modify Test stage
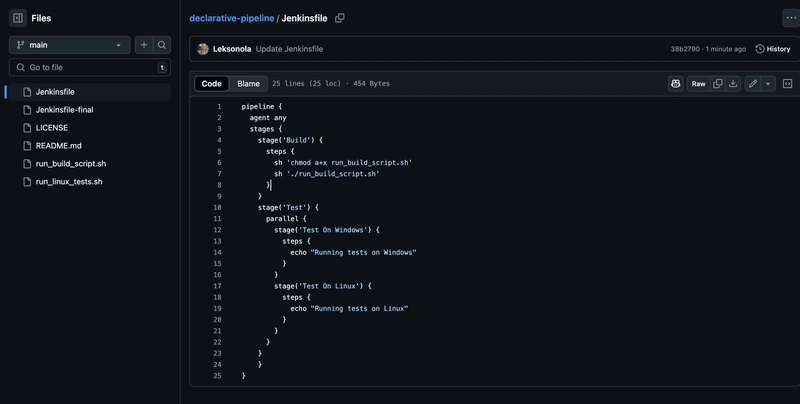
- Head back to Jenkinsfile in GitHub, Remove the existing stage and add a new one with a parallel block in it which has two stages ( Test on Windows and Test on Linux )
stage('Test') {
      parallel {
        stage('Test On Windows') {
          steps {
            echo "Running tests on Windows"
          }
        }
        stage('Test On Linux') {
          steps {
            echo "Running tests on Linux"
          }
        }
Your edited Jenkinsfile should look like this
pipeline {
  agent any
  stages {
    stage('Build') {
      steps {
        sh 'chmod a+x run_build_script.sh'
        sh './run_build_script.sh'
      }
    }
    stage('Test') {
      parallel {
        stage('Test On Windows') {
          steps {
            echo "Running tests on Windows"
          }
        }
        stage('Test On Linux') {
          steps {
            echo "Running tests on Linux"
          }
        }
      }
    }
    }
}
- commit the changes.
- Back to your Jenkins UI, Click Build now
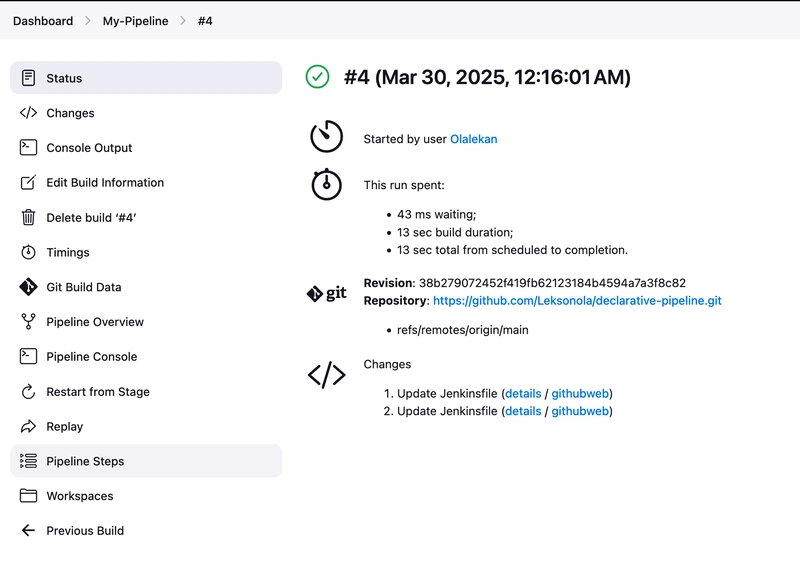 N.B: My build #3 encountered an error, I debugged it and build it again which is why is it displaying build #4.
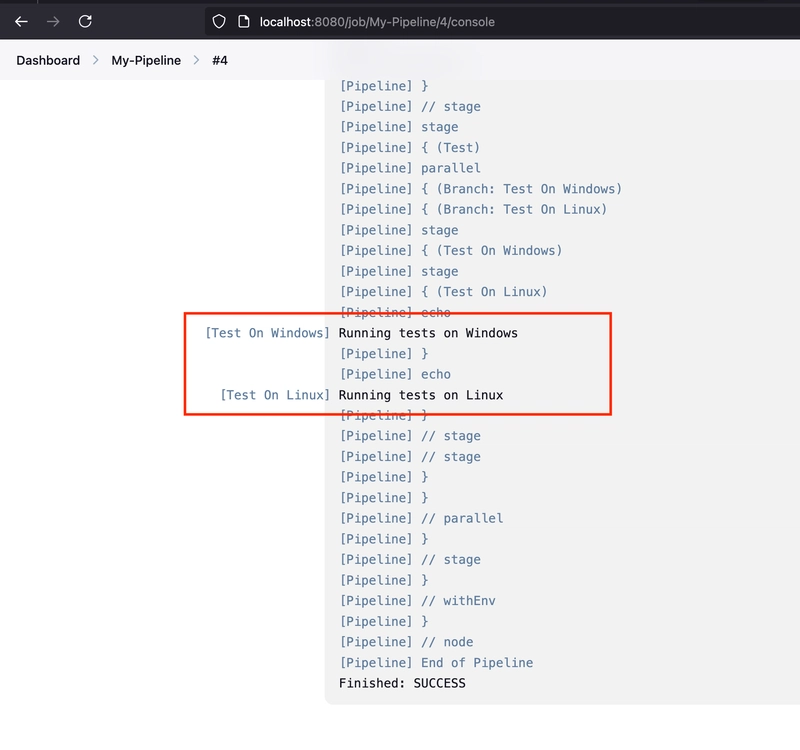
 - Check the Console output, scroll down to confirm the two see the two parallel test stages.
Seek Approval to deploy to a staging environment
- Modify the Jenkinsfile again in GitHub by adding this:
stage('Confirm Deploy to staging') {
      steps {
        timeout(time: 60, unit: 'SECONDS') {
          input(message: 'Okay to Deploy?', ok: 'Let\'s Do it!')
        }
      }
    }
    stage('Deploy to Staging') {
      steps {
        echo "Deploying to staging..."
      }
    }
  }
}
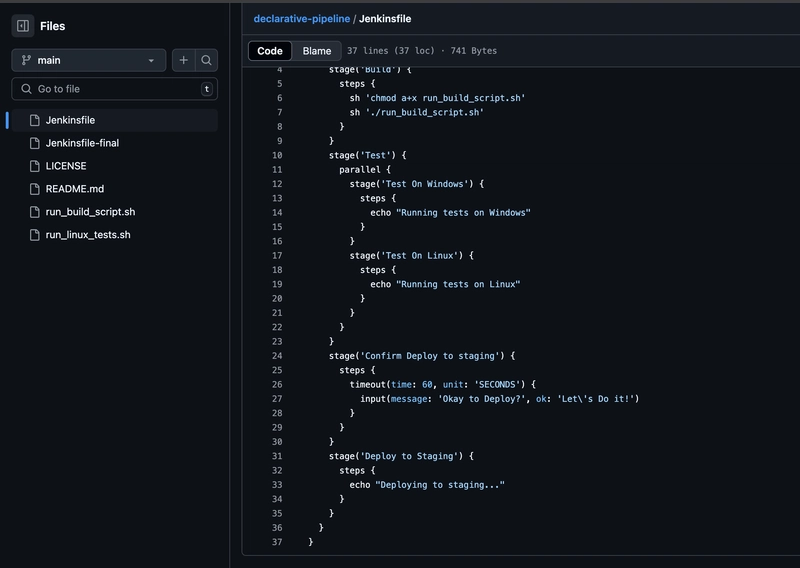
Your edited Jenkinsfile should look like this:
pipeline {
  agent any
  stages {
    stage('Build') {
      steps {
        sh 'chmod a+x run_build_script.sh'
        sh './run_build_script.sh'
      }
    }
    stage('Test') {
      parallel {
        stage('Test On Windows') {
          steps {
            echo "Running tests on Windows"
          }
        }
        stage('Test On Linux') {
          steps {
            echo "Running tests on Linux"
          }
        }
      }
    }
    stage('Confirm Deploy to staging') {
      steps {
        timeout(time: 60, unit: 'SECONDS') {
          input(message: 'Okay to Deploy?', ok: 'Let\'s Do it!')
        }
      }
    }
    stage('Deploy to Staging') {
      steps {
        echo "Deploying to staging..."
      }
    }
  }
}
- commit the changes
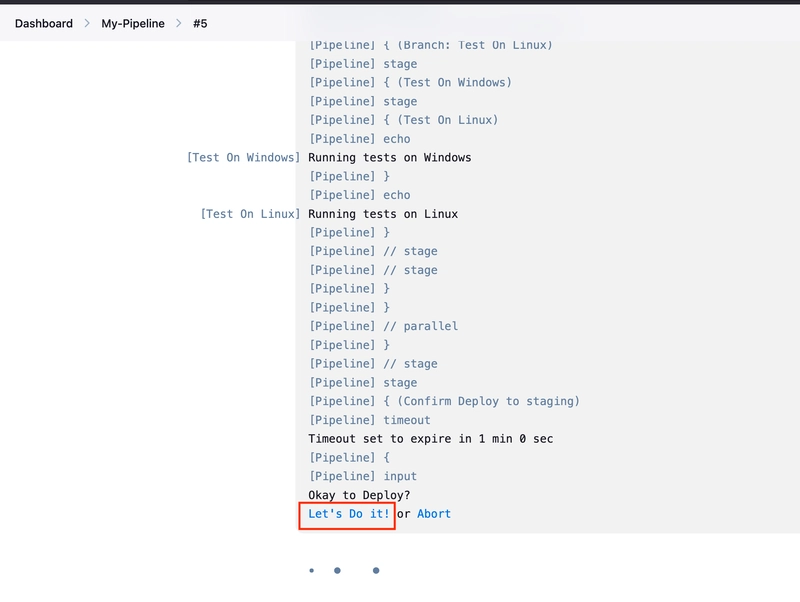
- Head back to the Jenkins UI to start another build.
- It asked for an approval
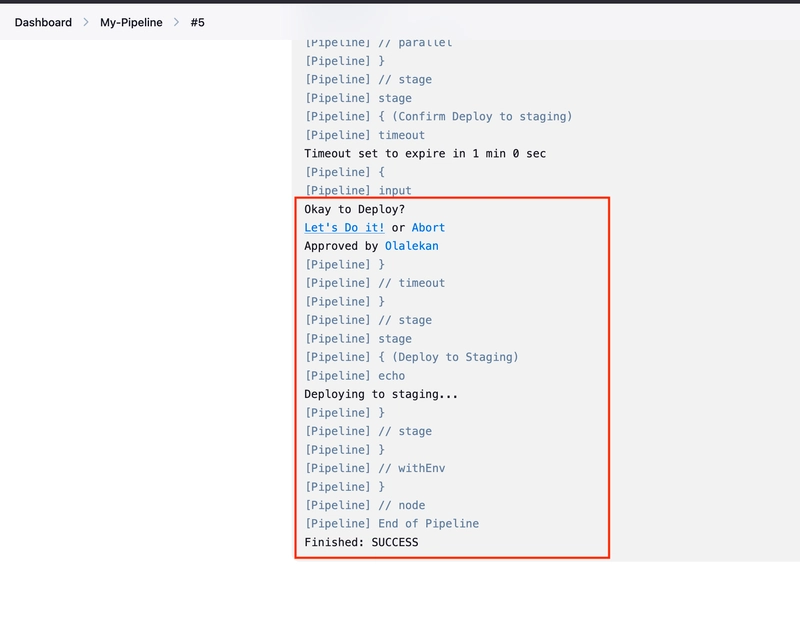
- After clicking Let's Do It!, it deployed to staging environment
Add stages to seek approval and then deploy to Production
- Modify the Jenkinsfile by adding:
stage('Confirm Deploy to production') {
      steps {
        timeout(time: 60, unit: 'SECONDS') {
          input(message: 'Okay to Deploy?', ok: 'Let\'s Do it!')
        }
      }
    }
    stage('Deploy to Production') {
      steps {
        echo "Deploying to production..."
      }
    }
  }
Your edited file should look like this:
pipeline {
  agent any
  stages {
    stage('Build') {
      steps {
        sh 'chmod a+x run_build_script.sh'
        sh './run_build_script.sh'
      }
    }
    stage('Test') {
      parallel {
        stage('Test On Windows') {
          steps {
            echo "Running tests on Windows"
          }
        }
        stage('Test On Linux') {
          steps {
            echo "Running tests on Linux"
          }
        }
      }
    }
    stage('Confirm Deploy to staging') {
      steps {
        timeout(time: 60, unit: 'SECONDS') {
          input(message: 'Okay to Deploy?', ok: 'Let\'s Do it!')
        }
      }
    }
    stage('Deploy to Staging') {
      steps {
        echo "Deploying to staging..."
      }
    }
    stage('Confirm Deploy to production') {
      steps {
        timeout(time: 60, unit: 'SECONDS') {
          input(message: 'Okay to Deploy?', ok: 'Let\'s Do it!')
        }
      }
    }
    stage('Deploy to Production') {
      steps {
        echo "Deploying to production..."
      }
    }

  }
}
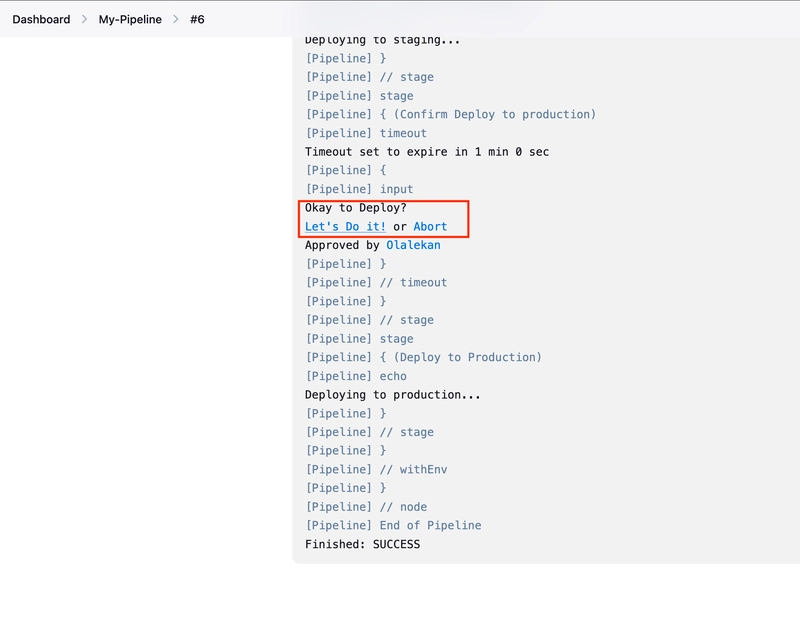
- Head back to the Jenkins UI and click Build now. You will approve deploy to staging as well as deploy to production.
Add a Post-build action
- Head to the Jenkinsfile and add a post-build action.
post {
    success {
      echo "build succeeded"
    }
    failure {
      echo "Build failed"
    }
  }
}
This will notify the users on the success and failure conditions.
Your edited Jenkinsfile should now look like this:
pipeline {
  agent any
  stages {
    stage('Build') {
      steps {
        sh 'chmod a+x run_build_script.sh'
        sh './run_build_script.sh'
      }
    }
    stage('Test') {
      parallel {
        stage('Test On Windows') {
          steps {
            echo "Running tests on Windows"
          }
        }
        stage('Test On Linux') {
          steps {
            echo "Running tests on Linux"
          }
        }
      }
    }
    stage('Confirm Deploy to staging') {
      steps {
        timeout(time: 60, unit: 'SECONDS') {
          input(message: 'Okay to Deploy?', ok: 'Let\'s Do it!')
        }
      }
    }
    stage('Deploy to Staging') {
      steps {
        echo "Deploying to staging..."
      }
    }
    stage('Confirm Deploy to production') {
      steps {
        timeout(time: 60, unit: 'SECONDS') {
          input(message: 'Okay to Deploy?', ok: 'Let\'s Do it!')
        }
      }
    }
    stage('Deploy to Production') {
      steps {
        echo "Deploying to production..."
      }
    }

  }
  post {
    success {
      echo "build succeeded"
    }
    failure {
      echo "Build failed"
    }
  }
}
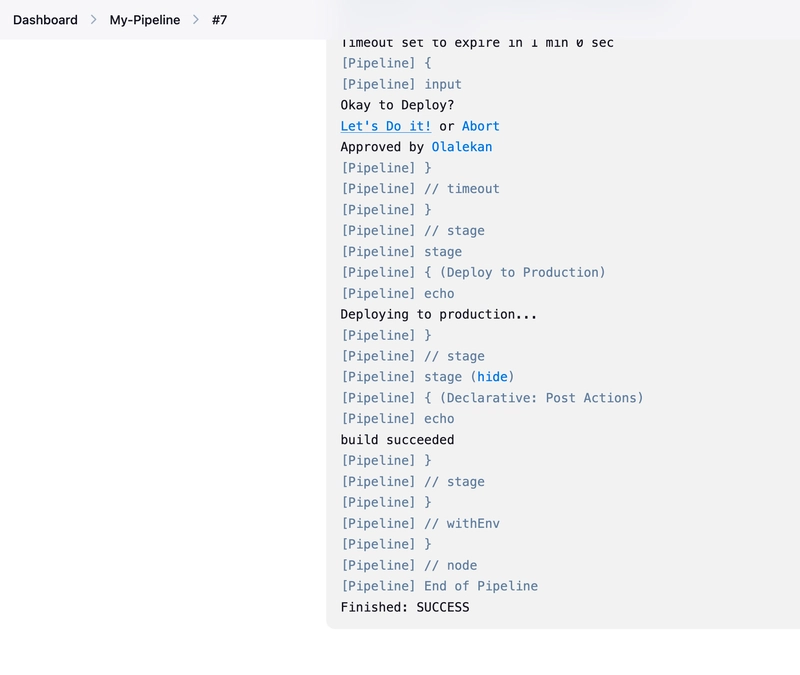
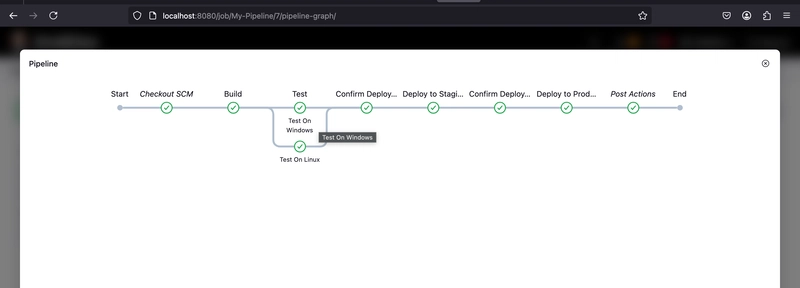
- Commit the changes and click Build now.
Thanks for staying till the end


Top comments (0)