
Spring boot is one of the popular Java framework, which under the hood comprises of multiple Spring based Java projects at its core. Spring boot helps to get started with stand-alone Spring based applications with minimal coding.
Spring boot provides an Embedded Tomcat, Jetty or Undertow runtime environments for the jar/war to run as stand-alone applications along with many other useful features.
Web applications are developed at a faster phase using Spring boot owing to its inherent support for simplifying web development.
Let’s create an web application hosting an API end point with returns the text Hello World !! as the response.
Spring Initilizr
The starter website (https://start.spring.io/) helps to add dependencies and make additional configuration through an interactive interface.
The options selected for generating this project is shown below in the image.
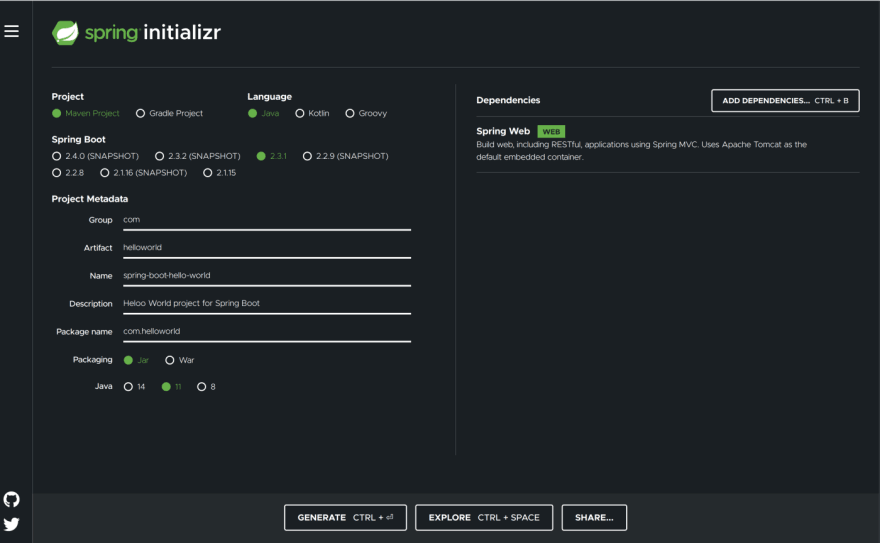
Spring Web is the only dependency that is required to get started. Sweet isn’t it !!!
You can click on Expolore to see the file structure which will be downloaded. Clicking on Generate button downloads a .zip file which contains all the boiler plate files needed to run the code.
The pom.xml should look similar to this
IDE
My preferred choice of IDE is IntelliJ, other IDE’s like Eclipse, NetBeans, etc. are also good enough to get started. After extracting the zip file the Maven project can now be imported into the IDE.
Pre Requisites
* Java 11
* Maven
Digging In
Once you have imported the project to an IDE the project structure looks similar to this.

- src/ contains the source code along with resources and tests
- main/ contains the actual source code and additional resources
- test/ contains the test cases and test suites
The main method is placed in the file
`SpringBootHelloWorldApplication.java`
which gets executed upon starting the application. The @SpringBootApplication annotation abstracts a lot ( (╯°□°)╯︵ ┻━┻ ) of the default configurations which otherwise needs to be set up for the web app to run.
First Light
Now lets create our first API end point. Create a class named
HelloWorldController.java
and add the following piece of code to it
Explanation
@RestController — a special annotation which says that this class contains the terminating end points, in this case /hello
@GetMapping — this annotation is written on top of a method which needs to be executed when /hello is requested from the client through the GET HTTP verb
The method helloWorld() is executed when /hello is encountered from the client and it returns a text as response in this case Hello World !!!
Witness the Magic
Now that we have written our first API end point, let’s build our Spring boot application. The build command used with the Maven build is
mvn clean compile package -DskipTests
We are skipping the tests for now. After a successful build the executable jar would be generated in the target/helloworld-0.0.1-SNAPSHOT.jar
Let’s run the executable using the command
java -jar target/helloworld-0.0.1-SNAPSHOT.jar
from the project directory and lets witness the magic

On closer observation of the logs written to the console we understand that the process is running on the port 8080 (it’s configurable of course)
Now that our web application is up and running on port 8080 lets see what happens when we visit the url http://localhost:8080/hello on a web browser.
You should be able to see

and Ta-Daaaa !!!! We just wrote our first API endpoint using Spring boot with minimal configuration and setup.

Top comments (0)