
Let's get straight to the point.
To understand why a profile README is a good idea for job seeking devs, let's see what this file is commonly used for.
When you create a GitHub repo for your project, you also create a README.md file for this repo and you do it for a specifc reason. That could be a) you want to offer a central point for your projects documentation. A place where users can refer back to, to get information about your project. B) It could be used to hold any kind of information about the technical specs of your project or c) to highlight specific stuff about your project that otherwise lives somewhere in a hidden place, unavailable to some users/readers. There are other reasons why you create a README file, but the point is, you use it to highlight, document, inform, and so on.
One thing you want to do as a job seeking dev, is to highlight, document, inform and so on about you, your skills and your projects. You may have other social profiles, where you already do this (or some of it), but since you likely host the code for your projects in a GitHub repo (or any other Git repo hosting platform) it is a good idea, to make use of the profile README.
If you have a LinkedIn profile, you will know that this is mainly used to build a profile around you and your professional experience. The same way you can use your GitHub profile, to build a profile around you and your code. What and how much information you put into the README, is totally up to you. It will however, round off your complete application package very well, as you have a nice personal profile, whether the recruiter or hiring manager checks out your LinkedIn, your GitHub or even both.
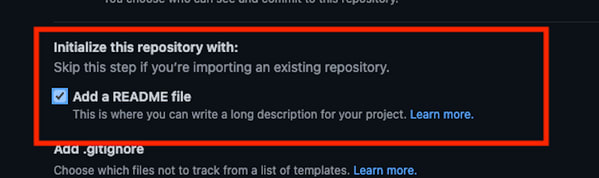
Here is how you create one:
- You create a new repo

- The repo MUST have the same name as your GitHub username. And you need to initialize it WITH the README file. (I have already created mine, hence the notification in the screenshot)

- Now you have a repo with only one file. The README file. At this point you can get creative and add whatever information you would like to use, to highlight, document, inform and so on about you and your code.
A quick Google search for "GitHub profile README examples" will give you enough ideas to get started. You can also use templates or template generators to build this out. These will give you the Markdown, wich yout then simply have to add to the file and commit the changes.
Here are two links that will help you writing Markdown yourself.
Basic writing and formatting syntax
One more thing: If you have any other social profiles such as LinkedIn, Twitter, etc. try to be consistent with your profiles. While each platform serves a different purpose, which means you have to create profiles around this purpose, keep things like username (if available), profile photo, summary, headline, etc. consistent across these platforms. That way you can be found easier and it also gives your personal brand a professional and mature look.

Top comments (0)