
Webpack is a powerful tool. Back in the day, it had a reputation of being hard to learn and hard to use. Nowadays, it has excellent documentation, sensible defaults, plugins, and loader - all this to help you keep your config small while achieving great results.
Important features in 2020
The most important features of webpack for our projects are:
- Tree shaking
- Code splitting
- Dynamic async loading chunks of code
This article explains how we used webpack in our documentation for the past couple of years for easy development and performant production builds.
The final webpack config looks like this:
const path = require('path');
const MiniCssExtractPlugin = require('mini-css-extract-plugin');
const WebpackRequireFrom = require('webpack-require-from');
const webpack = require('webpack');

const production = process.env.NODE_ENV === 'production';

module.exports = {
  entry: {
    'app': './src/app',
    'graphql': './modules/graphql/public/assets/graphql',
  },
  output: {
    chunkFilename: '[name].[chunkhash:3].js',
    publicPath: '',
    path: path.resolve('app/assets'),
  },
  module: {
    rules: [
      {
        test: /(\.css)$/,
        use: [MiniCssExtractPlugin.loader, { loader: 'css-loader', options: { url: false } }, 'postcss-loader'],
      },
      {
        test: /\.js$/,
        loader: 'babel-loader',
        options: {
          exclude: /node_modules/,
          plugins: ['@babel/plugin-syntax-dynamic-import', '@babel/transform-object-assign'],
          cacheDirectory: true,
          presets: [
            [
              '@babel/preset-env'
            ]
          ]
        },
      },
    ],
  },
  plugins: [
    new MiniCssExtractPlugin({
      filename: '[name].css',
      chunkFilename: '[name].[chunkhash:3].css',
    }),
    new WebpackRequireFrom({
      variableName: 'window.__CONTEXT__.cdnUrl',
    }),
    new webpack.DefinePlugin({
      'process.env': {
        NODE_ENV: JSON.stringify(process.env.NODE_ENV),
      },
    }),
  ],
  mode: production ? 'production' : 'development',
}
Note about static assets
We do not process static assets with webpack. Fonts, images are just sitting already optimized in their proper place in our platformOS assets directory - app/assets. There are a couple of reasons we do that:
- Manual optimization is usually better than automatic
- Config is simpler
- Fewer dependencies to break
- Build is faster
- We don't waste CPU time (= money) on CI doing the same operation on every build
Technologies
PostCSS is a framework for creating CSS parsing plugins. It allowed us to migrate away from SASS to reduce complexity. It handles some legacy browser fixes. It is also a base for TailwindCSS, a PostCSS plugin.
TailwindCSS is a CSS framework that makes it easy to create maintainable views with a minimal CSS footprint.
If you are interested in how we set up TailwindCSS and PostCSS, visit our documentation GitHub repository.
Base config
Out of the box, webpack can work with no config at all. Read more on prototyping with no config. By default, it looks for the index.js file in the src/ directory and outputs to dist/main.js. We need to use a couple of features, so we need a config file. The webpack settings we use are pretty simple.
Entry points
entry: {
  'app': './src/app',
  'graphql': './modules/graphql/public/assets/graphql',
},
We use two entry points (files that we will pull in from our HTML) because we have completely separate CSS files for our documentation page and autogenerated documentation for GraphQL endpoints. key is to define how the output will be named, value is the relative path to the file webpack will treat as an entry point. For example: app.js will be generated from entry point src/app.js.
Output
We don't define the output filename because by default, it is [name].js, and it works for our case. But for chunkFilename, we need to add chunkhash for cache invalidation purposes.
publicPath is set to empty because we will not use webpack's built in publicPath — we will use the one from WebpackRequireFrom, explained later.
path is the absolute path where the output files will be placed. In the case of platformOS, it is app/assets.
output: {
    chunkFilename: '[name].[chunkhash:3].js',
    publicPath: '',
    path: path.resolve('app/assets'),
  },
Plugins
MiniCssExtractPlugin extracts CSS to external files. Without it, webpack would package everything into one JS and one CSS.
new MiniCssExtractPlugin({
    filename: '[name].css',
    chunkFilename: '[name].[chunkhash:3].css',
})
The platformOS Liquid filter for getting the URL to assets placed on the CDN adds the query param to bust the cache, so the main files that we require in Liquid do not need to vary in between different builds. We add chunkhash:3 in the file name for chunks because those are loaded dynamically from webpack, and there won't be a query param to handle that.
Why all that? To prevent browsers from loading a file from cache (old asset could break something) if it changed.
Files loaded using the native platformOS asset_url filter:

Chunks loaded with chunkhash in the filename:

WebpackRequireFrom sets the CDN URL during runtime for dynamic chunks, so we don't have to hardcode anything. We just pull this URL from the HTML source, which is rendered server-side.
new WebpackRequireFrom({
    variableName: 'window.__CONTEXT__.cdnUrl',
}),
This option tells webpack where to look to get the CDN URL in the browser when the application is running. In Liquid, we define window.__CONTEXT__.cdnUrl to our CDN URL to let webpack know where to look for dynamically loaded chunks.
<script>
  window.__CONTEXT__ = { cdnUrl: "{{ '' | asset_url }}" };
</script>
This results in chunks loaded correctly on all environments provided by platformOS: dev, staging, and production.
The webpack.DefinePlugin allows us to pass build mode (production or dev) to the runtime. This is needed by the Algolia search script that we use as our search engine.
new webpack.DefinePlugin({
 'process.env': {
     NODE_ENV: JSON.stringify(process.env.NODE_ENV),
  },
}),
Keep in mind that for this line to work, we execute webpack-cli with NODE_ENV defined in the npm script.
"build": "NODE_ENV=production npx webpack-cli --no-color",
Loaders
Loaders are specific plugins for webpack that extend its functionality to operate on files that it does not understand by default. By default, webpack can only parse and bundle JavaScript.
The order of loaders matters. For example, css-loader cannot parse syntax written for PostCSS, so PostCSS needs to be executed first. Loaders are executed from right to left.
postcss-loader allows webpack to use the PostCSS plugins ecosystem. It usually needs the postcss.config.js file to add PostCSS plugins because PostCSS on its own doesn't do anything.
{
    test: /(\.css)$/,
    use: [
            MiniCssExtractPlugin.loader,
            { loader: 'css-loader', options: { url: false } },
            'postcss-loader'
        ],
},
For CSS files, PostCSS will do its thing first, pass the output to css-loader, it will do its thing (without resolving URLs in CSS) and pass the output to MiniCssExtractPlugin.loader which will save the CSS to separate files.
babel-loader transpiles JavaScript using babel and its plugins. We use preset-env and two plugins: syntax-dynamic-import and transform-object-assign for browsers defined in package.json.
Code splitting and conditional loading
This article wouldn't be complete if I did not include how to split code in webpack build time so that it asynchronously loads chunks while running in the browser.
import './app.css';

import { $q } from './js/helpers/dom';

import './js/sidebarMenu';
import './js/deepLinks';
import './js/autosteps'; // this HAS to be after deepLinks
import './js/toc';
import './js/externalLinks';
import './js/feedback';

import(/* webpackChunkName: "search" */ './js/search');

if ($q('code[class*="language-"]')) {
  import(/* webpackChunkName: "syntaxHighlighting" */ './js/syntaxHighlighting');
}
- All the ES6 imports (from
sidebarMenutofeedback) will be bundled directly into app.js. - Dynamic imports (function named import -
search) will generate chunks, that will be loaded asynchronously. - Dynamic imports wrapped in an
ifstatement will be loaded asynchronously only when theifcondition evaluates to atruthyvalue. In our case, when a certain selector is present on the webpage. Webpack will not load those modules on pages that do not require them.
Example requests for the homepage:

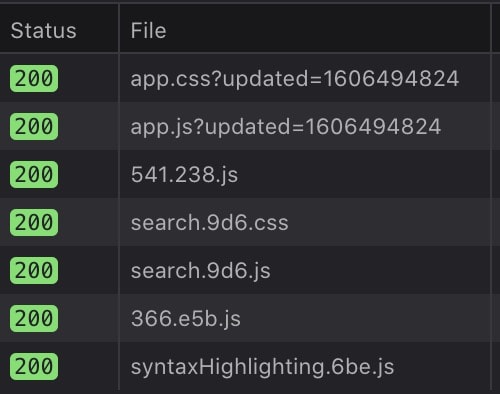
Example requests for a page where syntax highlighting is needed:
Closing thoughts
Webpack in 2020 is a totally different beast than it was in 2015, but it can still be intimidating. If you don't feel its syntax, you can try different code bundlers; some of them are simpler to some people (rollup), and some are much faster (esbuild). We chose webpack a long time ago because it was reliable, the most feature-rich (thanks to plugins), powerful, and very well documented.
If you are interested in a Webpack + TailwindCSS setup for static websites (with HTML that you can deploy to platformOS, netlify, vercel, or just AWS S3), we created an opensource boilerplate for you to quickly jump in and test it out.

Latest comments (0)