In my previous post I have explained how to style you chat bot when adding it on custom website or portals. But I always wondered can I add chat bot on a WordPress site, and I was able to find the answer to that question. So, let us see how we can achieve that. In this post I am only showing how to add bot to a WordPress site. To understand the styling refer to my previous post.
Before we begun, build your bot using Power Virtual Agent; also ensure that you either have managed WordPress or if you are using WordPress.com then you need Business Plan or above. Next you need to install Head and Footer Scripts Inserter plugin. Once you have these prerequisites then you can move forward. I will be using a managed WordPress site to do my changes.
Construct your page
You can pick an existing page but before you do this I would recommend to add a new page so you can test your bot before adding the code on your existing page.

After you add a page application will navigate you to the page editor. On this editor switch from Visual Editor to Code Editor (as shown below). Add the code provided below, and publish/update the page.

<!-- Chat Bot -->
<button onclick="openChat()" role="openchatbutton" class="open-button">
 <i class="fa fa-4x fa-comments"></i>
</button>
<div role="openchat" id="chatWindow" class="chat-popup" style="order: 3; position: relative; width: 400px; min-width: 400px; height: 100%;">
 <div>
  <div id="webchat" role="main"></div>
 </div>
</div>
Add Scripts
Now let us add appropriate scripts. To do so, from the Settings menu; go to Script Inserter (as shown below).
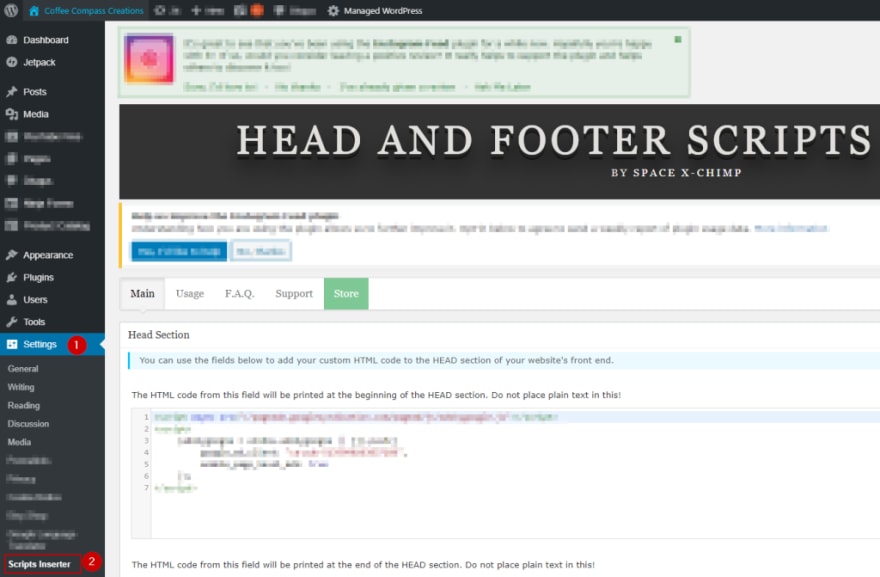
On this page, you will see few text blocks with two section; one for Head section and another for Footer section. Now add the following scripts in appropriate textblocks.
In the Head section on second text block add the following script.
<script src="https://cdn.botframework.com/botframework-webchat/latest/webchat.js"></script>
In the Footer section on first text block add the following script and replace the highlighted code with your own Bot Id.
<script>
    // Only for Power Apps Portals
    const styleOptions = {

        // Add styleOptions to customize Web Chat canvas
        hideUploadButton: true,
        botAvatarInitials: 'TAB',
        userAvatarInitials: 'You',
        backgroundColor: 'rgba(255,255,255,0.85)'
    };

    // Add your BOT ID below
    var BOT_ID = "YOUR BOT ID";
    var theURL = "https://powerva.microsoft.com/api/botmanagement/v1/directline/directlinetoken?botId=" + BOT_ID;

    fetch(theURL)
        .then(response => response.json())
        .then(conversationInfo => {
            window.WebChat.renderWebChat(
                {
                    directLine: window.WebChat.createDirectLine({
                        token: conversationInfo.token,
                    }),
                    styleOptions
                },
                document.getElementById('webchat')
            );
        })
        .catch(err => console.error("An error occurred: " + err));
</script>
As you can see we have defined the background color to the bot in the above script but if you want to add more styling to your bot as well as your buttons then you need to add some css. To do that you need to navigate to Appearance > Customize. This will launch the customizer screen; on this screen if your theme permit you will see an option Additional CSS (or some thing similar depending on your theme), click on it. This will show a CSS editor text block; add following css in this text block, and click Publish.
div[role="form"] {
  background: rgba(255,255,255,0.6);
}
div[role="status"] {
  border-bottom: 1px solid rgb(230, 230, 230);
}
div[role="status"] button {
  border-color: rgb(0, 0,0,0.4) !important;
  color: rgb(0, 0, 0) !important;
}
#webchat {
    position: fixed;
    height: calc(100% - 230px);
    z-index: 9999;
    width: 400px;
    top: 140px;
    right: 30px;
    overflow: hidden;
}
.chat-popup {
    display: none;
}
.open-button {
    background-color: transparent;
    color: white;
    border: none;
    cursor: pointer;
    opacity: 0.7;
    position: fixed;
    bottom: 20px;
    right: 20px;
    z-index: 9999;
}
Once all these steps are complete you can navigate to the page you added to see a button surfaced on the top-right corner. Clicking that button should show your bot window. To check out the demo click here.
To check out live demo I have kept the page still available on my wife’s website; so go to http://coffeecompasscreations.com/test-bot/.
Have fun chatting!!

Top comments (0)