
Now that you've started learning the basics of web development, what should you do next?
This is a typical dilemma faced by every newbie developer. If you're new to the web world and are learning web development, the next step is applying your learnings.
It is important to apply/implement the concepts as you learn them. This helps you gain in-depth knowledge about the functioning of a language/library/framework, etc. So that is exactly what we will be doing.
Here, we'll be going through some code snippets and a few important concepts of APIs. We will simultaneously be building an application. This article presumes that you have got a basic idea about HTML/CSS/JS.
So, without any further ado, let's get started.
What we'll be building
The article aims to introduce you to new concepts of web development. Hence, we will be building a simple yet out-of-the-box weather application using HTML, CSS, and Vanilla JavaScript to hone your web dev skills.
The features of this application will include providing real-time weather for any place searched by the user and displaying visuals of the weather using Google Maps and Tomorrow.io's Weather API.
The setup
API stands for application programming interface, which provides an interface to a service/function that usually intends to return a set of information/results that we could make use of in our application.
To query such information, we'd want to supply a token (API key) along with the request so that the server knows where the request is coming from and where to send the response.
Before we get started, we should get our API keys from the data providers - Google Maps SDK and Tomorrow.io Weather API. Both APIs are free-to-use. The weather API provides features such as real-time weather details with over 30 metrics (e.g. temperature, wind speed, etc). It can also be used to extract meteorological details from a location over a period of time, track weather along a route, and more. So, quickly head to the sites and create the accounts.
Building the webpage
HTML
Once you've created your accounts and gained access to different the respective API keys, let us set up the project structure.
Create a directory, this is the main directory where all our files go. Within this create an assets dir, which further contains 3 directories:
- Images
- CSS
- JS So your project directory should look something like this:
ROOT_DIR:
    -ASSETS
       -IMAGES
       -CSS
       -JS
    -index.html
We can start by writing some HTML code. Create a new HTML file named index, and add the below code:
index.html
<!DOCTYPE html>
<html>
  <head>
    <title>Simple Map app</title>
    <script src="https://polyfill.io/v3/polyfill.min.js?features=default"></script>
    <link rel="stylesheet" href="./assets/css/styles.css"/>
  </head>
  <body>

    <div class="container">

      <p style="font-size: 5rem;font-family: Arial, Helvetica, sans-serif;"><b>Weather Man</b></p>
      <input type="search" placeholder="Search for a place..." id="search"/>

          <div class="card">
            <div>
                <h1 id="weather">Weather: </h3>
                <h4 id="temperature">Temperature: 69 C</h4>
                <h4 id="humidity">Humidity: 25%</h4>
            </div>

            <img src="./assets/images/normal.png" height="100" width="100"/>
          </div>
          <div id="map"></div>

    </div>

    <!-- Async script executes immediately and must be after any DOM elements used in callback. -->
    <script
      src="https://maps.googleapis.com/maps/api/js?key=YOUR_API_KEY&callback=initMap&libraries=&v=weekly"
      async
    ></script>
    <script src="./assets/js/script.js"></script>
  </body>
</html>
As you can see, the above code consists of simple HTML tags like p,h, and divs. This is to setup a basic structure for our webpage with some static information (Like Dummy weather information) which will later show real-time weather for the searched place dynamically using JavaScript.
If you're an absolute beginner, you might be wondering, why is the div tag with the id, map, empty. This is because we'll be injecting Google maps into this div using JS.
Before directly copying over the given code, I'd suggest you to first look through it and try understanding the markup, and preferably writing it on your own, this would serve as a good practice.
JavaScript
In the beginning, I mentioned that this will be an out-of-box weather app. So what makes this stand out? On the map we'll be adding a data layer that shows any metric(temperature, precipitation) visually, this would make the map view more appealing and would also help the user assess the real time weather with more clarity.
Although this seems like a complicated task to accomplish, surprisingly this is fairly simple, all thanks to tomorrow.io's map view API. The creation and fetching of the data layers are outsourced to the said API.
Before implementing the core features, let's firstly establish a connection between our HTML file and JS, create a new file named script.js (Feel free to name anything you'd want, but make sure to update the name in the src attribute in the HTML file).
script.js
const searchElement = document.querySelector("#search")
const cardElement = document.querySelector('.card')
const temperatureElement = document.querySelector("#temperature")
const humidityElement = document.querySelector("#humidity")
const weatherElement = document.querySelector("#weather")
const imageElement = document.getElementsByTagName('img')[0]

const API_KEY = 'YOUR TOMORROW.IO API KEY HERE';

const MAPS_API = 'YOUR GOOGLE MAPS API KEY HERE'
document is a global window object in the browser, so we're using the document object to gain the reference to various HTML elements using their selectors(id or class). The reference of elements can be gained by their id's, class name, tag name, etc.
The whole point of doing this is to, manipulate the DOM further, as and when required.
Now that we've captured the elements, we can go ahead to initialize the map onto the div.
Create a function called initMap (again, could be anything).
And add the following code, right after the initialization of elements:
const myLatlng = {
  lat: 42.355438,
  lng: -71.059914
};

function initMap(){
  var map = new google.maps.Map(document.getElementById('map'), {
    zoom: 7,
    center: myLatlng
  });
}
This will load the map into our webpage, pointing to the location of the given coordinates, which happens to be Boston in this case.
Moving ahead, we would want the users to be able to search for a place by entering the name of it and showing that place on the map.
This could be done using Google's geocoding API, which comes with the maps API.
So before the initMap() function, add this event handler to handle the search logic:
res.addEventListener('keypress',(e)=>{

  if(e.key==='Enter'){
    fetch(`https://maps.googleapis.com/maps/api/geocode/json?address=${e.target.value}&key=${MAPS_API}`)
    .then(res=>res.json())
    .then(obj=>{
      const latitude = obj.results[0].geometry.location.lat
      const longitude = obj.results[0].geometry.location.lng

      myLatlng.lat = latitude
      myLatlng.lng = longitude
      initMap()
    })
    .catch(err=>console.log(err))
  }
})
A keypress listener is hooked with the input search element, meaning the callback function is triggered every time a keypress action occurs(Including delete/backspace, as those come under keypress as well). But we'd want to make a search action only when the user completes entering in the input field and clicks enter to search, hence the conditional check if(e.key === 'Enter').
In the if block, we're sending a network request to geocoding API to return us the coordinates for the searched place.
This is done using the fetch function that returns a promise, which is then resolved to convert it to JSON format.
This will enable to map the searched location onto the Google map. Thus far, our script.js should look something like this:
const API_KEY = 'YOUR TOMORROW.IO API';
const MAPS_API = 'YOUR GOOGLE MAPS API'

const searchElement = document.querySelector("#search")

const cardElement = document.querySelector('.card')
const temperatureElement = document.querySelector("#temperature")
const humidityElement = document.querySelector("#humidity")
const weatherElement = document.querySelector("#weather")
const imageElement = document.getElementsByTagName('img')[0]

const myLatlng = {
  lat: 42.355438,
  lng: -71.059914
};

searchElement.addEventListener('keypress',(e)=>{

  if(e.key==='Enter'){
    // console.log(e.target.value)

    fetch(`https://maps.googleapis.com/maps/api/geocode/json?address=${e.target.value}&key=${MAPS_API}`)
    .then(res=>res.json())
    .then(obj=>{
      const latitude = obj.results[0].geometry.location.lat
      const longitude = obj.results[0].geometry.location.lng

      myLatlng.lat = latitude
      myLatlng.lng = longitude
      initMap()
    })
  }
})
// initialize the map
function initMap() {

  var map = new google.maps.Map(document.getElementById('map'), {
    zoom: 7,
    center: myLatlng
  });

}
If you're not seeing the map yet, don't worry, it's because we haven't specified the dimensions of the map container, which we'll do in CSS.
Showing the place on the map for a searched location is cool, but what's even cooler is overlaying the real-time weather over the searched location. So it is basically like you search for a place and on the map, you're shown the location along with the real-time weather atop of it. We'll be using the tile overlay feature of the tomorrow.io API.
Before adding the overlay, we'd want to define a few parameters, namely:
Data field: What visual information should we overlay, e.g:
temperature,precipitationIntensityetc. You can find the complete list here.Timestamp: For what range of duration do we want the data field information.
While, you can always finetune the values as per your requirement, but for demonstration purposes, in this article, I'll be using the timestamp to be NOW and the data field to be precipitationIntensity.
So append the following constants at the beginning of the script.js file.
const DATA_FIELD = 'precipitationIntensity';
const TIMESTAMP = (new Date()).toISOString(); //The API accepts the time in ISO string format, hence we're converting the regular time format into ISO string
In the initMap() function, add the below code after the map initialization.
  let res
  let timeout
  var imageMapType = new google.maps.ImageMapType({
    getTileUrl: function(coord, zoom) {
      if (zoom > 12) {
        return null;
      }


       if(timeout){
         clearTimeout(timeout)
       }
       timeout = setTimeout(()=>{
         res = `https://api.tomorrow.io/v4/map/tile/${zoom}/${coord.x}/${coord.y}/${DATA_FIELD}/${TIMESTAMP}.png?apikey=${API_KEY}`
       },2000)


    return res
    },
    tileSize: new google.maps.Size(256, 256)
  });

  map.overlayMapTypes.push(imageMapType);
The getTileUrl function is called every time a zoom action occurs, if you are on free-tier you're likely to face the 429 error due to rate limiting. To avoid such a barrier, we've used the concept of debouncing by using timeouts and intervals, but here you'd have to compromise with the resolution of the tiles.
The visual overlay functionality is now successfully added. We can now move further to show the weather details (Like temperature, humidity) in words. For this, we again send an API request to the timelines endpoint of tomorrow.io's API.
Paste the give code after the overlay logic:
 fetch('https://api.tomorrow.io/v4/timelines',{
    method:'POST',
    headers:{
      'apiKey':'Kc4HFO75TNUmBRla3S661V2DkxJb4uiS',
      'Content-Type':'application/json',
    },
    body:JSON.stringify({
      "location": {
          "type": "Point",
          "coordinates": [
              myLatlng.lng,
              myLatlng.lat
          ]
      },
      "fields": [
          "temperature",
          "humidity",
          "weatherCode"
      ],
      "timesteps": [
          "current"
      ]
   })
  })
  .then(res=>res.json())
  .then(data=>{
    const values = data.data.timelines[0].intervals[0].values

    const temperatureData = values.temperature
    const humidityData = values.humidity
    const weatherData = values.weatherCode
    const weatherDataInWords = getWeather(weatherData)
    temperatureElement.innerHTML = "Temperature:
    "+temperatureData+"C"
    humidityElement.innerHTML = "Humidity: "+humidityData+"%"
    weatherElement.innerHTML = "Weather:
    "+weatherDataInWords.description
    imageElement.src =
 `./assets/images/${weatherDataInWords.description.toLowerCase()}.png`
//^ DOM manipulation to inject the weather data into the respective fields.

   cardElement.style.backgroundImage = weatherDataInWords.colorGradient
   weatherElement.style.color = weatherDataInWords.fontColor
   humidityElement.style.color = weatherDataInWords.fontColor
   temperatureElement.style.color = weatherDataInWords.fontColor
  })
Again, we're sending an API request using the fetch function along with a body that contains the details(coordinates) for the place for which the weather details need to be fetched. Here, I am interested in getting the temperature, humidity, and weatherCode which can be translated to weather in literal speech( Clear, Windy, Rainy). The list of weatherCode can be found here.
Depending on the current weather, we're also changing the image(Assets available in the source code at the end of the article). This is done with the help of our helper function getWeather, following is the code for the same:
function getWeather(weatherCode){
  // console.log(weatherCode)

  switch(weatherCode){
    case 1000:
    case 1100:
      return {
        description:"Clear",
        colorGradient:'linear-gradient(to bottom, #ffa970,#c5c5c5)',
        fontColor:'#000000'
      }
    case 1102:
    case 1001:
      return {
        description:"Cloudy",
        colorGradient:'linear-gradient(to bottom, #949494,#c5c5c5)',
        fontColor:"#ffffff"
      }
    case 4000:
    case 4200:
    case 4001:
      return {
        description:"Rainy",
        colorGradient:'linear-gradient(to bottom, #65b6fc,#8cc9ff)',
        fontColor:"#ffffff"
      }

    default:
      return {
        description:"Normal",
        colorGradient: 'linear-gradient(to bottom, #aed8fc,#cce7ff)',
        fontColor:"#000000"
      }

  }
}
So, we're using a simple switch statement to convert the weather code into corresponding weather in words with the help of the weather code table. We're also setting the font color and color gradient of the information container dynamically. Note, this function is designed to return only some weather types(Rainy, cloudy, Clear/sunny), for the rest of the weather a default "Normal" weather is returned, you can edit the code to add more details.
This completes our JavaScript coding. We can now move on to styling the elements and the page.
CSS
Since this is a single webpage with minimal features, we require only a single stylesheet to add stylings, dimensions and, alignment to the body.
Create a new file styles.css and add the following code:
/* Always set the map height explicitly to define the size of the div
       * element that contains the map. */

       html,
      body {
        height: 100%;
        margin: 0;
        padding: 0;
        background-image: url('./assets/images/wallpapaer.png');
      }

       .container{
         display: flex;
         flex-direction: column;
         /* justify-content: center; */
         align-items: center;
         padding: 2rem;
       }

       input[type=search]{
        width: 50%;
        background-color: rgb(226, 225, 225);
        border-radius: 0.5rem;
        height: 2rem;
        border-width: 0px;
        padding:0.2rem;
      }

       .info_container{
         display: flex;
         /* flex-wrap: wrap; */
         flex-direction: row;
         width: 80%;
         margin:1rem;
         justify-content: space-between;

       }

       .card{
        border:1px solid rgb(148, 148, 148);
        font-family: Arial, Helvetica, sans-serif;
        margin:1rem;
        padding: 1rem;
        width: 49%;
        display: flex;
        flex-direction: row;
        justify-content: space-between;
        flex-wrap: wrap;
        border-radius: 1rem;
        box-shadow: grey 1px 1px 2px 2px;
      }

       #map {
        margin: 1rem;
        height: 300px;
        width: 49%;
      }
To align the contents across the webpage, we're using flexbox styling.
This will be pretty much everything that's required to create this project.
Phew, tha was a lot of code, But, I hope you did enjoy learning new things and creating a cool weather app.
The webpage would look something like this:
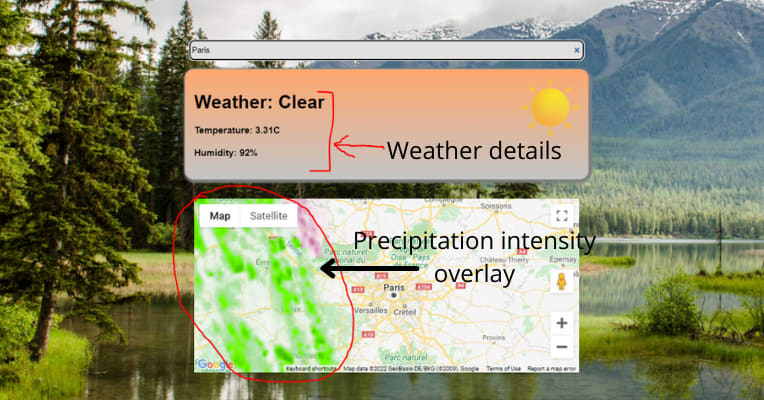

Weather man - Source code
Final thoughts
That was all about creating an interactive weather application. I hope you got to learn something new. I'd also encourage you to extend the features of this application to make it more interactive like adding animations, loading states while fetching weather data, color themes, and everything you can imagine of, the sky is the limit. If you liked the article, show some love by liking the article and sharing it with your friends & colleagues. You can also connect with me on LinkedIn /Twitter for more.

Latest comments (0)