The goal of this tutorial is to give an introduction to setting up a CI/CD pipeline for react apps. This tutorial is geared towards beginners and assumes no previous experience in CI/CD. The CI/CD pipeline is one of the best practices for DevOps teams to implement, for delivering code changes more frequently and reliably.
What is Continous Integration / Continuous Deployment?
Continuous integration is the process of pushing code changes regularly to the source code management repository, which is followed by a set of activities like static code analysis for checking code quality, building the application, perform tests against test cases, ensuring every code push is as per the requirement and follows the industry standard. In case of any failures, the team will be informed immediately. A developer’s job typically ends at reviewing a pull request from a teammate and merging it to the master branch. A CI/CD service takes over from there by running all tests and deploying the code to production, while keeping the team informed about outcome of every important event. This will allow us to fix the issue in the early phases of our development.
Continuous deployment is the automated process of deploying the builds from CI process, directly to the production environment.
The below image depicts the architecture of the ci/cd pipeline service we are going to set up.
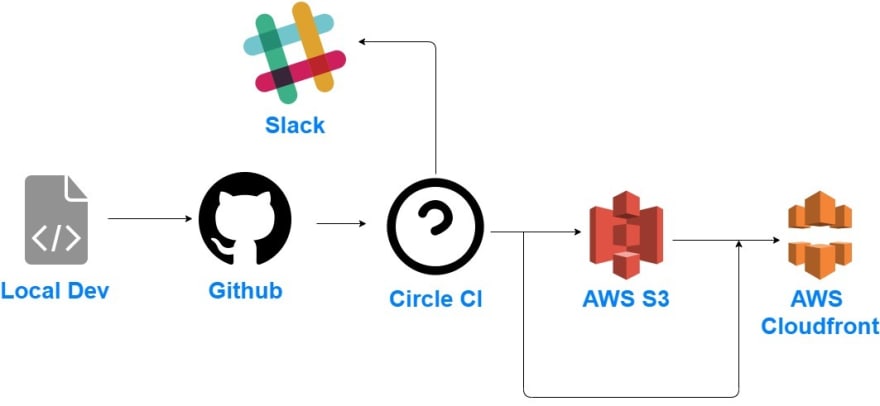
We are going to use git for source code management. From the local repository, we will push the code to Github. Circle CI will be our CI/CD tool. We will use AWS S3 buckets for storing the react application build and AWS CloudFront, which is a CDN(content delivery network) for delivering the content.
We will start the process by creating a react app.
1> create a new react app
We will check the node and yarn versions, and create a react app named reactcicd using yarn create react-app.
PS C:\react> node -v
v12.13.0
PS C:\react> yarn -v
1.22.4
PS C:\react> yarn create react-app reactcicd
yarn create v1.22.4
[1/4] Resolving packages...
[2/4] Fetching packages...
Once react app is created, check the directory structure.
PS C:\react> cd reactcicd
PS C:\react\reactcicd> ls
    Directory: C:\react\reactcicd
Mode                LastWriteTime         Length Name
----                -------------         ------ ----
d-----         7/7/2020   1:42 PM                node_modules
d-----         7/7/2020   1:41 PM                public
d-----         7/7/2020   1:41 PM                src
-a----        6/29/2020   9:58 PM            310 .gitignore
-a----         7/7/2020   1:42 PM            745 package.json
-a----         7/7/2020   1:41 PM           2884 README.md
-a----         7/7/2020   1:42 PM         473034 yarn.lock
2> Create SSH keys to connect to GitHub account
ssh keys provide a secure way to establish communication between our machine and the GitHub server. Watch the below video, if you want to understand how ssh key works.
Create an ssh key in the system using ssh-keygen command. In windows, use PowerShell to run this command. In mac / Linux, we can run in the terminal.
PS C:\react\reactcicd> ssh-keygen
Generating public/private rsa key pair.
Enter file in which to save the key (C:\Users\preeth\.ssh\id_rsa):
Enter passphrase (empty for no passphrase):
Enter same passphrase again:
Once the keys are created, we can verify it in the .ssh directory of the user. id_rsa is the private key and id_rsa.pub is the public key.
PS C:\react\reactcicd> ls C:\Users\1022786\.ssh
    Directory: C:\Users\1022786\.ssh
Mode                LastWriteTime         Length Name
----                -------------         ------ ----
-a----         7/7/2020   7:58 AM           1692 awsKey.pem
-a----         6/4/2020   9:44 AM           2610 id_rsa
-a----         6/4/2020   9:44 AM            576 id_rsa.pub
-a----         7/7/2020   8:12 AM            587 known_hosts
3> Add the public key in Github
Login to the GitHub account and click on the profile icon in the top right corner and select the settings

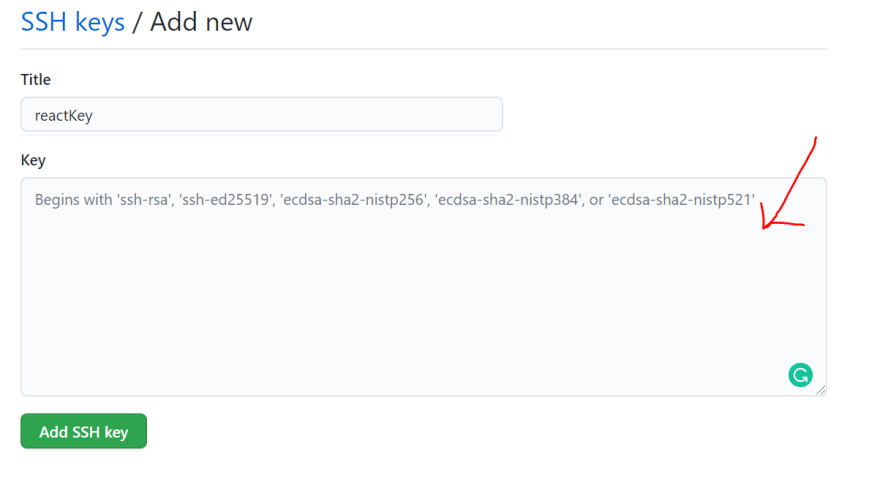
Click SSH and GPG keys and click New SSH key

open the previously created public key (id_rsa.pub) in a text editor and copy the public key. Paste the ssh key on the page and click Add SSH Key.
Now we will be able to access your Github repositories from our machine.
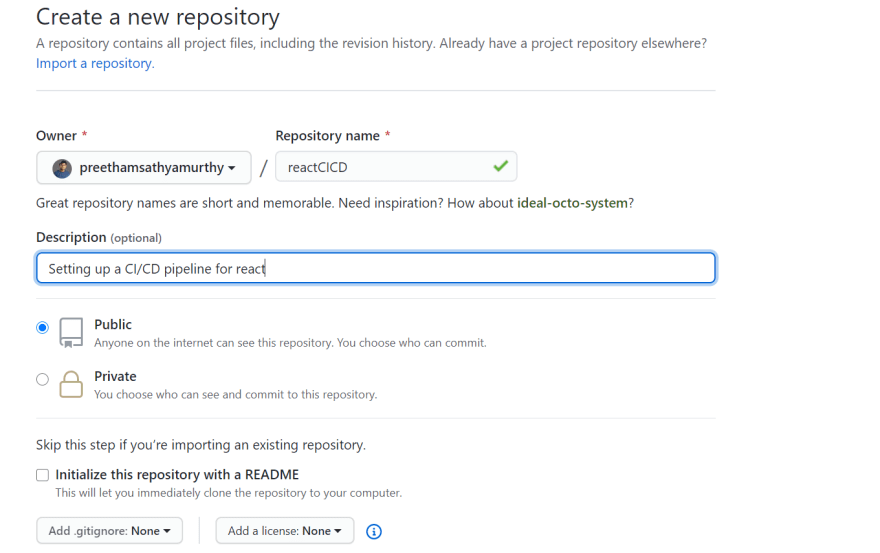
4> Create a new repository in Github
Give the repository a name, description(optional), choose private or public repository, and create a repository.
Once the repository is created, copy the GitHub URL.

Now come back to the terminal and change to the folder where react app is created.
Initiate the git, add all the files to staging and perform the first commit.
PS C:\react\reactcicd> git init
Reinitialized existing Git repository in C:/react/reactcicd/.git/
PS C:\react\reactcicd> git add .
PS C:\react\reactcicd> git commit -m "initial commit"
On branch master
nothing to commit, working tree clean
Using the previously copied URL, add the remote repository.
PS C:\react\reactcicd> git remote add origin https://github.com/preethamsathyamurthy/reactCICD.git
Now push the code from local repository to the remote repository.
PS C:\react\reactcicd> git push -u origin master
Enumerating objects: 22, done.
Counting objects: 100% (22/22), done.
Delta compression using up to 12 threads
Compressing objects: 100% (22/22), done.
Writing objects: 100% (22/22), 201.01 KiB | 6.93 MiB/s, done.
Total 22 (delta 0), reused 0 (delta 0), pack-reused 0
To https://github.com/preethamsathyamurthy/reactCICD.git
 * [new branch]      master -> master
Branch 'master' set up to track remote branch 'master' from 'origin'.
Now we can see that the code is pushed from local to our GitHub repository.

PS C:\react\reactcicd> git branch
* master
when we check our git branches, we can see that we only have the master branch.
So by default, we have the master branch.
So while writing this tutorial, I thought that branching and branching strategies can be explained in a separate post and wrote it.

By now, we will be having an understanding of the branching and branching strategy. We will follow the same branching strategy for this tutorial
Stay tuned!!! To be continued...

Oldest comments (0)